Before the arm can move the pieces, it is necessary to obtain their location. To achieve this we use a function that converts the coordinates from chess algebraic notation to Cartesian coordinates in inches. This function uses the dimensions of the board and the color of the pieces the robot is playing with, information that is entered into the GUI at the start of the game, to calculate the "x" and "y" coordinates that the arm must go to in a given move.
The coordinates are not the only information needed to move the arm to its destination. After obtaining them, we will need to determine the robots joint angles, for this we use inverse kinematics. In case you are not familiar with this term, don’t be scared, inverse kinematics simply allows us to calculate the variable joint parameters needed to place the end of the gripper in a given position and orientation relative to the base of the manipulator. In this tutorial we use the geometric approach to obtain the equations needed to calculate the required angles.
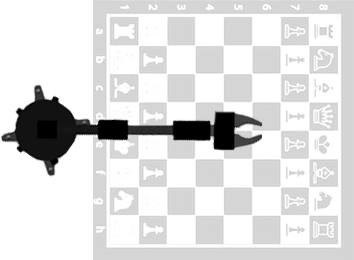
The following figure shows the top view of the arm in the XY plane as well as the base rotation angle q1 and the horizontal distance, or radius, from the start (center of the base) to the end of the chain (gripper).

Since the LSS arm has four degrees of freedom, there are infinite solutions possible for the arm to reach point (X0,Y0,Z0). This is why we introduce an artificial constraint and keep the gripper at a specific angle q0 (pitch angle) with respect to the horizontal axis, and make the calculations for a new coordinate (X1,Y1,Z1) of the wrist axis. Thus, to apply the inverse kinematics we must know the desired coordinates (X0,Y0,Z0), the pitch angle and the length of each joint.
The next figure shows a side view of the arm as well as the parameters needed for establishing the equations that will allow us to calculate the joint angles q2, q3 and q4. Looking at this diagram we can easily deduce these equations using geometry.

* Note that the angles in these equations need to be in radians and then converted back to degrees.
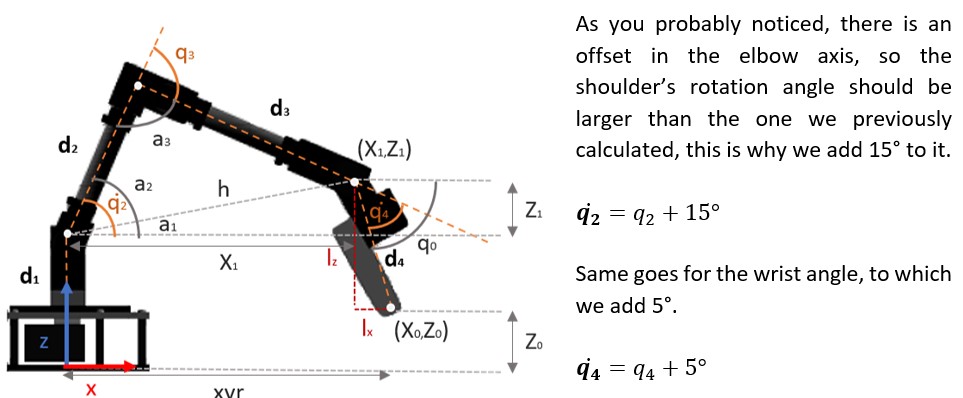
Note that the previously calculated angles q2 and q4 were converted to degrees. And it is also worth noting that it is necessary to include constraints to ensure that the arm is mechanically capable of reaching the given coordinates, in this case, we limit the rotation angle to -90° as minimum and 90° as maximum.
Now that we have the joint angles all we need to do is move the motors! As previously mentioned, this arm uses Lynxmotion Smart Servos and one of their “Smart” features is the possibility to control them using the LSS serial protocol which has human readable format. So, even though we could control them using standard servo pulses, we will be using the LSS communication protocol in this project.
There are numerous action, modifier, query and configuration commands available so if you want to know the complete list of possibilities we suggest checking the LSS Communication Protocol Wiki. However, in this tutorial we will only mention the commands used in the project.
In order to be able to control each servo individually, the first step is to assign a different ID number to each servo, this is explained in the 4 DoF Servo Setup.
The angular holding stiffness determines the servo's ability to hold a desired position under load. The values range between -10 to +10 and greater values produce increasingly erratic behavior and the effect becomes extreme below -4 and above +4. For this project, this value was set as 0 with the command: #254AH0<cr>
As you can see the command has a specific format:
- Start with a number sign # (Unicode Character: U+0023)
- Servo ID number as an integer
- Command (one or more letters, no white space, capital)
- Value in the correct units with no decimal
- End with a carriage return \r or
Unicode Character (U+000D)
This command sets the servo's maximum speed for motion commands in tenths of degrees per second. In this case, we set the speed to a maximum of 60 deg/s for all the joints except for the wrist and gripper which are set to 120 deg/s.
As you probably noticed, we didn’t mention the maximum speed for the shoulder or the elbow. This is because for these joints we disabled the trapezoidal motion profile so the motion during acceleration and deceleration is smoothed out. However, in this mode, modifiers such as SD or CH cannot be used at the moment, although the manufacturer is working to incorporate for future firmware updates.
- Filter Position Count (FPC)
This command allows us to change the Filter Position Count value, which was empirically selected as minimum 15 but is mapped out up to 30 for traveling larger distances.
- LED Color (LED)
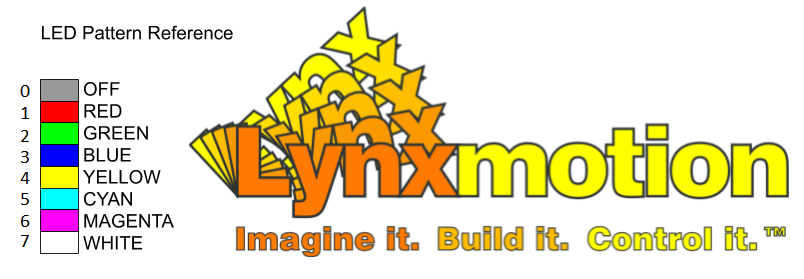
We will also change the color of the LEDs on the servos. This is achieved by using the LED action command: #254LED5<cr>. Note that at the end there’s a 5, this corresponds to the cyan color, as it is shown in the next figure:
And last but certainly not least, to move each servo we use motion action commands which have the same format described earlier, but in this case the relevant parameter is the position in degrees (D) and the value is in tenths of degrees. So, for example, to move the shoulder joint (which is the 2nd servo) to 10 degrees we would use the command: #2D100<cr>
To make a complete move, we created a function that receives the complete sequence of moves obtained with the chess logic module. This way, the arm moves to where the piece is, grabs it, moves the piece to where it should go, releases it, moves to the rest position and then goes Limp (L) until its next turn.
In addition to moving the chess pieces, the arm performs other interesting actions. For example, in case the user doesn't allow it to move, as discussed above, the servos stop, the LEDs change color to Magenta, says a warning message (if you have a speaker connected), returns to its initial position, goes limp, and verifies if the obstruction has been removed by checking if the chessboard corners are detected or waits a couple seconds to try to make its move again, this is done with one function called “askPermision”.
To detect when there's an obstacle that doesn’t allow the servos to reach the desired positions we use another handy command, but in this case it is a modifier that can be added to different motion action commands, it is the Current Halt & Hold (CH) command. This modifier allows us to stop the motion of a servo if it detects a current equal or higher to a certain value before the servo reaches the requested position, so if a moving servo exceeds this current value it will immediately halt and hold its position.
This is quite useful when you want to grab objects of variable dimensions with the gripper, because you can simply tell the servo to close the gripper completely and with this command it will close it until it is not able to do it anymore because the current would be exceeding the set value.
In addition to this function, we also use the Query Status (Q) command, which describes what the servo is currently doing. The query returns an integer which must be looked up in the table below.
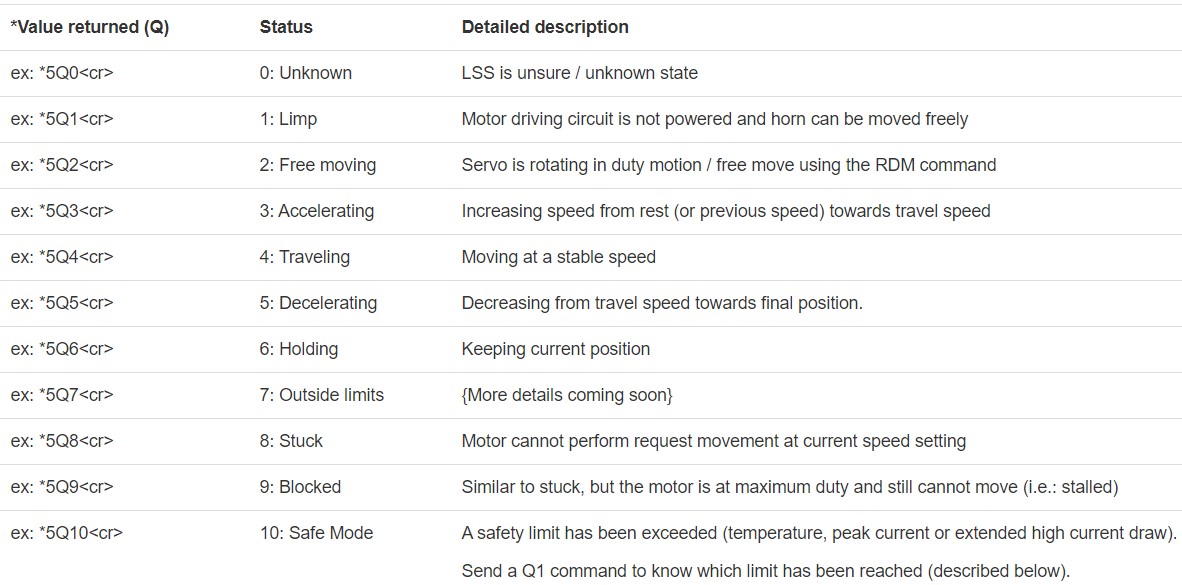
As can be seen, if the returned value is higher than 6 it means that an issue occurred and the servo is either Outside limits, Stuck, Blocked or in Safe Mode, in this case we return a variable named issue which is checked by the “askPermission” function mentioned above. If the issue value is 1 then the function will perform all the instructions described earlier but setting the color to Red to differentiate the issue type. However, if the query status is equal to 6 for all the servos (they are holding their positions) we check the positions and if at least one isn’t the desired one it means that the CH (Current Halt and Hold) command made it hold its position because the current exceeded the set value, in this case the value of the variable issue is 2 and the LEDs are set to Magenta.
Now let’s talk about the “talking” function. In the case mentioned above the arm tells the user that it is not his turn. To do this we used the Google Text-to-Speech API, or more precisely the gTTS python library, to generate the audio files that the robot will use to communicate with the user. However, as this requires internet connection, we decided to simply add these audio files to the project instead of generating them “on-demand”. This feature is also used to notify the user of special moves like capture, castling or promotion, and to warn the user if the move isn’t valid.
It's worth mentioning that even though we have been talking about the commands used to control/configure the servos, if you look at the code you will not find these commands. This is because in the project we use the LSS Python library (with some minor adjustments to add modifiers to action commands).


