Edward


update: added code (older version 1.1) as attachment

update: Frontplate is mounted. Turned the IR sensors. Lost the abiity to detect cliffs :frowning:


This is my second robot. The first one was for practicing soldering using a picaxe 08M prototype board. It had two modified servos, a led, an infra-red eye and a switch. I couldn’t get the speed control right using the servos so I figured I should use PWM. The other problem I ran into was the program size. The 256 bytes on the picaxe08M is just not enough.

the board

I bought a Picaxe 28 starter kit which is great for playing around, but it lacks a few features I wanted. First of all, the picaxe chip supports I2C, but since the I2C pins are fixed as digital inputs on the board. That means no eeprom chips and no I2C display. Also, the PWM pins of the picaxe 28 are also configured like that and I really want speed control.

So I decided to put my newly acquired soldering skills to the test and build a board from scratch. I intended to put the power-stuff on the board together with the motor driver and build it as a I2C slave. When I was done I figured I had enough space left to add two 32K eeprom chips and a few headers (for the sonic rangefinder, infrared and servos)

The 32K eeproms are to store texts, movement sequences and sensor-conditions. I don’t know how yet, but I allready tested some primitive menu using the serial cable to fill the eeproms from my laptop. This program uses about 500 bytes so I might be able to leave it there alongside the rest of the programming. we’ll see.

Here’s the result

Mainboard

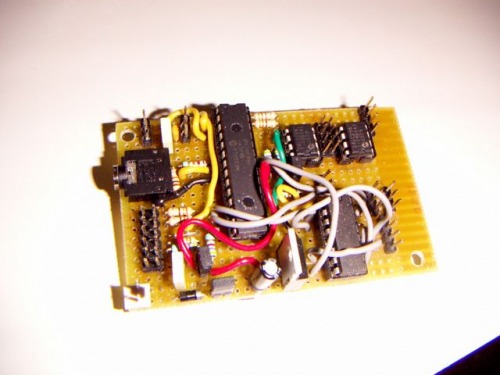
It takes 7.2V from 6 rechargable NiMH batteries. One jumper can be removed to provide a powerswitch and the second jumper can be removed to disconnect the logic circuit from the motor power, so you can use a separate 5V powersource. I added a diode just in case I put the power connector on the wrong way.

Hidden beneath the wires on the top, there is a third jumper which can be removed in case I want to use this board as a I2C slave. The jumper connects the pull-up resistors for the I2C bus.
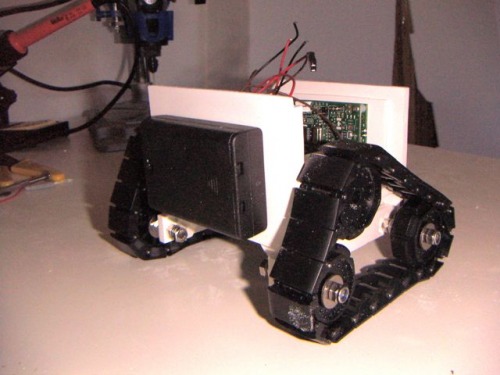
 

The body

I am building the body out of expanded-PVC. It is great stuff! Very easy to handle and you cut through it like butter. The ground plate is 5mm thick with a hole sawn out. That takes 5mm of the first battery case, which is mounted under the plate. The other battery case is carried on the back, sort of like a back-pack.

Back-view


The front will have a 2 x 8 character display from matrix-orbital (blue-ish letters on white background - looks very cool!) Still need to decide where to place a small button and the reset button, along with a few LEDs.

The main board will be skrewed on and hang from the top plate. Hopefully the serial jack connection will be reachable from the outside that way. On the front (bottom) two IR-rangefinders will be mounted to be used as bumper switches. I hope I can figure out some clever way to mount them at an angle. The wires on those IR thingies are really sticking out. Very hard to mount those things without the wires showing.
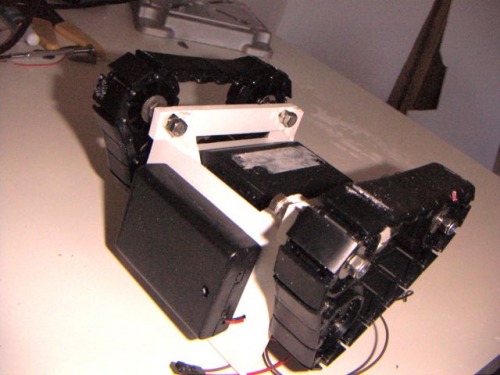
Tracks

I use tracks to enable the robot to drive over stuff. (My first robot could get stuck on a magazine on the floor) Because the motors are pretty thick, I decided to mount two idlers below the ground plate so that the motor is inside the body. That should give me more ground clearance. The idea is to get a Wall-e look.

The tracks are mounted using 5mm bolts from the local hoby shop. I bought some extra rings and stuff to get the distance right. It was a lot harder than I expected to get those tracks right. Too loose and the motor just spins without moving the tracks and 2mm too tight and the left and right tracks dont run at the same speed.

Bottom


First Moves

OK. The top board is on. I didn’t cut the hole for the wires of the head yet, but I really wanted to see this thing moving.

I renamed the robot to Edward (after Edward Scissorhands) because I’m afraid I don’t have enough space to add any kind of arms or hands. He’ll probably end up with dummies or no arms at all.

The treads are very smooth which is great for turning, but very bad when trying to drive over an obstacle on a wooden floor.
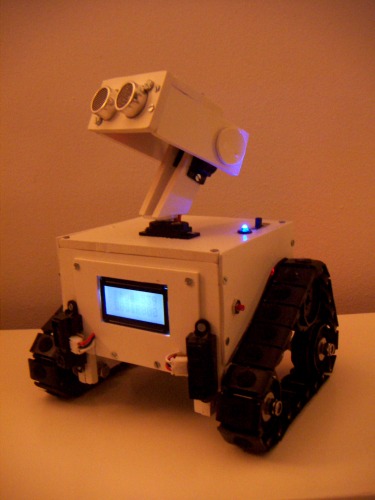
head attached

Edward has sort of half a head now. I still need to fix a frontplate to cover the sides of the display, finish the head (not a very nice job I did now) and fix the sharp IR rangefinders. That SRF05 is not very good at detecting the floor. I guess the ultrasonic pulse just bounces off the floor and doesn’t get detected.

I was hoping I could get it to look down and “see” the floor or “see” cliffs or table edges. I’m going to have to use the IR rangefinders for that.


Done

I’m calling this one finished. I’ll spend a few cold winter evenings trying different programs, but this design just isn’t very good. Lets look at what I think I’ve learned.

I tried a separate power supply, but that didn’t solve the resetting of the display problem. Which means I’ll need to shield the internal wires or something. Maybe the problem is that I use 7.2V through a diode, making it 6.6V and then through a voltregulator. Maybe the 6.6V is too little for the regulator, but I’m afraid those cute little servos will melt down when I give them the full 7.2V. Anyway: my next bot will have 2 powersupplies.

Another problem is the motor driver. I really don’t like the 1.4V voltage drop of the L293D. I’m experimenting with hooking up servo-electronics to different motors to be able to run them without the voltage drop and using 1 output pin for control. Maybe i’ll drive the next bot with 9V or 12V and use a switching voltregulator to bring it down to 5V for the servos. I’ll start playing around with relays. I want better speed!

Thirdly: the weight is distibuted wrong. I didn’t think it would become a problem, but edward falls on his back quite easilly.

And then the sensors. I knew the optimal way to combine IR and US sensors would be to have the SRF05 on the belly and two IR sensors on the head, but I went for looks. The IR’s are now mounted at an angle sideways so that they look in front of the treads. They don’t look down though. So Edward cannot detect cliffs anymore The head is only usefull for detecting large vertical objects and for cute looks. I’m considering building a Frits!LDR with lenses. Something that is more stable then the IR sensors and less sensitive to surfaces that don’t face the sensor directly.


This was a nice project and the result is a cute little bot with a display two 32K eeproms that I can program endlessly. On to the next…

Avoid obstacles… look cute… lots of programming to be done.

  • Actuators / output devices: 2x Solarbotics GM3, 2 servos for the head
  • CPU: Picaxe 28x1
  • Power source: 7.2V NiMH from 6 penlites (2 x 3)
  • Programming language: Picaxe basic
  • Sensors / input devices: 1 SRF05 and 2 IR distance sensors

This is a companion discussion topic for the original entry at https://community.robotshop.com/robots/show/edward

**I like the treads ALOT. **
I like the treads ALOT.


Ehi, very nice design! i

Ehi, very nice design! i like both the PVC structure and the board. I should try and make one myself :slight_smile:

About the tracks, i see you have enought room to add an axle tensioner… It’s not hard and it would fit your design well. Just use a single axle and use a couple of these:

|x

In this way. It's hard to explain but easy to implement :P

Also:

"First of all, the picaxe chip supports I2C, but since the I2C pins are fixed as digital inputs on the board. That means no eeprom chips and no I2C display."

I didn't got this.. why no eeprom and no display ?

when i read “Ehi” i knew it

when i read “Ehi” i knew it was you, Nicola :smiley:

What’s with the I2C? you can interface EEPROM with picaxe, the manual also shows you how to do that.

I like too how you fixed the threads, i need to get some inspiration from you.

EDIT: oh wait i got what you said, and that’s also why i made my own board, just like you did. If i well understood you just not like to have pins arranged like that on the picaxe board.

I wanna see this in action,

I wanna see this in action, post a video!

Thats a great way to fix the

Thats a great way to fix the axles! I’m not sure I could find those in the right size though. I’ll start looking around.

anyway:

The digital inputs of the 28X1 can be configured for a number of different things. There are two pins that can be used as PWM outputs (for speed control) and two that con be used to connect to an I2C bus. On the board that comes with the picaxe28 starter kit, all the digital inputs are connected to the ground with pulldown resistors. Its a very small single row that connects to each pin and an extra bit that connects them all to the ground. This setup works very well because you get a double row of headers where you can connect switches to.

These resistors are too small for me to cut and use the pin for something else. I like that board a lot, so I dont want to ruin it.

There is also a prototype board that can hold a picaxe 28 or a picaxe 40 chip where you can configure each pin as you like. That one even has a socket for an eeprom. What it doesn’t have is the nice headers where you can just stick devices on.

I think the picaxe people should do a version of the standard picaxe28 board where you can at least use the PWM ports on the motor driver. Here’s a picture where you can see the bottom of my board. Not really a pretty sight.

PICT0024.jpg

Thanx I tried the setup

Thanx

I tried the setup hooking up each battery case to a motor directly. Nothing much to see there and the low voltage makes it a bit slow. As soon as I make a top board and shorten all those wires, I can try some moves. I’ll post a video as soon as I got it running from the board.

Great robot. I like your

Great robot. I like your ideas. In future I will have to use EEPROMs, too. So please share your experiences :slight_smile:

Where did you get the belt tracks from? I’m searching for them in german shops but can’t findanything usefull…

Tracks and Eeproms

The tracks are the same ones as on the world famous yellow drum machine (except these aren’t yellow) As shown in the components section on this site. https://www.robotshop.com/letsmakerobots/node/145

The standard package gives you 20 segments of track for each side. You can order extra segments on solarbotics (I use 22 on each side)

I live in the netherlands, so ordering from the US usually means I pay quite a bit extra for shipping. I found a few shops in the netherlands that supply some of the parts that are mentioned on LMR, but they they charge so much, that it still pays off to buy the parts on the other side of the ocean. Same goes for most shops I found in germany.

I only just started to play around with robotting and I really dont have much experience. I played around a bit with the eeproms and the display and they are really easy to use. The picaxe I2C tutorial is a good place to start.

I have a few ideas/plans i want to try out using the eeproms and the display.

  1. Storing threshholds that an be altered using a pushbutton and a menu on the display. That way I don’t have to connect the cable and upload a whole program just to change the robots definition of “close” or “far” for example
  2. Because a menu means lost of text-data, I intend to store the menu and the text on the eeprom instead of coding it in.
  3. Having the robot scan around while standing in a (large) empty room and store all the readings. These readings can be compared to later readings. So when the robot is driving towards the edge of a table or staircase, it will be able to notice that the ground is “missing” when it looks down. Also, this could help prevent the robot from classifying its own body as a dangerously close object
  4. I want the robot to use different modes of operation. Each mode has a number of steps (i.e. motor and servo settings) and a set of conditions (min and max readings from the input devices) that result in a different mode or sequence. One mode (calibrate) will be used to calibrate the readings from point 3, an explore mode to explore the surroundings and a sentry mode to stand still and scan the room until something changes. (or something like that)
  5. When I press the pushbutton, the robot should go into “menu-mode” where all the motors and servos stop and you can change settings or change to a different mode of operation.
  6. I also want some simple movement sequences as gestures. That is one of the reasons I want to use 2 servos for the head: it looks more live-like.

Thanks a lot for sharing all

Thanks a lot for sharing all these ideas. I think you can really realize some of this things easily. I am also new in robotics, but I believe in “Where there’s a will there’s a way.” So the different modes especially the sentry mode should be no problem. Point 3 is I think very difficult to realize. That’s a lot of comparing, but try.

I always thought shipping from the US is way too expensive, but you’re right. Most parts are way more expensive here in Germany.

Looking forward for your project. I have written a code for searching objects and approaching them. Trying it now and I’m very excited.

Funny thing is I live in the
Funny thing is I live in the US and order my chips from the Picaxe store. If I order under 10 pounds (currency) shipping is cheap enough to make it cheaper that ordering from the US. If I order more it has to be around 50 or 60 pounds to make it cheaper again.

I order picaxe items from
I order picaxe items from the UK, some servos from here in the netherlands, but all the other cool things like gear motors, sensors and treads come from the us or canada

I love this, I’d whish I was

I love this, I’d whish I was as capable of doing neat stuff & making my own board etc. Cool!

I am not sure you are 100% right about the 28-board, but when you can just make your own, well :slight_smile:

I thought that perhaps instead of the IR’s, this would do better (you can hook it up to match the design, and IMHO it would look cool) How to make AmandaLDR

That’s a good idea. Those

That’s a good idea. Those AmandaLDRs can probably be made a lot smaller than the IR’s. I’m not sure that I am precise enough to make a decent casing that size but it’s worth a try.

I’d rather use the 28 board than making a board myself. It took me about a month to fit everything on there and the result is messy. I like building and programming better than thinking up boards. Anyway. I am certain that on the 28-board the PWM pins are not connected to the motor driver, but it may be possible to tweak the board for I2C support.

expanded PVC

Awesome bot!

Where do you get the Expanded PVC to use?

I get mine at
I get mine at http://www.kunststofshop.nl/ but I don’t know if they deliver outside the Netherlands. Also, though I’m not sure, it is the same stuff they call Sintra. You can get it at solarbotics here: http://www.solarbotics.com/construction_materials/

There are dozens of ways to

There are dozens of ways to “PWM” on the standard board. So many options, that I will not even start trying to make a list…

I am not sure about the i2C - where the problem should be, but thn again I have never really tried it with that setup, I must admit :slight_smile:

I have some nice little housings for LED’s that you might want for the AmandaLDR, PM me if interested, with address…

I know you can write a

I know you can write a program so that any output port does PWM stuff, but the picaxe has a cool pwmout command that you just “fire-and-forget”: just like the servo command. That command only works on input 1 and input 2 (or portc 1 & 2)

The problem with I2C is that blueish thing next to the input headers. It is a resistor-array, that connects all 8 digital inputs to ground. For use with I2C, inputs 3 and 4 should be connected to V1 with 4K7 resistors. Maybe it’s possible to cut the legs under the resistor-array for pins 3 & 4 or (not so nice) to bend the legs of the picaxe chip so they don’t go in the socket.


Very nice, I like it. This

Very nice, I like it. This is a robot that has good aesthetics like rik was talking about in this blog post.

I dunno why I had never thought about it, but I really like the idea of mounting the sonar sensor on a dual-axis mount like that, almost like a mini-arm. I’ve seen pan-and-tilt brackets for them, but this one looks more like a neck, and I like that. I just like to imagine him edging up to the edge of a table and looking down at the cliff below, then backing away in fear :slight_smile:

Dan

doesn’t work

Thats sort of what I had in mind, but it doesn’t work very well. Because it looks down at the table at an angle the sound bounces away and it doesn’t read an echo. It can detect obstacles looking down, but no cliff detection yet.