I have read several forums discussing possible solutions for trying to control more than 32 servos with the SSC32U and VSA. I wanted to see if anyone could shed more light on this topic.
I would like to use VSA and some combination of multiple SSC32U’s or the SSC32U and another board to be able to control more than 32 servos.
At first I thought the Adafruit PCA9685 16 channel board was the solution, but I do not think VSA is compatible with this board.
I know the BotBorduino can be used in conjunction with the SSC32U to control more than 32 servos, but I am not sure if VSA can handle this or if I would need to use a different control software/write a control software myself.
Any thoughts or suggestions would be greatly appreciated. I am relatively new to using servos and the SSC32U.
Wow! You must be building something big, complex or both!
I think you hit the nail right on the head there. If you connect multiple SSC-32U to a computer they will each get a different COM port. Therefore, you should then be able to control each of them in VSA individually.
Yeah, I don’t think there is support for that board at this time. As far as I know, new board support is not currently in the works.
Yeah, to use the BotBoarduino you’d need to create a special sketch to do two things:
Control the RC servos on the I/Os of the BotBoarduino. Using the Servo library you should be able to handle about ten of those, maybe more.
Add code to handle serial communication to accept “SSC-32U” style commands. This is not trivial, but also not too difficult, either. I’m sure there are some example code online doing something along those lines (parsing SSC-32U commands) that could be adapted to the BotBoarduino.
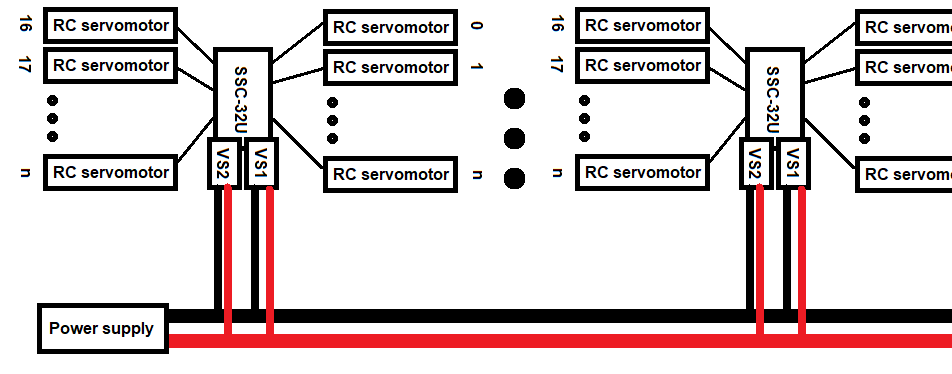
I think your best bet would be to use multiple SSC-32U. Also, there are two important features with the SSC-32U that is important when you have so many RC servomotors connected together in a project:
The SSC-32U allows for two power rails (VS1, VS2) that are independent (remove the VS1=VS2 jumpers first, but keep them safe! I recommend a small resealable plastic bag tape to the board) of each other. This allows you to provide independent power supplies for each group of 16 servos easily. Of course, if you rather use just one large power source you may want to simply wire all of the VS1/VS2 screw terminals of all the SSC-32U in parallel to that power source.
The SSC-32U also allows for sending a “high” or a “low” pulse to any of the 32 channels (#0P65535\r or #0P0\r). On most RC servomotors this will cause them to go limp (since there is no more control signal) but it can also be used to control relays or other digital devices. Also, each board has 8 inputs (6 of them digital, all 8 analog capable) which can allow you to easily add sensors to any project using them.
Of course, feel free to ask any other questions you may have about the SSC-32U or anything else related. Good luck with your project!
@scharette thank you for your welcome and reply! I am enjoying reading up on the RobotShop forums!
I am attempting to research, plan out, prototype, and then eventually completely build out an animatronic tentacle beard for Davy Jones. It’s a hobby project I am picking back up on, and with so many tentacles and some of them consisting of multiple stages the amount of servos can add up quickly.
I really appreciate your input. You really provided a ton of clarity for me. I think I am going to go with getting another SSC32U and giving them each a different COM port. I see what you are saying about removing the jumper where VS1=VS2 (I will seal them in the plastic bag taped to the board like you mentioned). I am thinking about using one rail to power high voltage servos that are meant to run on 7.4 volts with a 2S LiPo battery, and then using the other rail(s) to power servos that run on 6V. I will likely be using big batteries capable of providing lots of amperage. I may even dedicate a power source solely to VL as well just in case.
Thank you so much for your feedback and suggestions. If I have any other questions I will post them.
Glad to know you are enjoying the community! Don’t forget to also check out the blogs, tutorials and robots/projects, too!
That sounds like an amazing project! You should totally create a project page here (even if not started fully / complete). It could help you track progress and also make it easier for people to help when you are stuck or have questions since all the details would be available easily in one place. Plus, robotic tentacles are cool!
Yeah, you can end up needing quite a bit depending on how much freedom of motion you want. With some robotic snake arm (how you search for them so you don’t google “tentacle” at work … the Internet can be a weird place ) designs you can easily have 2-4 servos per section where it can bend and many, many such sections if you need lots of flexibility in the possible motions!
Sounds good! Glad I could help out.
Another thing you can do (and which I also liked quite a bit) was to use a 3S battery pack connected through a high current, low dropout switching regulator with a fixed output at 6, 7.4 or whatever DC voltage you need. This allows for your RC servo motors to always be at the exact same voltage no matter the state of the battery pack.
Using a (or more) high capacity 3D UAV battery pack (for their huge amount of current they can provide without dropping voltage) and one regulator per VS rail you can get a pretty reliable/stable system going on.
Of course, it’ll still work with using 2S LiPo directly, too, as long as your RC servomotors are fine with a range of 6.6-8.4 V DC (from “discharged” 3.3 V DC to fully charged 4.3 V DC per cell). Of course, with a voltage source varying that much you will see a noticeable difference in speed and torque provided, which can make the timing of animation change quite a bit for longer motions (and then you end up with limbs of your robot stuck in each other). Just more food for thought!
As for regulator examples, we have stuff like the RB-Pol-467 that provides up to 15 A @ 6 V DC (you can find more 6 V DC options here) and variable output voltage ones like the RB-Vel-162 that could provide up to 2.5 A @ 7.4 V DC. You can find regulators for various voltages here.
I recommend not using the VL screw terminal on a SSC-32U. The main reason this exists is for backward compatibility with designs that used the older SSC-32. On the older board there was no capacitors on the main inputs and instead the VL was typically connected to a separate 9V battery on Lynxmotion platforms. This prevented brownouts of the main microcontroller on the SSC-32 when many or all servos moved at once, dropping momentarily the voltage from the power source.
On the SSC-32U the design was vastly improved and now has a low dropout voltage regulator for the VL connected through a diode to VS1 internally (on traces). And it has two huge capacitors! Therefore, even when VS1 is only powered at exactly 6 V DC on large platforms like the various 3 DoF Lynxmotion hexapods there are no brownouts because of the newer design.
Just make sure your VS1 power source is sufficient and everything should be fine. Make sure it is 6 V DC or more, too.
That is a great idea to create a blog post for this ongoing project! I was not even aware of the blog/tutorial feature on the RobotShot Community page. Thank you so much for your suggestion! I went and created a blog post for the tentacle beard detailing all of my ideas and preliminary research that should contain all the information I have to date for my plan to build this thing. I will keep updating it and making changes as those plans evolve and change. Here is a link to the blog:
(https://community.robotshop.com/blog/show/animatronic-tentacle-beard-for-davy-jones)
I went back and researched a little more on batteries and looked into the regulators/batteries you mentioned. I have made note of these different circuits/system set-ups for future use in case I go this route. Those are wonderful suggestions.
I was thinking it might simplify things for me a little bit if I go with a 7.5V switching power supply that has a lot of amperage. This could be used to power my 7.4V servos. Then I could find a 6V switching power supply with lots of amperage to power the rest of my many 6V servos I plan on using. I am assuming they will supply a steady voltage to the servos even if many servos move at once or something? I also didn’t realize the VL terminals shouldn’t be used on the SSC32U. Now I see what you are saying with those two big capacitors being used to prevent brownouts. I will make sure to have the VS=VL jumper connected and simply plug in an adequate power supply to VS1 and power the board that way. I made note of this in the blog as well. I really appreciate your advice on this.
That is simply amazing! Wow! What a great collection of ideas! Great job!
I am genuinely happy to see this!
Happy to help! We can only design with what we know. What we don’t know is the issue, usually. And what we don’t know we don’t know is the worst! Hence why I love having brainstorming with lots of people on lots of subjects!
Indeed! There’s also the benefit of the servomotors always receiving the same voltage, too!
Also, if you use more than you can spread the load/current requires for the regulator(s) which will reduce concerns for heat (and heat sink/fans/etc.), single failure point, etc.
Yes, but up to their specs!
Another thing you can do with those is stagger the start of the moves by a few ms. The spikes on initiating moves under loads aren’t all that long in duration. So instead of having 30 servos move at once, you have 30 servos start their moves over 5-10 ms. Barely noticeable to most humans but also greatly reduces peak currents (and therefore the risk to regulators / the specs required).
Yes, most people do not know about it and use it like the older SSC-32.
Do not connect a jumper on VS=VL. That is for a different purpose, hence why it comes unpopulated. This can only cause you issues unless you have the one case where it is helpful… which is not this one!
As mentioned above, there is an internal connection from VS1 to VL through a diode. The jumper is used in the case where power has to go both ways. Just, hmm… don’t use that jumper!
Make sure your note doesn’t say to use VS=VL!
@jacol_3006
Amazing work! I’m looking forward what else you’ll be doing next with this project!
Thank you so much @scharette I really appreciate that. I am positive more questions will come up from all of this, so I will for sure keep you updated on this project. Your help has been extremely valuable.
You are exactly right on that. Brainstorming with others and learning from their experiences and creativity is a vital piece of the puzzle. It helps you learn what you do not know so you can design better projects. I love collaborating with people such as yourself whom I have so much I can learn from. The teamwork is what makes things so rewarding in the end. You nailed it man.
That sounds like a great idea. I will move ahead with that 7.5V and 6V switching power supply and make note of my initial arrangement and let you know how it works. I admit I am also a little more novice in the power/control/electrical side. This input is helping me learn more on this.
That is another great suggestion I just added to the blog. I will definitely do that. Staggering the movements would be almost unrecognizable like you said to most people, and it would seriously help decrease the excessive current draw when so many servos try to move at once. Awesome.
Thank you for clarifying my misunderstanding on the VS=VL jumper. I was misunderstanding that. I see now what you mean how the internal connection via the diode from VS1 to VL is how the board automatically powers the logic through the VS1 terminal. The jumper looks to be if someone might be having issues with the auto select or something else maybe. Thank you so much I went and changed that note in the blog
Now I will not make that mistake
Have a great weekend as well! I will keep reading up!
I found another question while researching this weekend and thought I might reach out again. I have been researching which gauge wires (AWG) I should use to connect a switching power supply to the SSC32U.
I am wanting to use a 7.5V 46A switching power supply from RobotShop to power my 7.4V servos, and a 6V 30A switching power supply to power my 6V servos (all connected to the SSC32U). I am planning on putting the 7.4V servos on VS1 and the 6V servos on VS2. The 7.4V servos pull 2.7A at peak and 0.3A at idle/no load. The 6V servos pull 2.4A at peak and 0.45A at idle/no load. I am pretending like the VS1 and VS2 rails could be maxed out at 16 servos each.
After researching, I see that the recommended wire gauge (AWG) to carry anywhere from 30A to 50A (which both correspond to my two power supplies) seems to range anywhere from 5 AWG to 12AWG depending on if the wire is solid or stranded. I have looked at different wire connector types and the best I can find that seem to work easiest with the SSC32U are pin terminal style. The pin terminal style connectors for these gauge wires do not appear as if they will fit in the SSC32U screw terminals.
I am thinking I might be oversizing things a little. On the lynxmotion website, I see where 15 amps per side (VS1 and VS2) is the max amperage the board can handle. Maybe I need to look at wires that are rated for that amount instead of trying to size the wires for the output of the power supply.
I know I could use some schooling on this so any feedback/suggestions are welcome. I apologize if any of my initial thinking sounds completely outrageous. It could easily be!
No worries, this is all a great analysis of the situation.
What will happen with the circuit is that the current needed depends on the load. Since no SSC-32U should use more than a certain amount of current individually, you do not need cables rated for anything higher than that amount.
Now, your power supply will need bigger cables to connect to it, but from that you can then split it to smaller cables going to each of the SSC-32U’s VS1 & VS2 terminals. I think those terminals can possibly fit 16 AWG but I’m not 100% sure. Also, if using stranded cables make certain there are no strands touching across VCC/GND on the terminals (they are somewhat small and close to each other… and it has happen to customers before!).
As for connecting the smaller cables to the larger ones you will need to splice your smaller wires to the larger one. Once that is done and tested for continuity with a multimeter simply add some solder to hold everything in place. You could also add some heat shrink (place on one side beforehand) or use electrical tape to insulate that connection point.
For tips on splicing wires, check this video out. There’s probably plenty of other sources available online for this kind of info, too.
That makes perfect sense. That is what I will plan on then. I will use a thick wire to connect to the power supply, then splice smaller wire to the thick wire so I can connect the SSC32U to the power supply.
I have the wiring harness with wall pack connector from RobotShop, and it has 18AWG wires which fit into the screw terminals on the SSC32U barely and with a tight fit. I am thinking about using 18AWG wires to connect to the SSC32U.
One question before I proceed: I see where 18AWG is rated for 16A max in chassis wiring and 2.3A max during power transmission from the American Wire Gauge Chart and AWG Electrical Current Load Limits table. This is a very conservative estimate based on the 700 circular mils per amp rule. If I have sixteen 7.4V servos connected to the SSC32U (each servo runs 0.3A at no load operation and 2.7A at stall), then I could have anywhere from 4.8A-43A being pulled from VS1 at any given time. I plan on using animation and control techniques like staggering servo movement, as you mentioned, to decrease current draw so hopefully I can keep amp draw as low as possible.
Do you see any issue with this setup? Particularly regarding current draw through the 18AWG wires with sixteen high torque servos on a single rail of the SSC32U?
Thanks for the confirmation. Most sources specify something along the lines of 15-16 A for that size if made of copper.
Yes, your math seems correct - in theory. In practice, there’s two other things to consider:
Stall current it a momentary thing. If any of your servos reach that current for any significant amount of time (depending on the model, it could be seconds) they’ll most likely get damaged or destroyed by it (overheating, usually).
The rated current is for continuous use, not peak currents. Effectively, if you use about 16 A continuously (or less), your wire should not heat up significantly.
Of course, if this is a concern, you may want to add temperature sensors on the wiring (such as a thermistor) and connect the output to an analog input of each SSC-32U. That way you could monitor the temperature and cut off power to that bus if required. That being said, I highly doubt that would be an issue. If the wiring or the SSC-32U do become hot to the touch the best might be simply to add one or more small fans blowing air at them.
Not that I can think of. I recommend trying it with one SSC-32U and both VS1 & VS2 and see how it goes. This should give you a good benchmark for the rest of the work. If it does happen that it is too much power for one VS, simply place less LSS on each side and add more SSC-32U. We’ve had a customer before use SSC-32U with 100 RC servomotors.
They ended up not using staggered motions and the peak currents were quite high. Therefore they placed only 6 servomotors per side of the SSC-32U and had to user 9x SSC-32U!
The 18 AWG wire is most like completely fine. As said above, just monitor it for temperature / cool it slightly if required.
The SSC-32U is the likely to get a bit warm over time. Again, if it does seem to get too hot just cool it down with forced air. If that doesn’t work reduce the total amount of servomotors per side.
A final note:
Make sure to have airflow, passive or forced! Since this will be generating a lot of power (and therefore lots of heat, especially in the servomotors), make sure to have a way for that heat to leave. If because of design constraints you cannot have the RC servomotors exposed to the air, use some with metal cases instead and connect them internally using metal (aluminum is useful here) to a heat sink (typically fins and a fan). This is what all modern hardware does (a good example is laptops for their CPU & GPU).
Sincerely,
P.-S.: You should totally make a post here about your project. This sounds like something our community would find very interesting! Plus, it makes it easier for others to assist in the future since all the info would be in one place!
Thank you so much for your input @scharette! I went and bought some 14AWG, 16AWG, and 18AWG stranded copper wire just to be sure and found that indeed the 18AWG is the only size I could get to reasonably/properly fit into the screw terminals on the SSC32U.
I just finished building my tentacle mechanism/test rig and will now focus on building the power circuit so I can start doing some motion checks and calisthenic tests on this tentacle concept. I will absolutely make a post on this idea I really like that suggestion! Previously I made a post under the “Blogs” section of the RobotShop community which I plan to update and add to once I test this prototype. Should I post under the “Robots” Tab instead? I might should have started there.
I totally see what you are saying now about how if all the servos were at stall current for any sustained length of time then things could get damaged. I think my calculations were severely overestimating the average current draw After doing some tests I see my servos never really get above 1A under normal load and even if they climb high they rarely stay there for more than a second. 16A per power rail on the SSC32U using the 18AWG wire looks like it should be perfectly ok as you said. I am on the same page now. I will keep a small fan nearby in case things do get too hot for some reason. That is an awesome idea.
I will utilize both power rails during my testing and see what the current draw looks like (I will likely use staggered motions to try and decrease peak currents) and then possibly use less LSS per side and add more SSC32U if for some reason peak currents are too high. Thank you for mentioning that.
I love the idea of having forced/passive air flow. I used this last week to design the test rig to mount the tentacle mechanism on and designed the system to be exposed to air and have plenty of passive cooling. Your input has been so helpful to me. I will update my post soon detailing the mechanism, test rig, animation, power circuit, etc. I cannot thank you enough for the input and suggestions.
Robots sounds like a better place for an on-going project.
You never really should be at stall current, since that means 0 motion anyway. I highly recommend that you use the 20-25% rule, where you spec your motors so that any continuous torque applied will be about 20-25% of the stall torque. This allows your motors to work for longer, prevent damage and give plenty of power left for those starting motions where more torque is needed.
Depending on what you are using to test your motors, you may not be able to see peak currents that are short in duration, such as when starting from not powered to full torque. These peaks will happen really fast. The problem is if you need too much current for the cabling/power systems you have the voltage will drop. If it drops low enough, the coils in the motors themselves won’t have any energy to actually turn/hold a position and then you get wonky behaviours (at least temporarily).
As long as it doesn’t cost you too much or make the build inefficient, more current capacity is never a bad thing anyway!
That should be far more than enough. I don’t think one screw terminal (or the traces underneath) could support that much for long anyway… Haha!
If I remember correctly the standard pins used for SIGNAL/VCC/GND of the RC servomotors can support at most 3 A continuous themselves, so that’s for sure a hard limit per servo. Of course, the board itself cannot provide 3 A x 16 servos on one rail… Seems obvious, but mentioning it just in case.
Hehe, just like we all don’t want to overheat, you should do the same for the RC servomotors (likelier) and the SSC-32U (not likely in most use cases).
This is going to be so cool!
Well, thank me by doing the best thing anyone can: share that knowledge freely with others! That’s how we improve everything!
Thank you so much for your help on this @scharette. I just finished the prototype project, posted it on the robots page here, and also I will go ahead and link a really quick video for your convenience which shows the mechanism in action!
I was able to get the control/power circuit working properly thanks to your help. The 18AWG wires have held up perfectly so far with the eight 7.4V servos I am running on VS1. I have used staggered movements to try and reduce momentary surges in current. I took your great advice and added a fan to cool down the servos while they run.
The write up I did on the robots page (linked above) contains all of the background information needed for any further questions I will have. Now I can link that as a way to help explain the context when I ask more questions.
I thought I would share the results with you! Thanks again for all of your help on this. I hope my sharing of this project helps/inspires anyone else who thinks robot tentacles are cool or who wants to build a cool animatronic.
I’m sure this will garner interest and may even win you something in the next robot contest (typically some gift cards).
Well, I’m glad you took the time to write this up so nicely. It certainly inspires me!
I shared the post with my colleagues of the Lynxmotion team. I’m sure they’ll appreciate since one of them posted this a little while back. In that case it is directly driven at each joint but still quite fun to use!
I would absolutely love to enter this project into the next contest. That certainly sounds like a ton of fun. I remember you saying to thank you by sharing with the world, and I plan on making good on that!
I checked out that link, and wow that is SO cool! I love how the robot is driven at each joint.
Thank you for sharing with the Lynxmotion team. I will be continuing this project and trying to prototype the full beard with more servos and different tentacle mechanisms as we discussed before. I have to go back to school soon, but I will have more questions in the future when I pick this project back up. I will share all updates. Thanks so much man
Hi @scharette! I wanted to ask you a quick question. I would love to participate in the robot contest, but I see where there needs to be at least two entries in a month for the contest to occur. I was the only entry last month, so it looks like the robot challenge couldn’t occur. Is it possible to re-enter for this month if I want to participate? How might I go about doing that if so?
Thanks man, I hope you are doing well and staying safe!


 … the Internet can be a weird place ) designs you can easily have 2-4 servos per section where it can bend and many, many such sections if you need lots of flexibility in the possible motions!

