


Here is a video of the final mechanism in action!
Preface
I am a Pirates of the Caribbean fanatic, and I have a passion for stories and for bringing stories to life. I have found I really enjoy trying to bring stories to life through building animatronics as a hobby. My brother and I like to pick some of our favorite scenes from the Pirates movies or Disney attractions and try to creatively recreate them in our own way. After building my first pirate animatronic, The Helmsman, with my brother, we both thought it might be completely awesome to try and recreate some of the coolest scenes from the Pirates movies with a Davy Jones animatronic.
In my attempt to start the Davy Jones animatronic figure with one of Davy's most interesting characteristics, his tentacle beard, I anticipate having lots of questions along the way. What better place to share ideas than in the RobotShop community? I know I can learn a lot from other people's creativity and experience, and I think teamwork really makes any project that much more rewarding. I 100% welcome any feedback, suggestions, comments, ideas, or anything else. So without further ado, let's dive in!
Goal ("Why do research first?"):
To obtain an accurate, realistic, and life-like idea of the overall look and feel of Davy Jones's tentacle beard.
This way, hopefully, the animatronic tentacle beard and thus the Davy Jones animatronic character can really come to life and reflect the nature of Davy Jones as he was brilliantly created and portrayed in the movies. The research is meant to inform the design choices and refine the approach so the story really tells itself when all is said and done.
I have learned from my previous build of my first pirate animatronic, "The Helmsman", that research helps me reshape my expectations and vision for a project when first starting out. I tend to start out with a plan or rough idea of how I think I can best bring a certain character or scene to life, but when I begin researching, reading forums, and looking at others who have done similar projects, I find my expectations change rapidly and my initial approach evolves along with that too.
Approach ("What are you looking for during your research?"):
Before getting started on any attempt to design/prototype this animatronic tentacle beard, I want to answer some basic questions:
1. What are the basic dimensions of Davy Jones's tentacles? This overarching question can be broken down into the following smaller questions:
a) How many tentacles does Jones have?
b) What are the overall lengths of the different tentacles on Jones's beard?
c) What are the overall widths of the different tentacles in their non-tapered section on Jones's beard?
d) What is the length of the tapered section of all of the different tentacles?
e) What will be the width of the actual mechanism itself ( i.e. the dimensions of the actual mechanism that will be housed in the silicone tentacle skin)?
f) What is the slope of the taper for the different tentacles?
2. What will be the basic working model for my tentacles? Again, this overarching question can be broken down into several smaller questions:
a) How many independently controlled stages will there be?
b) How many degrees of freedom will each stage have?
c) What are the motor requirements for the design?
3. When animating the tentacles, which forces are important to simulate in the animation to really bring the squid-like characteristics of this tentacle beard to life? How do you make sure to preserve Davy Jones's cruel, tormented personality in the behavior of the tentacles?
Results/findings from research- Answers to the above questions:
I compiled all of my detailed notes and findings from my research in a report/word document that details how I arrived at the best answers I could for some of the above questions. I have linked it just below. I will also summarize my answers neatly below in the same order as the questions are listed above and add some details where necessary:
- My preliminary research for all basic tentacle parameters (includes tentacle geometry analysis and key animation styles/tentacle behavior): click here
- PDF detailing some of my rough hand sketches for different tentacle designs in terms of overall look and shape: click here
- PDF showing my approach to doing hand calculations to determine different mechanical requirements for the tentacle design: click here (NOTE: I am neglecting the inertia of the tentacle in these calculations. Loads will be higher in reality and motor requirements will therefore need to be chosen accordingly with this assumption in mind).
1. What are the basic dimensions of Davy Jones's tentacles? Let's answer this question by answering several smaller questions:
a) How many tentacles does Jones have?
Davy Jones has 46 tentacles in all (per Industrial Light and Magic).
b) What are the overall lengths of the different tentacles on Jones's beard?
If I am assuming the two chin tentacles and the two lip tentacles are the same length, then it appears they are approximately 24" in length. I could see anywhere from 24"-26" being a reasonable length to make the lip/chin tentacles. A good compromise might be 26" OL for the two lip tentacles and then 24" for the two chin tentacles.
c) What are the overall widths of the different tentacles in their non-tapered section on Jones's beard?
So far in my research I have primarily analyzed Davy Jones's chin and lip tentacles. They appear to have an overall width of approximately 30mm in the non-tapered section and a 35mm depth on the side where the tentacle suckers are. The length of the non-tapered section looks to be approximately 2/3 of the tentacle's overall length. For a 24" OL tentacle this means the non-tapered section would be approximately 16" long.
d) What is the length of the tapered section of the different tentacles?
Based on the estimate that 2/3 of the tentacle OL is non-tapered, this means approximately 1/3 of the tentacle's OL is tapered. For a 24" OL tentacle, the tapered section would be around 8" long.
e) What will be the width of the actual mechanism itself (i.e. the dimensions of the actual mechanism that will be housed in the silicone tentacle skin)?
I am using 21mm for the tentacle mechanism itself in the non-tapered section. If I were to use 1/4" thick silicone for the tentacle skin, I would end up with an overall width of around 33mm for the tentacle which I am fine with. Of course the depth would be more than 33mm because of the suckers on one side of the tentacle.
f) What is the slope of the taper for all the different tentacles?
I am using a taper slope of -1.625mm/inch when starting at 21mm and ending at 8mm over the 8" tapered length. In order to figure out this -1.625mm/inch slope I only needed the starting point width (21mm), the ending point width (8mm), and the tapered length (8"). The starting point width of 21mm is the width I am using for the non-tapered tentacle mechanism width/diameter mentioned above. The ending point width of 8mm is the smallest I believe I can feasibly make the bottom-most vertebrae of the taper and still maintain accuracy in my 3D printing and such.
2. What will be the basic working model for my tentacles? Let's again answer this question by answering several smaller questions:
a) How many independently controlled stages will there be?
After studying the pirates movies and looking at various ILM (Industrial Light and Magic) models, I think I can still achieve the proper motions in the animation while preserving the true character of Davy Jones through the general behavior of his tentacle beard with three independently controlled stages. The first 8" or so will be stage one, the middle 8" will be stage two, and then the bottom 8" where the tip is will be stage three.
b) How many degrees of freedom will each stage have?
Each stage will have two DOFs, and each DOF will be orthogonal to one another. To clarify a little bit, the lip tentacles will have all basic degrees of freedom except the ability to twist along their center/core axis. I do not want the tentacles to be able to twist along their core, but I do want them to be able to move about the other 2 basic axes/planes of motion in 3D space.
c) What are the motor requirements for the design?
I did some detailed hand calculations (see PDF above) to try and get a good estimate for how much motor torque/speed would be needed in order to animate these tentacles in a way that accurately reflects the behavior of Jones's tentacle beard. It should be noted I have neglected the inertia of the tentacles in these calculations. Therefore, the loads in the system will be higher at times than my calculations reflect. Ultimately, I will need to size the motors to be more powerful than what my calculations will reflect. All things considered, I decided on the HS-7950TH servos for the first stage of the lip tentacle, the HS-5585MH servos for the second stage, and the HS-5645MG servos for the third stage.
3. When animating the tentacles, which forces are important to simulate in the animation to really bring the squid-like characteristics of this tentacle beard to life? How do you make sure to preserve Davy Jones's cruel, tormented personality in the behavior of the tentacles?
ILM published a quick one page document where they detailed their approach to performing a rigid body dynamics analysis on Davy Jones's tentacle beard when they were animating the character for the Pirates movies. The article mentions several aspects of the animation of Davy's tentacle beard that makes the beard really come to life.
It was important to them for the tentacle beard to "[behave] like that of an octopus, but still [present] the dynamic motion of the character’s performance". When animating these tentacles I want to make sure to bring the octopus-like quality to life without suppressing the heart/personality of Davy Jones that needs to be reflected in how the tentacle beard behaves.
The article also mentions how collision of the tentacles with each other and other objects was important. John Knoll coined a term for a certain type of collision reaction force known as "stiction". This simply refers to the "wet/limp noodle" effect where the tentacles collide but sort of grab onto each other and spring off of one another.
Gravity also plays an important role in animating the tentacle beard too. When Davy's head moves, sometimes the tentacles lay on his chest as they are pulled down by gravity. Buoyancy could also play an interesting role here.
Another great video by ILM showcases a sort of "tentacle calisthenic" video of different standard tentacle poses that could be programmed and used to more easily animate the tentacle. This appears at the 3:40 mark.
So What's Next?
My next step will be the design/prototyping phase. My plan is to take all my parts which I have designed in SolidWorks, have them 3D printed/laser cut/machined, and then prototype the lip tentacles. As mentioned before, these tentacles will be three-stage, 6 DOF mechanisms.
Regarding the general tentacle mechanism model, I have not created or invented this mechanism. I am largely using the process that Joshua Vasquez has posted about on his various platforms where he built his own two-stage tentacle mechanism. Joshua has done a fantastic job of laying out how the two-stage tentacle mechanism works, what the physics inside of this model is doing to allow the tentacle to operate, inventing his own hand controllers, and then creating a BOM and posting all of his CAD for his tentacle mechanism design (all of this can be found in the Hackaday instructions which I have linked below).
My goal in this phase is to take Joshua's two-stage tentacle mechanism, scale it down/change the design where necessary to fit my application for the Davy Jones tentacle geometry, design a third stage for the mechanism, motorize the control rather than use hand controllers, design a motor mount rig, and control the tentacle with VSA so I can animate it while it is synced up to an audio track. As you can see, it all starts with Joshua's two-stage tentacle mechanism. His Hackaday instructions have largely inspired me to start this project. So huge shout out to Joshua!
I would highly recommend going to visit all the links below to see how Joshua designed his tentacle, and so you can get a working mental model in your head of how these multi-stage tentacle mechanisms work. This is the foundation of the animatronic tentacle beard for Davy Jones.
Joshua's two-stage tentacle mechanism tutorial on Hackaday: click here
Joshua's youtube videos of his two-stage tentacle: click here
Joshua's Flickr build log for the two-stage tentacle: click here
Joshua's website where he details the two-stage tentacle and many other projects: click here
Where is the best place to start?
After doing all my research above, the next step was to move to acquiring all off-the-shelf components necessary for the prototype as well as beginning to design any other components to be custom manufactured for this tentacle application.
When ordering my off-the-shelf components from various places online, I found it to be very cost-effective to place a single large order rather than multiple small orders. This will ultimately save money on shipping. Thus, the importance of doing as much planning, researching, and designing as you can before trying to order parts to start building your design. Of course, when prototyping a design and doing some of your own R&D, there will always be some amount of cost associated with R&D which is unavoidable.
The Step-By-Step Process for Tentacle Assembly
In addition to Joshua's Hackaday tentacle mechanism, I decided to design my own tapered tip (third stage) and base plate to mount my tentacle design to a motor rig. I added my design onto the two-stage mechanism to create a three-stage mechanism.
Joshua Vasquez's Hackaday tutorial under the "Tentacle Assembly" section is a great step-by-step write up for how to assemble a multi-stage tentacle mechanism. His tutorial and his three-part post on Hackaday do a wonderful job showing the proper tips and steps for successfully building one of these tentacles. Another great resource to begin reading up on different building/designing methods for tentacles as well as the basic mental model for how multi-stage tentacles work is on Brian Poorman's tentacle guide. He has a five-part tutorial on how he built his own tentacle which has lots of important tips in it.
These photos should help clarify the assembly notes and steps during the building process
Also check out Joshua Vasquez's flickr build log for more helpful photos of his mechanism to aid in the building process.
Motor Control Rig Design Philosophy
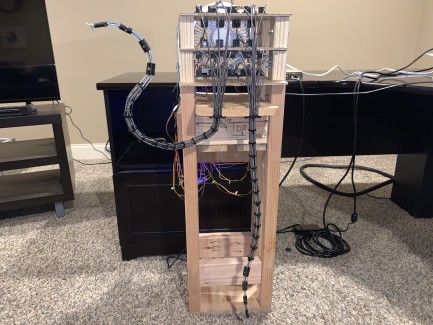
Here are some close-up photos of the rig
Most of the snake arm/continuum robots/tentacle mechanisms I see online utilize hand controllers to motorize them. These hand controllers can produce extremely life-like and fluid movements for tentacle mechanisms. I wanted to see how much realism I could achieve with a motorized design.
With that in mind, I wanted to build a rig to house the motors for both lip tentacles that would resemble a potentially feasible figure head design in the future. I decided to dedicate three different planes stacked on top of each other for the twelve motors that are being used between the two tentacles. The first stage motors for both tentacles are mounted on the bottom plane of the rig, the second stage motors for both tentacles are mounted on the middle plane of the rig, and the third stage motors for both tentacles are mounted on the top plane of the rig. Three inches separate each plane in this rig, but in reality this could be reduced to 2".
I made sure to include a mounting panel behind the rig to mount the SSC32U servo controller so all the servos could attach to the controller. This way a cable can be run from the controller to my laptop to animate the tentacles.
Each plane is stacked on top of one another and mounted to the rig with bolts. This means if I needed to access the bottom or middle plane for whatever reason, I could take the appropriate bolts off and lift the successive planes/plates above off the rig in order to access the desired plane.
Lastly, I designed some brackets (I call them "cable insert brackets") to be 3D printed which are bolted to the rig. These brackets act as the termination point for the extension springs that are being utilized as cable conduit in this design. These brackets have a bicycle brake cable ferrule press-fitted into them so as to transfer stresses off the 3D printed part and onto the off-the-shelf aluminum ferrule. The control cable passes through the bracket and terminates on the motor pulley.
In the next step, I am going to detail out how I am currently powering my rig, and how I plan to power the full animatronic tentacle beard when it's complete.
How is this particular rig being powered?
For this rig, I am using a 7.5V 50A switching power supply (see BOM) that is supplying power to the first and second stage servos for both tentacles. That means this power supply is powering a total of eight servos. The servos for the third stage of both tentacles run on 6V, so those servos are being powered by a separate 6V 5A power supply (see BOM). That means the 6V power supply is powering four servos. In total, there are twelve servos being powered on this rig by two different power supplies.
All of these servos are connected to a single SSC32U servo controller. The eight servos that are running on 7.5V are hooked up to the VS1 rail of the SSC32U while the four servos running on 6V are hooked up to the VS2 rail of the SSC32U. In order to use two separate power supplies, I had to remove the VS1=VS2 jumper on the SSC32U. Additionally, the SSC32U is designed such that when VS1 voltage is above 5.3V (not counting temporary drops) the logic of the board can be sufficiently powered. So, my 7.5V power supply connected to the VS1 terminal also powers the logic of the servo controller.
The 7.5V power supply is connected to the SSC32U via a positive (red) wire and negative (black) wire connected to the positive and negative VS1 terminal slots, respectively. This wire is 18AWG stranded wire (see BOM), which is the largest stranded wire the SSC32U can accept. I have not tried to fit solid wire into these terminals. It might be possible for the terminals of the SSC32U to handle 16AWG solid wire, but I have not tested that theory. The 18AWG wire is rated to handle 7.5A continuously, which is suitable for my current application.
The 6V power supply is connected to the SSC32U via a wiring harness (see BOM) which accepts a 2.1mm x 5.5mm barrel jack. The positive (red) wire and negative (black) wire of the wiring harness are connected to the positive and negative terminals of the VS2 rail, respectively. The wires on the wiring harness are also 18AWG wire. These wires appear to be solid wire as opposed to stranded wire.
It should be noted that each rail of the SSC32U is rated for no more than 5A of continuous output and 15A-16A of peak current at any given time. Additionally, the standard pins on each power rail used for SIGNAL/VCC/GND of the RC servomotors can support at most 3A continuous themselves. Of course, the board itself cannot provide 3A x 16 servos on one rail. Since I have eight servomotors on the VS1 power rail, I need to be careful to draw no more than 5A continuously and/or 16A at peak from each power rail during the animation of the tentacles on the rig.
It should also be noted that if more current is needed than the cabling/power systems can handle, then voltage will drop and the wires themselves could begin to heat up. If voltage drops low enough, the coils in the motors themselves won’t have any energy to actually turn/hold a position. This can cause temporary, uncontrolled, and erratic behavior from the motors. In any case, as long as the current demands from the load stay within the SSC32U constraints, then the 18AWG wire will not be at risk as the wire can handle higher loads than the servo controller can.
In order to avoid placing the SSC32U and potentially any cabling under too heavy of a load, a couple approaches can be taken:
- Servo movements can be staggered by a few milliseconds. The spikes on initiating moves under loads aren’t all that long in duration. So instead of having 30 servos move at once, you have 30 servos start their moves over 5-10 ms. This is barely noticeable to most humans but also greatly reduces peak currents.
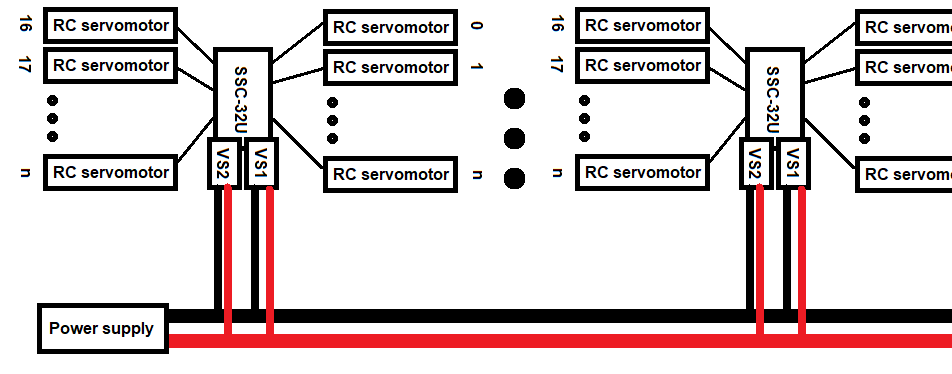
- The amount of servos per rail can be reduced and then spread out over more SSC32Us. If more SSC32Us are used, it should be noted that a thicker wire will be needed to support the loads coming from the power supply. This thicker wire should then be spliced with the 18AWG wires which will connect to the various SSC32U being used. The following image depicts this type of setup.
For more helpful information on the power circuit for this project, I highly recommend going to read my forum post where the leader, Scharette, does a marvelous job detailing out potential issues and solutions for this project. Most of my information in this step has come from this forum post.
In my next step I will detail out how I went about animating the two tentacles on this rig to move around.
When I built my first pirate robot, The Helmsman, I used Visual Show Automation (VSA) from Brookshire Software. This software has enormous capabilities for allowing for the simultaneous control of dozens of servos, DMX equipment, audio tracks, and even video files during a show/performance. This software is by far one of the most convenient and easy-to-use control softwares for a robot project where an animation profile is desired in which servos or DC motors need to move in synchronization with time/audio/video cues or in a live capture situation.
The Skinless tutorial is an excellent step-by-step tutorial on how to use VSA to control servos and how to import an audio file to synchronize servo movements with said audio file.
One important lesson I learned while creating the animation profiles for the tentacles was to make sure the bandwidth out of my COM port was sufficient given the demands of the profiles. Depending on which types of devices VSA is controlling, a noticeable slow down or glitch can be observed if too many events are occurring at one time. The VSA help manual says that if too many events are occurring at one time out of one COM port, there are three approaches that can be taken to increase bandwidth in order to get rid of the slow down:
1. Some devices can be taken off of a COM port and then moved to another COM port.
2. The frame rate can be increased in the COM port settings (F3) in VSA.
3. The Baud rate on the controller and the COM port in VSA can be increased (F3).
For part of my animation, I was trying to send nine SSC32 servo commands at once, and I noticed a slow down during the animation. The VSA timeline appeared to lag. I decided to increase the baud rate of my SSC32U controller and COM port from 9600 to 38400. This baud rate was sufficient to provide enough bandwidth given the demands of my animation profile.
The animation profiles I created contain a calisthenics portion, different standard tentacle poses, and several animated scenes from The Pirates of the Caribbean film series which are detailed in the last step.
This is the successful completion of a working prototype for a three-stage tentacle mechanism.
These mechanisms will also include a silicone or rubber latex skin in the future.
Final Videos of the Mechanism
Here are the links to the final videos of the mechanism in action:
Calisthenics/Poses video
Mechanism in action video