

LIDAR-Lite v3 - Available for pre-order


*note* : for discussing any technical issues or project designs with your LIDAR-Lite v3, please proceed to our forum and create a new topic here.
 LIDAR-Lite v3
Everyone has been eager to know when the LIDAR-Lite would return to market, so we are very happy to announce it is now available for pre-order via the RobotShop website: LIDAR-Lite v3. The second thing everyone was insistent on knowing was: "Will this work with my previous setup/project/custom mounting/etc.?" In this post, we will cover in more detail the similarities and differences of the new LIDAR-Lite V2 and V3 range finder modules.
Lidar what?
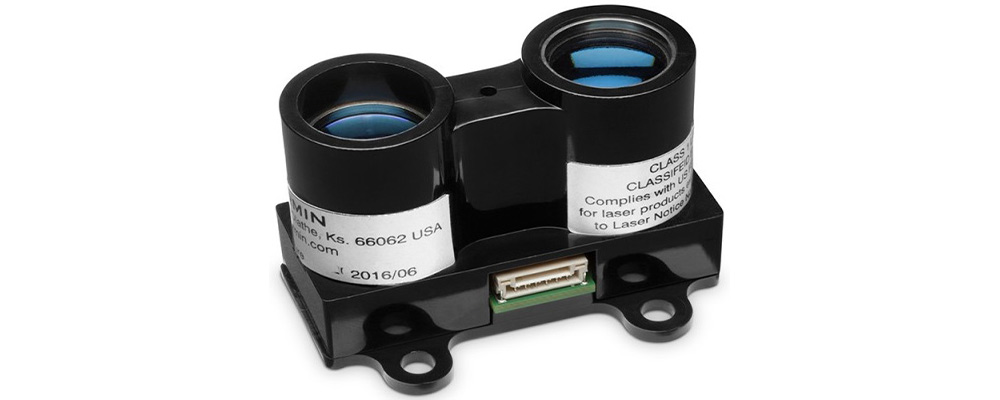
For those of you who have not heard of the LIDAR-Lite before today, we figure a quick introduction would be best. The LIDAR-Lite v3 is the third generation of a low-cost, long-range laser-based distance measurement device (also sometimes referred to as "laser range finder"). The LIDAR-Lite v3 can provide measurements at distances up to 40 meters (accuracy of +-2.5 cm) and reliably function at night, in day time (outdoors!) and even during rain / fog (provided that you protect it appropriately from the elements, of course!). The device also comes with an extensive Arduino library that exposes most of its settings and functions with a simple to use API. Over the last year and a half, LIDAR-Lites have been used in many projects, including UAVs, autonomous rovers and even a laser harp!
Mounting / case
With a weight of just 22 g (0.77 oz) and its compact size of only 40 x 48 x 20 mm (1.6" x 1.9" x 0.8"), the LIDAR-Lite v3 has kept the same form factor as its predecessors, so no need to worry there all previous projects will still be able to use this new version as a drop-in replacement for the v1/v2 when it comes to size and mounting.
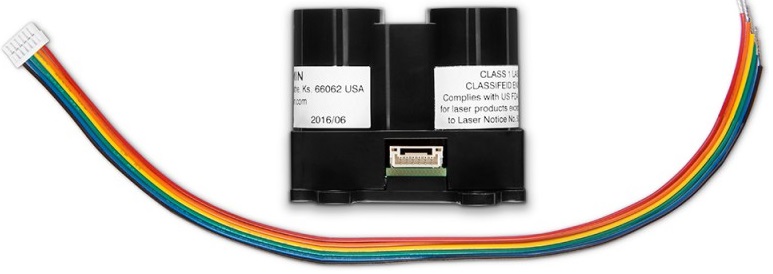 LIDAR-Lite v3 new wiring harness
Interfaces
The LIDAR-Lite v3 still offers both of its traditional interfaces, I2C and PWM output. Therefore, you should have no issues using your previous wiring schemes with your projects, either. The connector and cable did change though, but a cable is included with the product and the other end of each individual wire is bare, which is the same as the previous model. One notable change is the addition of colors to the wiring, which makes identifying which wire is associated with the SCL, SDA, MODE, etc. much easier than before. No more of that "use the other black wire" type of thing. You can find a short pinout guide on the product page under Useful Links.
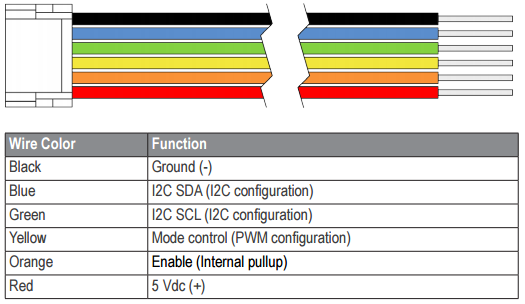 Wiring harness pinout
Electrical
In the past we have noticed many users running their LIDAR-Lite V1 straight off a USB-powered microcontroller board, such as an Arduino Uno. When the LIDAR-Lite v2 came out, some did the same but ran into intermittent issues which were due to the inrush current requirements of the V2 during power-up which was too high for what the average USB-powered voltage regulator could provide. Whenever such a situation happened, it would cause errors during the initialization sequence of the LIDAR-Lite V2, forcing the users to restart the board/LIDAR-Lite until it finally worked. This is still the case for the V3, but there is a simple solution to this "issue" and it comes in two parts:
Part 1: Capacitor
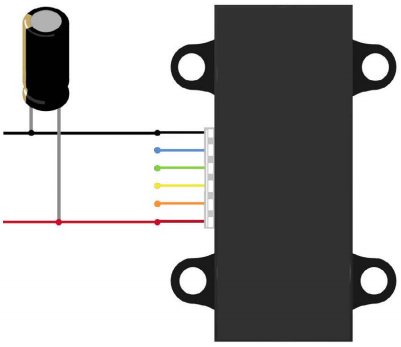 Mandatory capacitor (680 µF)
Adding a capacitor as shown in the diagram above will ensure a smooth power supply to your LIDAR-Lite v3 and it is required for consistent / proper operation. 680 µF is the minimum appropriate value for this capacitor, though if all you have available is a slightly larger capacitor such as 1000 µF, that will be fine, too. You can find capacitors here (ex: RB-Plx-294).
Part 2: External power source
While the reported running current consumption of the LIDAR-Lite V3 is ~130 mA, the inrush current during initialization is much higher (possibly ~500 mA). While this current peak is only for a short duration, if your setup is not providing enough power, it will most likely prevent the proper initialization of your LIDAR-Lite V3. For our tests, we connected a wall adapter of 7 V DC, 2 A power supply to our microcontroller board, which worked quite well. For most cases, a power source that can provide at least 6 V DC with 1 A of current should be fine. You can find some options here, here and here. Another good option if you need your project to be mobile or just don't want more cables would be to use a battery pack with your microcontroller setup. The typical recommendation would usually be either a 6 V DC NiMH (ex: RB-Sta-13) or a 7.4 V DC LiPo (2S) (ex: RB-Dfr-160) battery packs. Our NiMH packs typically come with a Tamiya connector, so you may want a wiring harness (RB-Onl-12, RB-Onl-16) and a barrel connector adapter (such as RB-Cyt-52), for ease of use. NOTE: The LIDAR-Lite V3 requires a stable, nominal voltage of 5 V DC (4.75 - 5.5 V DC is acceptable), so make sure your external power source is passed through a quality 5V DC regulator (such as is used on the Arduino boards) before reaching the LIDAR-Lite V3 (and its capacitor!).
Code
Some more good news here: the LIDAR-Lite v3 is compatible with the previous Arduino library and I2C interface specifications, so you should not have to make any changes to your current code base / examples to use the new version. We tested one of our LIDAR-Lite V3 samples with previous code (see LIDAR-Lite Laser Rangefinder – Simple Arduino Sketch of a 180 Degree “Radar” for more details) and it worked right away, no changes! The manufacturer is currently working on additional code examples to explore more advanced features with the LIDAR-Lite v3, such as high-speed operation, increased sensitivity, etc. We are looking forward to see all the great projects that you will create with this new product! Let us know about them in the comments below, on our forum project showcase or our project-oriented website, Let's Make Robots.
Thanks for helping to keep our community civil!
This post is an advertisement, or vandalism. It is not useful or relevant to the current topic.
You flagged this as spam. Undo flag.Flag Post
Your post is currently under review by our moderation team. The review process usually takes up to 48 business hours.
You can track your post's status in the "My Content" section of your profile. Once approved, it will be published and visible to others.

Thank you for contributing to our community!