- Lesson 1: Terminology
- Lesson 2: The Platform
- Lesson 3: Propulsion
- Lesson 4: Choose a flight controller
- Lesson 5: Assembly
- Lesson 6: Get it all working together
- Lesson 7: FPV & Long-range
- Lesson 8: Aircraft
Now that you have either chosen or built a frame, the next step is to choose the right propulsion system. A complete propulsion system includes motors, propellers, ESCs, and a battery. Almost all small multi-rotor drones / UAVs are electric, with almost none being gas-powered. For this reason, we will focus on implementing electric propulsion using brushless DC motors.
The motors you use will have a huge impact on the payload (or maximum load) that your UAV can support, as well as the flight time. We strongly suggest using the same (propulsion) motor everywhere. Note that even if a pair of motors are the same brand and model, and from the same production run, their speeds may vary slightly, which is something the flight controller will take care of.
|
|
|
Brushed vs Brushless
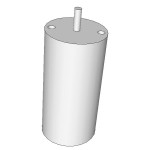
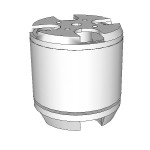
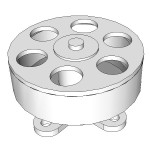
Brushed motors spin the coil inside a case with fixed magnets mounted around the outside of the casing. Brushless motors do the opposite; the coils are fixed either to the outer casing or inside the casing while the magnets are spun. In most situations, you will be considering only brushless DC motors. Brushless DC motors are used extensively in the hobby RC industry for products ranging from helicopters and airplanes to the drive system in RC cars and boats. "Pancake" brushless motors have a larger diameter and are essentially flatter and often allow for higher torque and lower KV (details below). Smaller UAVs (usually the size of the palm of your hand) tend to use small brushed motors because of the lower price and simpler two-wire controller. Although brushless motors come in a variety of different sizes and specs, selecting a smaller brushless motor rarely means it will be less expensive.
Inrunner vs Outrunner
There are a few types of brushless DC motors:
- Inrunner - these have the fixed coils mounted to the outer casing and the magnets are mounted to the armature shaft which spins inside the casing (tend to be used on RC cars because of the high Kv)
- Outrunner - these have the magnets mounted on the outer casing which is spun around the fixed coils in the center of the motor casing (the bottom mounting of the motor is fixed).
- Hybrid outrunner - technically outrunners but have a static outer shell around them to make them look like they're inrunners
Inrunner brushless DC motors tend to be used in RC cars, airplanes, and helicopters because of their high KV. They may also be geared down to increase the torque. Outrunners tend to have more torque.
"KV"
The KV rating/value of a motor relates to how fast it will rotate for a given voltage. For most multirotor aircraft, a low KV is desired (between 500 to 1000 for example) since this helps with stability. For acrobatic flight, however, you might consider a KV between 1000 and 1500 and also consider using smaller diameter propellers. If the KV rating for a particular motor is 650rpm/V, then at 11.1V, the motor will be rotating at 11.1V x 650 = 7215rpm. If you operate the motor at a lower voltage (say, 7.4V), the rpm will be 7.4V x 650rpm/V = 4810rpm. It is important to note that using a lower voltage tends to mean that the current draw will be higher (power = current x voltage).
Thrust
Some brushless motor manufacturers give an indication of a motor's thrust corresponding to several propeller options (often presented in a table). The unit of thrust is often Kg, Lbs, or N. For example, if you are building a quadcopter and find that a specific motor can provide up to 0.5Kg of thrust with an 11-inch propeller, that means that four of these motors (with that given prop) can lift 0.5Kg*4=2Kg at maximum thrust. Therefore if your quadcopter weighs just less than 2 kg, it will only take off at maximum thrust. You need to either choose a motor + propeller combination which can provide more thrust, or reduce the weight of the aircraft. If the propulsion system (all motors and props) can provide 2 kg of thrust (max) then your entire copter should be at most about half this weight (1 kg, including the weight of the motors themselves). The same calculation can be done for any given configuration. Let's assume a hexacopter's weight (including frame, motors, electronics, battery, accessories, etc) to be 2.5 kg. Each motor should therefore be capable of providing (2.5Kg/6 motors) x 2:1 = 0.83kg of thrust (or more). You can now calculate the specs of your motor(s) but suggest reading through the sections below before making a decision.
Additional Considerations
- Connectors: Brushed DC motors have two connectors: one for positive, the other for negative. Reversing the wires reverses the rotation of the motor.
- Connectors: Brushless DC motors have three connectors. Refer to the ESC section below to know how to wire them and reverse direction of rotation.
- Windings: The windings impact the KV of a motor. When you want a lower KV but maintain the torque, you may need to consider a larger pancake-style brushless DC motor.
- Mounting: Most manufacturers have a general mounting pattern for brushless DC motors which has allowed companies that produce frames to not have to design adapters. The pattern is normally metric, with two holes spaced 16mm apart, and another two holes spaced 19mm apart (at 90 degrees to the first).
- Thread: The mounting thread used to secure a brushless motor to a frame can vary. Common metric screw sizes include M1, M2, and M3 and imperial might be 2-56 and 4-40.
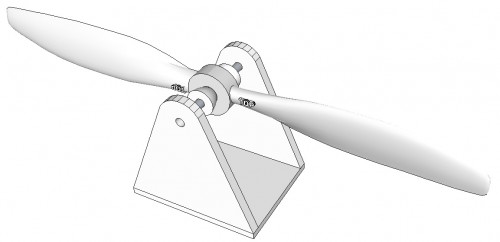
Propellers for multi-rotor aircraft are adapted from propellers used in RC airplanes. Why not use helicopter blades? Although it has been done, imagine the size of a hexacopter that used helicopter blades. Note that a helicopter-type system also requires that you vary the pitch of the blades which significantly adds to the mechanical complexity. You may also ask why not use a turbojet, turbofan, prop-jet, etc. These are incredibly good at providing a lot of thrusts, but also require a lot of power. If the objective of the drone was to move really fast rather than hover in confined areas, one of these may be a good option.

Blades & Diameter
Most multi-rotor aircraft have either two or three rotor blades, with the most common being two. Do not assume that adding more blades will automatically mean more thrust; each blade must travel through the wake of the one which precedes it, so the more blades, the more prevalent the wake will be. A smaller diameter propeller has less inertia and is therefore easier to speed up and slow down, which helps in acrobatic flight.

Pitch / Angle of Attack / Efficiency / Thrust
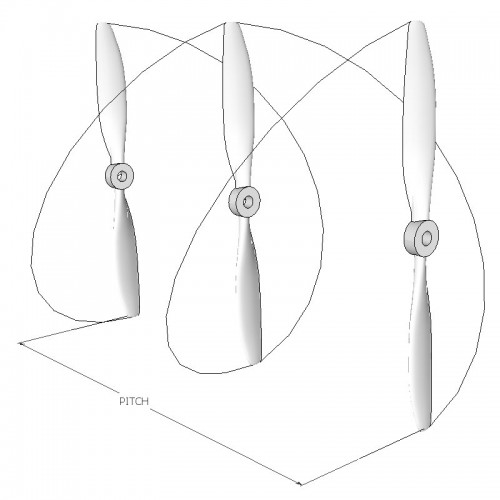
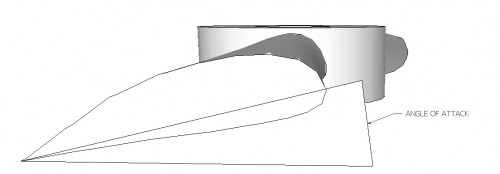
The thrust produced by a propeller depends on the density of the air, the propeller's RPM, its diameter, the shape and area of the blades, and on its pitch. A propeller's efficiency relates to the angle of attack which is defined as the blade pitch minus the helix angle (the angle between the resultant relative velocity and the blade rotation direction). The efficiency itself is the ratio of the output power to the input power. Most well-designed propellers have an efficiency of 80%+. The angle of attack is affected by the relative velocity, so a propeller will have different efficiency at different motor speeds. The efficiency is also greatly affected by the leading edge of the propeller blade, and it is very important that it be as smooth as possible. Although a variable pitch design would be best, the added complexity required as compared to a multirotor's inherent simplicity means a variable pitch propeller is almost never used. Additional information regarding the theory behind blade design and thrust generated can be found online at sites such as the MDP project. There are also several online tools which help calculate a propeller's thrust. Certain sites list a variety of motors such as eCalc for the thrust calculations
Rotation
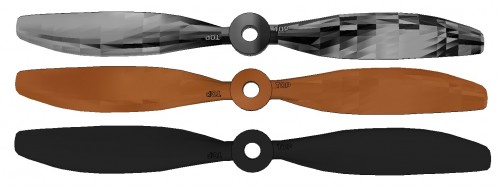
Propellers are either designed to rotate clockwise (CW) or counter-clockwise (CCW). It is important to know which part of the propeller is intended to face upwards (the top surface is curved outward). If the design of your multirotor inverts some of the motors (as is the case for a Vtail, Y6, X8), be sure to change the orientation of the propellers so the thrust is still downwards. The top of the propeller should always face the sky. The documentation associated with the flight controller (discussed in the next lesson) normally shows you which way each propeller is intended to turn for each multi-rotor it supports.

Material
The material(s) used to make the propellers can have a moderate impact on the flight characteristics, but safety should be the primary consideration, especially if you are new and inexperienced. Plastic Injection-Molded Plastic (ABS / Nylon etc.) is the most popular choice when it comes to multi-rotor aircraft. This is large because of their low cost, decent flight characteristics, and respectable durability. Normally in a crash, at least one propeller ends up broken, and while you are calibrating the drone and learning to fly, you will end up with a lot of broken propellers. A plastic propeller that has been reinforced with carbon fiber is arguably the best overall choice because of its high rigidity and low cost. Fiber-Reinforced Polymer A fiber-reinforced polymer propeller (carbon fiber, nylon-reinforced carbon, etc.) is a "cutting edge" technology in more ways than one. Carbon fiber parts are still not very easy to produce and as such you pay quite a premium for them over a plastic propeller with the same specifications. In the event of a crash, a carbon fiber propeller is harder to break and flex and as such will cause more damage to whatever it contacts. This having been said, if you want to consider a fiber-reinforced propeller, they are normally well made and rarely require balancing, are stiffer (so fewer losses in efficiency due to flexing, etc), and are lighter weight than other materials. We suggest considering these high-performance propellers only after you are comfortable flying. Natural materials such as wood are not used often to make propellers for multirotor as they require machining to produce and therefore cost more than plastic. The main advantage here is that wood is quite strong and will not bend. Wood propellers are still used for RC airplanes.
Folding
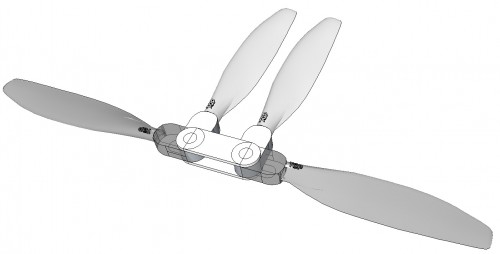
Folding propellers have a central part that connects to two pivoting blades. When the center (which is connected to the motor's output shaft) spins, centrifugal forces act on the blades, forcing them outwards and essentially making the propeller "rigid", with the same effect as a fixed propeller. Because of lower demand and the higher number of parts required, folding propellers are less common than fixed propellers. As expected, a folding propeller makes transporting the aircraft quite a bit easier and combined with a folding frame, the "retracted" size of the UAV can be significantly smaller than in flight. Folding propellers also have the nice advantage of only having to change one blade in the event of a crash.
Mounting
Since aerial vehicles can come in a wide range of sizes, so can propellers. As such, there are a few somewhat more "standard" sized motor shaft diameters in the industry. Propellers often come with a small selection of these adapter rings (which look like washers with various different diameter holes in the middle) to press into a cutout of the propeller so it centers it on the motor's shaft. If you find that the center ("bore") of the propeller you are using is way too large for the shaft of your motor, you will need the spacer/adapter ring. Don't assume that the propeller you are purchasing includes the adapter; check the bore and compare it to your motor's shaft diameter. Certain manufacturers further customize the way the propeller mounts to the motor. Some have D-shaped (single or double) cutouts on the motor, and the propeller has the missing material; this ensures that the propeller will not loosen itself in flight. Other manufacturers have been known to include other types of specific "male/female" motor-to-propeller connections as well. Newer propellers have a thread rather than a hole which is opposite to that of the rotation, and the motor's shaft has the same thread, essentially tightening the propeller when rotating.
Prop savers
Prop savers replace the normal propeller adapter on a motor and have a small part (such as an O-ring) that keeps the propeller in place. In the event of a crash, the propeller is normally prevented from rotating (ex it contacts an object) and since the motor is still rotating and high speeds, it causes the O-ring to either rip apart or fly off, ideally saving both the motor and the propeller from damage. As great as this might be, there are a few disadvantages:
- The propeller sits higher on the shaft
- If the design of the prop saver is off, or not properly centered center it can lead to vibration
- Check O-rings periodically since they may become brittle and crack in flight
Prop guards
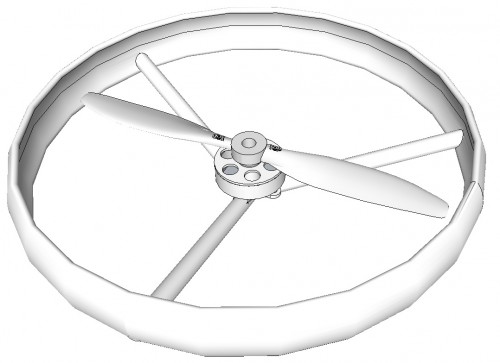
Propeller guards ("prop guards") connect to the main frame and provide a fixed ring/cushion around the propeller. Should the UAV contact an object, ideally the propeller guards will contact the object first and withstand the impact so the propellers are not touched. Small toy multi-rotor UAVs often have removable plastic prop guards included. As always, there are some compromises to using prop guards:
- They can be a high source of vibration
- Only good for low-force impacts
- Can lower thrust if there are too many supports directly under the propeller wash
Balancing
Most inexpensive propellers are not very well balanced, which can be seen by simply balancing the center on a pencil (one side will likely be heavier than the other). As such, it is always good practice to balance your propellers before fixing them to the motors. It is very important that the propeller be balanced because if not, the vibrations caused by an unbalanced propeller often propagate to the flight controller, causing erratic flight. A propeller can be balanced in many ways, but if you are building your own UAV, then an inexpensive prop balancer is ideal. A prop balancer simply allows you to easily see where there is a weight unbalance in the propeller. In order to adjust the weight, you can either sand down the heavier part (evenly sand the center part of the propeller only as opposed to leading or trailing edges, and DO NOT cut off part of the propeller), or add clear masking tape (which is very thin) to the lighter side (and keep adding lengths of tape evenly until it is balanced). Note that the farther away from the center you make the modification (sanding or adding tape) the more of an effect it will have based on the principle of torque.
An ESC (acronym for "Electronic Speed Controller") is what allows the flight controller (covered in the next lesson) to control the speed and direction of a motor. The ESC must be able to handle the maximum current that the motor might consume, and be able to provide it at the right voltage. Most ESCs used in the hobby industry only allow the motor to rotate in one direction, though, with the right firmware, they can operate in both directions.

Connectors
An ESC might initially be confusing because it has several wires exiting on two sides.
- Power input: The two thick wires (normally black and red) are to obtain power from the power distribution board/harness which itself receives power directly from the main battery.
- 3 bullet connectors: These pins are what connect to the three pins on the brushless motor. There are some standard sizes in the industry, but if you find the two are mismatched, you will need to replace one set.
- 3-pin R/C servo connector: This connector accepts RC signals, but rather than requiring 5V on the red and black pins, most of the time an internal BEC provides 5V to power the electronics.
In certain instances, the manufacturer does not want to assume which connectors you are using and leaves the wires for the motor connection and power input bare (they may provide bullet connectors in the packaging which you may or may not want/need and would have to solder onto the wires). The bullet connectors you received with the motors may also not match those of the ESC, so in this case, it's simply best to replace one or the other. Your next question is obviously given three bullet connectors, which one plugs into which on the motor? As far as the connector for the power, this is entirely up to you - ideally, you would use connectors to make the ESC easily removable in case of failure, or if you want to use it on a different project, but be sure that the positive on the ESC goes to the positive on the battery and same for negative. In order to reverse the direction of rotation, swap any of two of the three connectors between the ESC and the brushless motor.
BEC
Most ESCs include what is called a "Battery Elimination Circuit" or BEC. This comes from the fact that historically, only one brushless motor was needed in a given RC vehicle, and rather than splitting the battery, it would just need to be connected to the ESC, and the ESC would have an onboard voltage regulator to power the electronics. It is important to know the current which an ESC's BEC can provide, though it is normally in the range of 1A or above and is almost always 5V. In a multi-rotor, you need to connect all ESCs to the flight controller, but only one BEC is needed, and having power coming from multiple sources all being fed to the same lines can potentially cause issues. Since there is normally no way to deactivate a BEC on an ESC, it is best to remove the red wire and wrap it with electrical tape for all but one ESC. It is still important to leave the black (ground) wire in place for "common ground".
Firmware
ESCs are not all equally good for use with multi-rotors. It is important to understand that before multi-rotors were around, those brushless hobby motors were used primarily for RC car drives, airplane propellers, and as primary motors in model helicopters. Most of these applications did not require very fast response time or rapid updating. An ESC equipped with SimonK or bheli firmware is able to react very fast (much higher frequency) to changes in input, which may mean the difference between a stable flight or a crash.
Power Distribution
Since each ESC is powered from the main battery, the main battery's single connector must somehow be split among four ESCs. To do so, a power distribution board or power distribution harness is used. This board (or cable) splits the main battery's positive and negative terminals into four. It is important to note the type of connectors used on the battery, ESC, and power distribution board may not all be the same, and it is best, whenever possible, to choose a "standard" connector (such as Deans) which is used throughout. Many inexpensive boards require soldering, as they do not want to assume you are using any specific connector. A very simple power distributor could involve a two-input terminal block or soldering all positive connections together, and then all negative connections together.
Chemistry
Batteries used in UAVs are now almost exclusively Lithium polymer (LiPo), with some more exotic ones being Lithium-Manganese or other Lithium variations. Lead acid is simply not an option and NiMh / NiCd are still too heavy for their capacity and often cannot provide the high discharge rates needed. LiPo offers high capacity with low weight and high discharge rates. The downsides are their comparatively higher cost and continued safety issues.
Voltage
You should really only need to consider one battery pack for your UAV. This battery's voltage should correspond with the motors you chose. Almost all batteries used these days are lithium-based and incorporate a number of 3.7V cells, where 3.7V = 1S. Therefore a battery that is marked as 4S is likely 4 x 3.7V = 14.8V nominal. Providing the number of cells, however, will help you determine which charger to use. A single-cell high capacity battery may physically look a lot like a low-capacity multi-cell battery.
Capacity
A battery pack's capacity is measured in amp-hours (Ah). Small battery packs can be in the range of 0.1Ah (100mAh) though battery packs for medium-sized drones are 2-3Ah (2000mAh-3000mAh). The higher the capacity, the longer the flight time, but the heavier the pack will be. You can expect the flight time of a normal UAV to be in the order of 10-20 minutes, which might not seem like a long time, but you need to consider it's always fighting against gravity, and unlike an airplane, there are no surfaces to help with the lift.
Discharge Rate
The discharge rate from a lithium battery is measured in C, where 1C is the capacity of the battery (normally in amp hours unless you're looking at a very small drone the size of your hand). The discharge rate of most LiPo batteries is at least 5C (five times the capacity), but since most motors used in multi-rotors consume high current, the battery needs to be able to discharge at incredibly high current, which is often in the order of 30A or more.
Safety
LiPo batteries are not entirely safe since they contain pressurized hydrogen gas and have a tendency to burn and/or explode when there is something wrong. As such, if you have any doubts about the battery pack you are holding, DO NOT plug it into the UAV or even the charger - consider it a "write-off" and dispose of it properly. Telltale signs that something is wrong include dents or the battery is larger than it was when you first received it (i.e. leaking gas). When charging a LiPo battery, it is best to keep it in a LiPo-safe bag. Storing the battery is also ideally done in a LiPo bag as well. In the event of a crash, the first thing you need to do is unplug and check the battery. Having the battery in a fully enclosed case may add to the weight, but can really help keep your battery safe in a crash. Certain battery manufacturers sell batteries with and without a hard case.
Charging
Most LiPo batteries have two connectors: one is intended to be the main "discharge" wire which can handle high current, while the other, normally smaller and shorter is the charging connector. This charging connector is almost always a white JST connector which has one ground pin followed by the same number of cells used to create the pack. This is what you connect to the LiPo charger which then takes care of charging (and balancing) each internal cell. The charger should indicate when charging is complete and, given the safety issues with LiPo batteries, it is best to unplug the battery and charger when charging is complete.
Mounting
The battery pack is the heaviest item on the UAV and as such, should be placed dead center to ensure the motors are subjected to the same load. A battery does not include any specific mounting (especially screws which could puncture the LiPo and cause a fire), so some mounting methods currently used involve Velcro straps, rubber, and plastic compartment among others. Having the battery suspended below the frame using Velcro is quite popular because of its accessibility.


