Torobot software help

Ok so I’m trying to figure
Ok so I’m trying to figure out what everything does in this program. I did figure out how to set the servo serials I’m gonna use by pressing panel in the upper right hand corner. I then set those up as seen below ( pic 2). Top left is left front leg, top right front right leg etc.

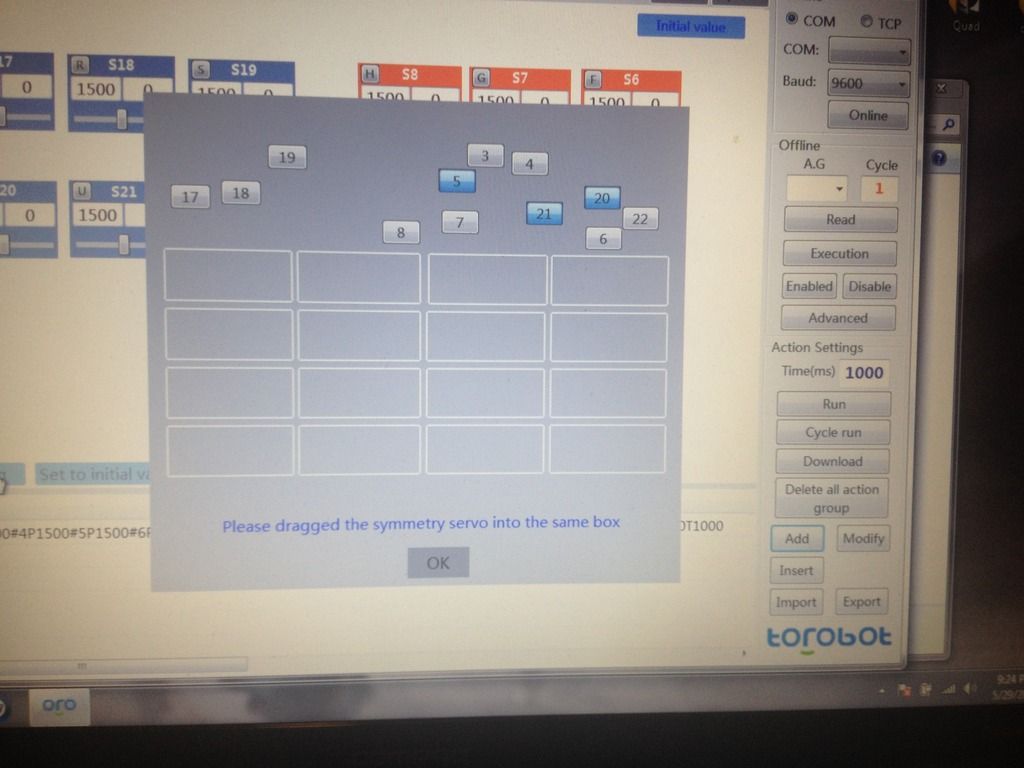
When I open the settings buttons In the bottom window under settings it asks for me to lay out servo symmetry. 3 servos can fit in each rectangle (pic 1). But i have no idea how to set this up properly. It also will not let me click on the the other buttons with out the symmetry.

I pretty much know what all the buttons to the right do but I’m a lil confused here. When I hit add, it adds all the servo extensions to the bottom window. I think I’m supposed to write the code for the servos listed but it won’t let me add text to the lines. And when I hit modify nothing happens. Insert also adds the servo positions. (Pic 2 bottom widow) and what are the import export buttons for.

[IMG]http://i1254.photobucket.com/albums/hh601/Duhjoker1/Quadruped/15898824-32F1-4CDA-ADAE-74F12477031B_zpsikkf1huf.jpg[/IMG]

Hmmmmmm. Nope still won’t
Hmmmmmm. Nope still won’t let me do either of the above.

Ok I did some experimenting with the program. Here's what I have

Here are couple pics of the torobot program…

The first pic shows the main screen broken down into three parts, upper window, lower window, control panel ( left widow).

When you hit panel a sub menu appears showing all the different channels and there serial positions. You check off which serials your not using then close the window or go ahead and arrange your serial blocks into your preferred arrangement.

The tabs at the top let you decide which robot your building. Going right is the remote button that brigs up the PS2 controller screen to choose your executable demands.

The options button brings up a window that lets you choose the language. Angle or PWD? And the maxpwm and minpwm and another box that’s not translated. Plus uninstall and restore factory settings.

Next to that is the initial values button that so far does nothing.

I pretty much know everything about the control panel but …

When you hit the add or insert button it drops off a line code in the Bottom Window showing all the #included servo servo serials. I’m pretty sure I’m supposed to add my code here but it won’t let me click the lines to add code.

Nothing happens when you hit the modify button with the servos in the bottom window or not.

There is an import and export button too that give options of the full value of the imported or into relative value on import and the options full value of export or relative value of export under the export button. Might be used to import and export code?

I just clicked on each option and each one added an open screen for Arduino and Visual studio and one marked library. So now I’m pretty much conviced these are for code insertion. But when you click on the inner buttons it erases the #included servos list in the Bottom Window.

Ok now the parts I really don’t understand the Bottom Window options.

Ok by clicking on the “O” ( as in October ). Four buttons appear.

Setting button brings up the screen in pic two. And says please drag the symmetry servo into the same box. Have no idea what this means except to drag the serial blocks into the squares but I’ve tried a few different things and no go.

Next is the set to initial values button that does nothing because the symmetry is not set.

<m.left is next and also does nothing because of the symmetry

<m.all> also does nothing because of the symmetry

And m.right> which does the same as above.

Also in the instructions ( back to top pic ), it says something about using the slider function on the the main screen servo serial blocks but I have no idea why or what it does.

Thank you for your help.

Update:: the import buttons import .LIB. I tried to get it read some arduino files but it still only brings up the read me file. Should I write my code in notebook and save it, Then import it?

All right as you can see in
All right as you can see in pic 1 above, the main screen is split into two windows. The large window shows your servo serial blocks. Look below that and you’ll see the bottom window. It looks like the background of visual studio when coding. Any way when you import the code it goes in the bottom window. To left of the these widows is the control panel buttons.

…(Another) it was sold to me as arduino compatible. I think it was my syntax. The error I get is that “void setup(){” is not a valid integer value. I’ve got the { to close to the () after voidsetup(). Thing is I corrected that in note pad and saved it. And when I import it, it’s still at the first value. If it’s not arduino what code do you think it uses?

i fixed the code it was
I was using the wrong sketch so I found the right one and imported it and i fixed the void setup() error by moving the “{” bracket. There was also a " ; " missing at the end of a function. Now I’m getting void loop() is not a valid integer.

update it was syntax like I thought. I added an extra space between void and loop now the program runs a cycle. When the code imports even though I'm picking import full value it bunches every thing together so extra spaces are needed. now how do insert the servo I want controlled into the code?

Got curious and just started
Got curious and just started putting the serial blocks for the symmetry in the order that they appear on the symmetry screen except in the blocks two at a time. Now when I press the <m.all> or the others nothing pops up but I can’t modify using those buttons. Weird. What can be done is once the code has been imported you can delete lines and insert copied code by right clicking the mouse.

Ok I imported all three example code pages onto the code screen and clicked run. It executes just fine but I don't think that's the way it's supposed to work. I think I need to import a file then save it to the board then repeat with all the three but each file has the same .txt end on the name. How will it know which file to do what.

Also where is the best place to go to get help deciphering the code examples so I know how they work and how to use them?

Ok looks like I’m gonna have
Ok looks like I’m gonna have figure out that equation. I certainly can’t afford $80 right now.

-I found out something interesting. After looking up some of the Lynxmotion kits and seeing how expensive it would be to go that way, I decided to go back to the Torobot program. After watching an introduction to the SSC-32 software I discovered some thing. There are two ways to control it using the software. First by constructing a set of code using your notepad and importing it to your GUI or by using the sliders to set what you want each servo to do then hitting the add button. After doing so it adds the sequence you just created to the code screen. Then you hit run to test it and download it to the board. I think at this point it will give you or let you create an action group code to add to the wireless controller screen. So yea I will need help with that equation. But once I figure it out it will be easy to load it.

-I also need a good tutorial on servo speeds and time or whatever you use to make them move.

------------------------------------------------------------------------------------------------------------------------------------------------------------------------------------------------------------------------

I solved the servo symetry problem too. After choosing a type tab at the top of the serial block screen. Click the “O” in the left of the bottom code screen window. Hit the setting button and the symetry box will appear. Now I haven’t figured out what use it really has but I can tell you this. Each rectangle holds 1-3 serial blocks. Hit the panel button in the top left hand of the serial screen and you’ll see a screen pop up showing you 4 rows descending showing 4 sets of 3 numbers. Use thus as a guide and just put each serial block into the symetry as to how it corresponds to the panel.

------------------------------------------------------------------------------------------------------------------------------------------------------------------------------------------------------------------------------------------------

This is what it lets you do. Make your speed and time adjustment by either using the slider or typing it in manually. Then you can hit any of the buttons in the bottom code screen and will move the sliders to a new position or modify the string. Haven't figured out what it's doing really and why it's useful and it seems random but I'll keep investigating. Now using these functions to create a string that can yield up to 32 servos movement at once.

------------------------------------------------------------------------------------------------------------------------------------------------------------------------------------------------------------------------------------------------------------------------

So I guess now I just need to learn the servos part and how to use the IK equations.

-----------------------------------------------------------------------------------------------------------------------------------------------------------------------------------------------------------

-This first pic explains the the sliders as mentioned above.

1C02D41A-09C1-4796-A086-51122F0D5F77_zpsexjwbma8.jpg

This explains how to add your created action to the code screen for testing and downloading to chip.

8002DB68-A03C-4219-AF99-23EB6D505446_zpsc2dp7cdy.jpg

This shows how to download your AG and apply it to your wireless controller.

50D53E72-A70A-4BD6-9936-74EBBA3D3BD6_zpstipcsg5a.jpg

Google is your friend. I

Google is your friend. I searched on “ps2 pins” and got many hits.

One page that had good images is http://store.curiousinventor.com/guides/PS2/

Oh yea Google is very much
Oh yea Google is very much my friend. Didn’t think to search for that particular though. Turns out Duane is right. I got an email today from Torobot IT who said that only the 32channel board is PS2 handle compatible.

Ok I haven’t tried this out
Ok I haven’t tried this out yet but here’s my new sequence. Each sequence is done one at a time for a total of nine sequences to propell forward.

1= lift legs 1, 3, 5

2= rotate legs 1, 3, 5 forward

3= lower legs 1, 3, 5

4= lift legs 4,2,6

5= rotate legs 1, 3 ,5 reverse

6= rotate legs 4, 2, 6, forward

7= lower legs 4, 2, 6

8= lift legs 1, 3, 5

9= rotate 4, 2, 6 reverse

Need to stop for a couple
Need to stop for a couple days and do a rebuild. Having trouble keeping the servos centered because everything keeps getting loose and stripping out. May need to use glue.

Any tips?
Any tips?

Lol. I meant with getting
Lol. I meant with getting your servos locked in on the body and leg pieces so I’m not resetting Neutral every time I try to use it. Yes sir I did read the replies and thank you. just haven’t had a chance to try them yet.

I’m ba-ack!!! Been waiting
I’m ba-ack!!! Been waiting on parts. I went ahead and just got the upgraded Torobot 32. The upgrade comes in the form of an annoying beep that goes off when the servo power is not connected. I would like to remove but not sure how yet.

Still trying to get 2.0 built right. Hope to try sequencing in the next few days.

Ok on your second post about
Ok on your second post about the sequencing you mention mid point. Do you mean to move them 45degrees?

here you I meant mid
here you go I meant mid position which you just explained but here’s the link

https://www.robotshop.com/letsmakerobots/torobot-software-help#comment-130566

I ran up on the Phoenix Hexapod code, could this be adapted to work with my board? Can you send a link to or do you know of any source code that can be adapted? From the software examples for the Torobot, it seems to need the same type files as the Phoenix.

Also, the above says how to move the Coxa and the Femur, how should I be moving the tibias during these motions.

Also looking for the Nuke editor or pypose. I followed the links to the Arbotix Google repository and downloaded both zips but neither one came with a single .exe file. I've typed in nuke editor and pypose in every way possible but keep getting the same pages listed that take me to the same places to download it and no EXE.

What’s the gait called in
What’s the gait called in this video 20 seconds in. It looks like it’s only moving one leg at a time.

http://youtu.be/A7hNHw3Dwn8

Ha!!! Now don’t I feel
Ha!!! Now don’t I feel stupid!!! I didn’t even see that.

Yes please any thing you can
Yes please any thing you can find on host to sequence a 12step ripple would be awesome I’ve been looking and can’t find much but vaguery.

Ok so before I started the
Ok so before I started the walking sequence I spent a day creating a few action groups. The first is spider neutral. Then I did spider legs up to rest it in when turned off. But I had fun creating spider attack. It brings the middle legs up while squatting the back legs a hair lifting the front of the bot, then the front legs come together and do an opposite wave up and down with each other.

I just got my successful walk forward using the sequence you helped me with. It's slow though, there's a pause between each sequence. The other bots I've seen using this controller are smooth walkers. There's no way I can do the ripple gait using the sequencer. After watching it for an hour to write the sequence I caught on. sequence goes a lil like this though......

1st leg up-rotate-drop

5th leg up rotate-drop

3rd leg up-rotate-drop

Next 3 sequences include 1-5-3 moving reverse at same time

4th leg up-rotate-drop

2nd leg up-rotate-drop

6th leg up-rotate-drop

And so on........

As you can see I need each leg to lift rotate and drop in the same sequence. I could probably code that if I understood the code.

So I did some experimenting
So I did some experimenting tonight with the PS2 controller and managed to download and enable all four of my lil functions including walk. There’s about a 2 1/2 second delay from the handle to the action of the robot. And I haven’t figured out whether the directional pad cross is hyper or not.

Well the walk gait does work though I need to extend it a couple sequences and I'm happy with the motion but it's way toooooo slow. Any ideas on how I could make it quicker?