My LMR Start Here - CDR ( Compact Disc Robot )

    This is my first robot.  I started fiddling with microchips as a break from high level programming.  I like feeling more in touch with the low level operations I rely on everyday.  This little guy started life as a version of Frits' start here robot.  I called him KiBHuJu ( Kit Bashed Hunk of Junk ).  The Microchip Pic 16F88 is programmed in Assembly on Linux, using gpasm.  The programs are loaded with picp.  Testing was done with gpsim.  Props to all who work on this toolchain! 

    I couldn't wait for parts, so I bought the Ping Ultrasonic sensor from Radio Shack.  I had a Parallax servo from a Basic Stamp kit I bought to get started in electronics.  I was still waiting for the motors, so I soldered up a mess of a board and got the servo and sensor working.  Still, waiting on Solarbotics, I added the piezo speaker. 

    The motors arrived, and I promptly trashed them ( see my blog for the whole grisly story ).  I decided to rebuild the board, so that I could use it in many development projects.  The board now looks like this:

Dev Board


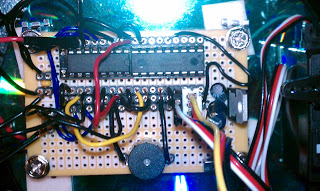
    It could use a few more things yet.  It has two 18 pin chip sockets, a piezo speaker, a 5V regulator, cap smoothed pins for 2 motors, and a power switch.  What it needs is a reset switch and a header for bootloader programming.

    Here is the schematic:


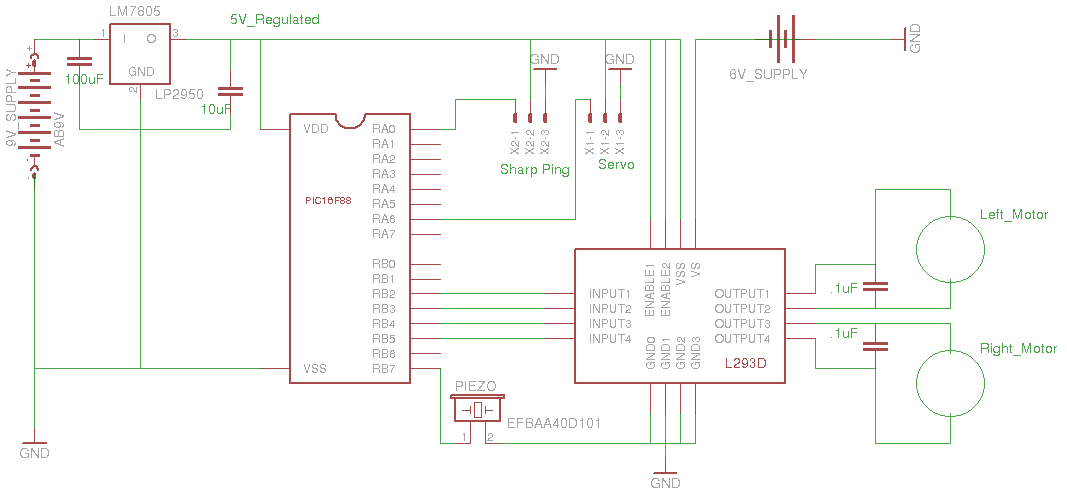
    The power solution is less than optimal.  I used 4 AA rechargeables for the motor supply.  I decided to wire a second 9V battery in for the board supply.  I am really an electrical tyro, so I took the safest approach.  For me, the fun is in programming the chip in a low level language.

Here is the bottom of the robot.  You can see the power arrangements.  The wires run up through the center of the CD hole.


    This was definitely a learning robot.  I learned about line noise, rebuilt the gear motors, got the peripherals working, and learned that I want a bootloader. 

    I've started work on a bootloader.  I've got the Pic code done.  I'm just about there with a python programmer.  I need to add a reset switch and header for bootloader programming to the board.  That and some "neating" stuff like shrink tubing for the connections.  I also need to build an RS232 shifter for programming.

    This is a really satisfying hobby.  Thanks so much for providing a space to share!

Explores via Ultrasound, plays "Zelda's Lullaby" when stuck

  • Actuators / output devices: 2 GM9 motors, 1 Parallax Standard Servo
  • CPU: Microchip Pic 16F88
  • Operating system: Open SuSE 11.2 Linux
  • Power source: 6V rechargeable for motors, 9V battery for board
  • Programming language: Assembler
  • Sensors / input devices: Ping ultrasonic
  • Target environment: indoor on smooth surfaces

This is a companion discussion topic for the original entry at https://community.robotshop.com/robots/show/my-lmr-start-here-cdr-compact-disc-robot

video?

i like it :slight_smile:

can you post a video?

Working on it…

Thanks.  I’m pretty happy with it.  I took the board design from the picaxe board that Frits recommended.  I like the idea of female headers on the board rather than male headers.  Less likely to short.  You can see better images on my blog ( link on the post ).  

I’ll get around to video as soon as possible.  I wiped the chip for now.  I had the hardware built like Frits’.  I rebuilt it to use the CD as the base, so that blew the turn times.  Rather than go through the pull the chip–>program some values–>plug the chip–>test, cycle, I thought I’d finish my bootloader to speed up the process.

I’m working on my bootloader.  It just needs the code to rewrite the user’s first 4 instructions to an area in the last 192 lines of the program memory and recompute the crcs.  Once I have that done, I need to write some echo code to see if the pic is receiving the lines correctly.  Then I’ll unleash it

When I have the turns again, I’ll publish a vid on Youtube and link it here.  If you are interested, I’ll make the bootloader code and python programmer code available, too.  It’s pretty basic.  I’m working on the “good enough for now” principle.  In Agile programming, I’m at the “Make it Work” stage.  “Make it Right” and “Make it Fast” will follow.  

I’m also going to change the bot to use the Sharp IR sensor instead of the Ping.  The ultrasonic is a bit slow.  

What made you decide to use

What made you decide to use a bootloader over, say, ICSP?

Glutton for Punishment?

I do this for relief from the everyday challenges of high level programming.  I love the challenge of solving low level interface programming.  ICSP has been solved even for Linux users.  I found some bootloader programs that had programmers in Windows.  I thought it would be cool to write my own for Linux and pass it on for others to make right.  I may even do a GUI in TkInter ( but I’m more of a command line inteface guy ).

nice robot

I tried using a boot loader, but found it to be a pain. I use some kind of jdm programer that is just a cable from the rs232 port and 3 resistors, but it works well. I would like to make a usb programer like usbasp that is avaiable for avr’s, the problem is unless you want to stick to low voltage programing, you loose one pin, else you program in high voltage. Its just a pitty pics aren’t as straight forward to program than the avr’s… maybe one day they will be.

Keep up the good work on your robot. I like what I see, and it gives me a couple of ideas for my own.


Thanks!

You highlight a lot of the things I thought about when deciding how to program it in circuit.  I wanted the programming to have minimal impact on the board.  I didn’t want to tie up an extra pin on voltage.  I wanted to be able to program from both serial and USB.  I also wanted to play with the Pic’s ability to rewrite its programming space in code.

So I settled on the following.  I bought a USB to serial adapter.  It works great.  On my OpenSUSE machines, it shows up as /dev/ttyUSB.  I am using Python with a free module called uspp ( Universal Serial Port Python ) by Isaac Barona ([email protected]).  You can get it at: http://ibarona.googlepages.com/uspp.  It gives you a basic serial port class to open, close, flush, read, write.  The Python is, of course, cross platform as is the uspp module.  I plug the adapter into an RS232 level shifter.  It terminates in four wires ( Vcc, Gnd, TX, and RX ).  

I agree that AVRs are much simpler and straight forward to program.  I like the simplicity of the Pic’s assembly language, though ( aside from having to execute 2 instructions to move a value from one register to another and the funky status flags for subtraction ).

EDIT: ICSP - What a Great Idea!

After a number of things changed ( like my Python install going weird on me and moving to the 18F chips ), I bit the bullet and bought a PicKit2 programmer.  Now, everything I do is via ICSP.  You were right all along.  I’m learning…slowly…  Since that switch, I’ve designed and either built or had built a number of carrier boards for my PIC chips.  All of them have an ICSP header. 

I had a lot of fun building the bootloaders ( both the PIC code and the PC code ), but ICSP is way easier.

No doubt you learned a lot

No doubt you learned a lot by writing the bootloader code - I just like the power and convenience of ICSP =)