So in addition to my previous question about the ground wire from ssc32 to botboard your comment above about power for the Botboard… I would want all powered by 6v battery and not usb or 9v so how is the acheived exactly? I see the ps2 also has a 5v wire so just need to understand how to make sure the power situation is set up properly… I have the 6v wired into the vs1 on the ssc32 which the initial instructions called for.
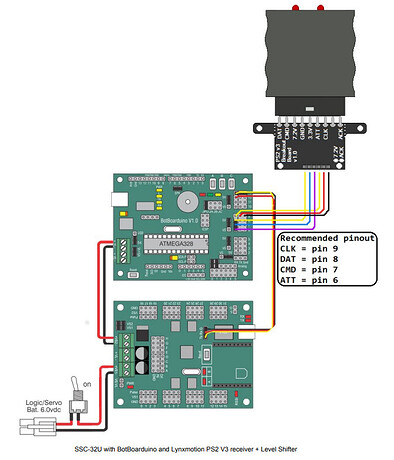
In the reply above, the “jumpers” were specific to the BotBoarduino. There were jumpers on the older SSC-32 board, but the SSC-32U did away with them in favor of a button to change the baud rate. If you purchased the Phoenix with electronics, there should be a spare cable which allows you to connect the Tx, Rx and GND between the two boards. As per the diagram, you’ll also need to connect the VL terminals together (ensuring positive to positive, and negative to negative).
Ok Thanks… I feel as if I’m getting somewhere now… I will connect the VL terminals together on bother boards… So then Connecting the Tx and Rx from 32 board to to 12 and 13 pins of Botboard without ground is OK… correct… due to VL’s being connected…
tx
Sorry to clarify my last statement… the wiring diagram in the instructions does not show where the ground wire goes in the botboard…from Tx and Rx
It shows the Red wire going in pin 12 and the yellow wire going in pin 13.
Apologies - checked out the link above and it doesn’t show the SSC-32U, but rather the old SSC-32. We’ll update that soon.
Use the following (from page 23) for wiring between the SSC-32U, BotBoarduino and PS2:
It’s always best to understand the electronics as fully as possible, so we suggest reading the guide above, but also the BotBoarduino:
https://www.lynxmotion.com/images/html/build185.htm
Regarding wiring communication between the boards, just ensure that the Tx from one goes to the Rx on the other, and GND to GND.
Hmm… interesting… yes your instructions definitely need updating… So the question still remains… The Rx and Tx and ground leave the 32 board… the Rx goes into pin 12 the Tx goes into pin 13… where does the ground go?? pls be specific…
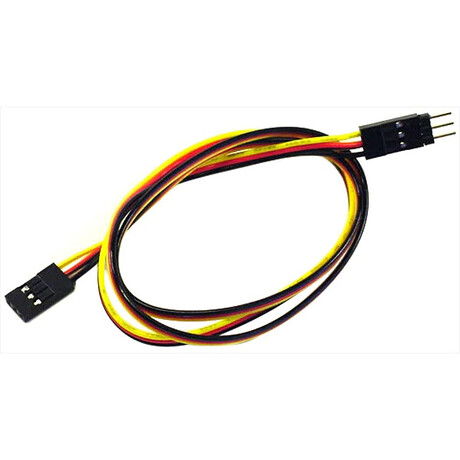
Also, the terminals for the Ps2 connector show as female in your diagram… they are a male in real life… You do provide a purple blue and yellow male to male connector in the package… However for the rest of the connector of the ps2 you provide another male to female connector which cannot be used… I will have to source wires you don’t provide… Also the VL to VL wire required to connect the boards is not provided in the package… I’ll have to source that as well… Hopefully in the bowels of my basement…
Further clarification… the package provided with the kit includes about 10 male and female the other end connectors… none are required…
what is needed is female to female connectors… which are NOT provided…
The Phoenix code, uploaded to the BotBoarduino uses software serial to send commands to the SSC-32U, which is why Tx needs to be connected to Rx and vice-versa. The ground pin on the SSC-32U is marked with G:
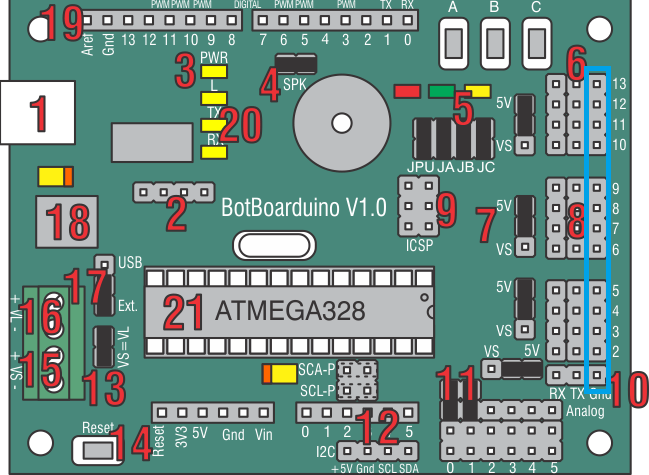
On The Botboarduino, the outer pin of the 3-pin headers is Gnd (ground).
Also, the terminals for the Ps2 connector show as female in your diagram… they are a male in real life… You do provide a purple blue and yellow male to male connector in the package
The wires included with the PS2 kit should be female to female, allowing you to plug them from the PS2 adapter board (male) to the standard spaced male pins on the BotBoarduino. If you need extensions, you can either use a male to female, or another female to female and male to male pins.
yes the 32 board has a ground pin next to rx tx but where does the ground go into the botboard… FYI… The people who pack your Pheonix Hexapod only pack jumpers that have male one side and female on the other side.
Can you confirm if that’s the RC servo extension cable? Notice that the end on the right of the image is actually a male to make header inserted into the female header, and the 3-pin male to make can be removed. If that’s not the case and you did actually receive a male to female, can you take a photo to provide here?
All of the pins here are ground on the BotBoarduino:
wow… I’m just reading this now… yes they are removable… I’m sorry… and you have answered the ground question… tx
So some good news the legs have moved for the first time! At least one leg… when I power up and start the leg calibration program it still says no connection where the version should show… one of the legs moves up about 45 degrees for a few seconds and then down 45 a few seconds later… I try to hit the 1500 button but no reaction… the leg stops moving up and down when I close the Hexipod calibration program… So I’m still stuck at the point where it does not seem to connect to the calibration software properly…
Commands can be sent to the SSC-32 using the serial pins on the board. There are two ways
the BotBoarduino can be connected to the SSC-32
- Direct serial connection
● TX from the BotBoarduino to RX on the SSC-32U
● RX from the BotBoarduino to TX on the SSC-32U
● GND on the BotBoarduino to GND on the SSC-32U - Software Serial (allowing you to connect other devices to the BotBoarduino’s serial pins).
● I/O pin 13 on the BotBoarduino to SSC-32 TX (yellow)
● I/O pin 12 on the BotBoarduino to SSC-32 RX (red)
● GND on the BotBoarduino to GND on SSC-32 (black)
I’ve switched from option number 2 as per diagram you sent to option number 1 which got the one leg moving result… still not connecting to hexapod calibration software for some reason though…
I don’t think there is any firmware installed my the 32u board…and this could be the problem… how do I get it?

No, it’s highly unlikely there is a firmware issue on the SSC-32U. DO NOT update the firmware on the SSC-32U. If you’re using Lynxterm, you need to modify the Setup (just under COM) to ensure it’s communicating with the board at the right baud rate etc. That likely explains the jibberish you’re seeing on screen. Indeed Lynxterm can be used to calibrate the servos instead of the Hexpod program.
115200 is what the com port is set to in the device manager for pc and that is the same bitrate under setup for the lunx ssc 32… There is a red and green led showing on the 332u board which I think i saw somewhere is Baud 115200. When I read your post I got excited that could be the answer… Could the baud rate be different on the board?
sorry for the typos in my reply… should I change the baud rate I wonder…
Tried different Baud and same Jibberish… The Lynxmotion ssc32u gives instructions how to change the baud… it says by the way that the board is shipped… at 9600 baud but it has always been at 115200. I never changed it till now… but it make no difference… still jibberish.
Actually it does do a slightly different type of jibberish based in the baud… the led’s on the botboard by the A B C buttons are all flashing three lights red green and yellow… that seems to never change…
Eric Nantel says in the Botboarduino wiki…
The image above illustrates the shorting bar jumpers (the black rectangles) as they are on the board as it is shipped. The jumpers are used to set operating parameters for the board. It should not be assumed that they are correct for your project as changes are likely to be required. Please consult the tutorial for your project for the proper shorting bar jumper positions.
I just need someone at your end to tell me the exact jumper and wiring configuation for my set up… Not just provide links and wish me the best… nothing personal to anyone… you are good folks trying hard to do your job… tx


