Little 8

Edit: Check out this nice clone: https://www.robotshop.com/letsmakerobots/node/8386


From building big, nasty, with large shovel, 2 cores, multiple sensors, soundsystem etc, I got tired of that.. and decided to see what fun I could have with a little Picaxe 8 on a board ($16, total prize for robot is about $40).

Version II of this fella here: https://www.robotshop.com/letsmakerobots/node/101

I have since recieved some interest in how to build this extremely easy and cheap robot, and so I hereby transform this post to a small and simple tutorial:


Shopping list:

Can be bought from Picaxe:

You can get this from anywhere:

  • 1 9V battery
  • Some sticks and something to cut them
  • Screwdriver
  • Soldering iron and led
  • Some pieces of wire and something to cut it with
  • Some different types of glue or tape etc
  • a table-tennis ball and a knife to cut it
- And then you need some motors with wheels. I recomend these, used in my robot.


I like the challenge of only having 8 pins and 128 bytes of code etc. But be aware; you get a funny robot, but it is blind, can only sense a bumper in front, and you really do not have much memory in it etc.

What I did after building this, was i set it up with Easy Radio serial wireless input on the only pin left for anything. This made it possible to control this little robot by another robot, which opens new windows etc.

Some friends and i in our local club also had a contest of making it draw the number 8 on a piece of paper with a marker glued to its back.. Good fun little fast and chep robot!
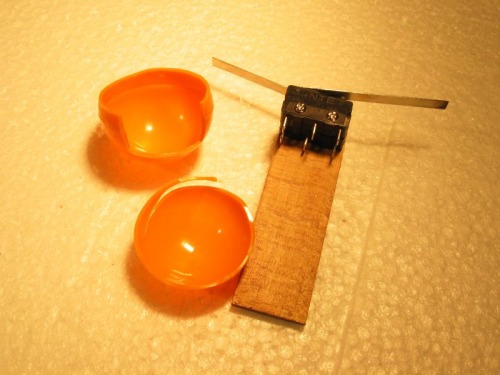


A stick, some switches, and a sliced up table-tennis-sized ball for "the third wheel"
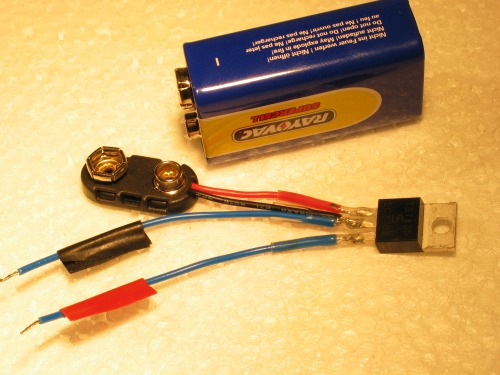


To get the 9V down to 5V, I use a voltage regulator.
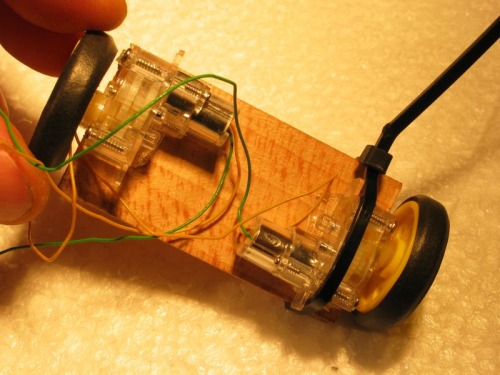

I was just mounting with some glue, the strips just tohold things in place..
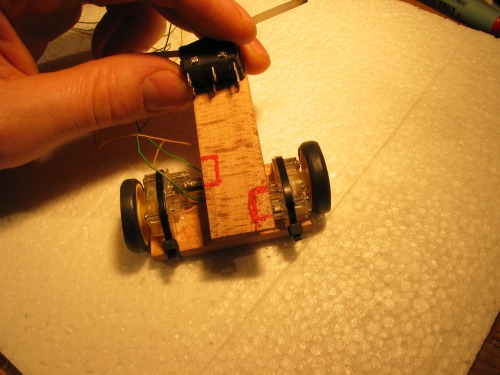

An angle grinder may look like an extreme tool for such a small job - but I use it quite often. Just turn it on, hold it steady against something, and anything you stick in there is just vanishing, nice and smooth - compared to cutting such small parts. I also use it for acrylic (Plexiglass), again it is perfect to make little cuts and markings.
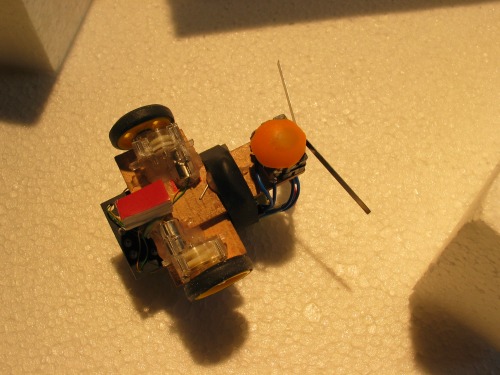
Just follow the instructions that comes with the board - it cannot be more simple, hook up the 2 motors.

The motors I recomend are incredible! Fast and strong, even though I only feed them 3.5V due to the 1.5V drop from the Motor Driver. So I actually had to make a "tale-bumper" (red square) as it was lifting the front a little too much :D With the bumper on it turned out quite cool, as it is just as capable of navigating on only the rear-wheels.. there is nothing else but a glider in front anyway.

All needed now is some code and the battery.

TIP: Get rechargeable batteries (and a recharger) - Or you will soon have used as much on batteries as on the Robot itself!

REMEMBER: If you make anything like this, to take a picture and show me :)

Here is the code used in the robot on the video. Don't mind that the names of the sub-routines does not make sense to you. Fact is that nothing in this code makes much sense, it was just the fun I had at the time when I shoot the video :)

I will have a closer look at this soon, but on request, here the code from the video:


symbol fw = 20
symbol bc = 200

b0= 175

''''''

dav:
random w5

for w3 = 0 to w5
if pin3 = 1 then
gosub bum
end if
next w3


b0= b0 +1
random w5
if b0 < w5 then goto hest

random w5
if w5 > fw then
high 1 low 0'ForwardRight
endif

random w5
if w5 > fw then
high 4 low 2'ForwardLeft
endif

hest:

random w5
if w5 > bc then
high 2 low 4'ReverseLeft
endif

random w5
if w5 > bc then
high 0 low 1'ReverseRight
endif

goto dav

bum:
w4 = 32212
return

high 2 low 4 high 0 low 1'Reverse
pause 300
if b0 > 175 then
high 1 low 0'ForwardRight
high 2 low 4'ReverseLeft
else
high 4 low 2'ForwardLeft
high 0 low 1'ReverseRight
end if
pause 300

b0 = 175
return

Very cheap but fun little beginners robot. It think' it has a brains within a Picaxe 8

  • Actuators / output devices: 2 tiny motors
  • CPU: picaxe 8
  • Operating system: Picaxe
  • Power source: 9v battery, 5v regulator
  • Programming language: Basic
  • Sensors / input devices: 1 switch (2 paralel coupled)
  • Target environment: indoor, in scenes and rings

This is a companion discussion topic for the original entry at https://community.robotshop.com/robots/show/little-8

Angry little robot!

I like this one! It seemed to be quite angry when it was stuck between those styrofoam walls :-). I guess you could do micro-sumo with that kind of robot! Very challenging to build small robots. Isn’t there already a voltage regulator on the board? I like the motors on the robot… what kind are they and what’s the gearing ratio?

- Jimmy

I VERY much like the motors

I VERY much like the motors as well - have put a link in there, under the picture!

They coool!

Don´t think the board has any voltage-regulation.?

I have just modifyed the bot, now it is radio-controlled! (it still is just a picaxe8 standard with only 128 bytes available!)

Will make new entry later today, showing off it´s remote abilities with me controlling it with an old joystick… And then, I will make it a slave for a normal sized little sumo; Sumo sees, and Sumo sends commands to Little8… Gonna be fun!

PS: Note the total building cost for this project, and I have even set it quite high, it is VERY cheap! (30-40 USD in total!)

/ Frits

Nice Little robot

Very nice, wondering if another power source smaller in size, would be possible

Yes, of course. I never

Yes, of course. I never really wanted to make it as a small robot - only all the parts I was using was small, and so… :slight_smile:

But you are right, the battry is really big for the rest - I have an old mobile-phone, I may try to see if one of the batteries will do. (And the phone can still charge, so I have a nice charging-unit there) Just hope it will not explode, it is most likely not made for the kind of load, even though the motors are small etc…

Got it remote via wireless serial yesterday, it is the coolest little joystick-controlled trick-performing thingy, will see if I can make a video of it etc later today :slight_smile: (And next I want another robot to remote-control it, that´s also gonna be a lot of fun, so many projects…)

/ Frits

Part II

i made a part II now:

https://www.robotshop.com/letsmakerobots/node/101

/ Frits

hello fritsl

please post the code for this robot i like this robot…cool movie very good robot for beginners
<><><><td UNSELECTABLE=“off” height=“250” width=“100%” vAlign=“top” id="HB_Focus_Elemen</>

Hi Tim, welcome :)I have

Hi Tim, welcome :slight_smile:

I have posted the code as used in the video, but hope to post some better code soon.

/ Frits

ok so im like completely new
i have had a fastination with robots for a long time now and i tried so many times to build 1 but i always failed (mostly because i was 13). i am 15 now and i was hoping u could give alittle advise for a beginner, should this be my first real robot or do u suggest another? hope to hear from u. (your robots ROCK)

yes

This one seems quite easy. It’s just two motors and some switches, which makes the programming easy to do. Start with this. Then, when it works, add distance sensors and other sensors. Just remember, that with the Picaxe 8, you don’t have that many ports, so there is a limit to the number of things you can connect to it. But it’s a good way to start.

And most important. If you get stuck, ask in here, instead of giving up. Even if it seems like a stupid question. We have all been beginners at some point and had the same problems as you might run into.

Have fun!

A teensy bit of a hint
I cannot exaclty make out from the pictures how you wired the switch’s. I have that same project board sitting here in front of me ready to go. If you could post something i will be checking back for maybe a picture or something, thank you soo much.

i am on my way out now, but

i am on my way out now, but here is a hint:

Both switches make full connection. Only one needs to be "on" for the whole thing to be "on".

I am not using the "pin 5" - option or what it was… Only the single pin… was it pin 3? Or the other way around?

Sorry, this may not be much help, I will get back to you in 3-5 hours :slight_smile:

(send me pictures of your project)

/ Frits

Ok finished a variant.
Well I burned out a couple of motors by accidently glueing their bearing whilst trying to glue "wheels" to their shaft, but found a good source for small, fast motors & got this together :

|x

I hope to fiddle with it a bit more, it needs some gear reduction… basically, it cannot support the weight of the battery box as is. I plan on fiddling a bit more when I get home, to make it more reasonably shaped. And try to find some geared down motors. I have yet to find a ready source for such in "found" parts sources. I also edited the code a bit, the one you pasted, has a return after the w4 setting in "bum" and I am not sure it would work with it. It seems to wrok better without it.

Hahaa… Thant is going to be

Hahaa… Thant is going to be cool!

Please share it (top right corner) - it is way too much me posting robots in here!

i see you are using 3 1,5V cells. That only gives you 4,5V. Then there is a voltage-drop in the motor-controller on 1,5V, and so you only get 3V to your motors. i would find some how to get 4 batteries in there!

…And yes, the motors has to be geared. The motors I link to are really very good, and even expansive, wothr it, I think. On a robot that almost only consists of motors, you need good motors to get a good robot :slight_smile:

How cool that you are building that, it makes me very happy.

And yes, it looks as if you are right about the code! I am trying to get time for it all, and I will re-write that code!

I have now found my "little 8", and regarding the switches;

connectswitch.png


your switches may have 3 poles. You should find the 2 on each that - when switch is "touched", is making contact. That will make "pin x = high".

let us say that the yellow dots above here are those poles, then connect to the board as shown, and you should be on your way; no matter which switch is touched, pin 3 will be "high".

i know that the manual says something about pin 5 and 2 switches in paralel or something, cant remember.. Just remember that I did not understand it, and made the above :)

Have fun!

/ Frits

Fritsl, Hello!
YEs, I have looked into swapping my 3 AA supply for a 9 volt.
Didn’t have a voltage regulator handy; but Igot one the other day. Next time I get a change, I will re-work this with a 9 volt battery & some gear down. Don’t bother with the Pic-axe pin 5 thing, I re-read mine & I am pretty sure it’s just usable as another place to screw down wires & it’ll act as parallel. your way is smoother. I’m trying to find nice buttons like yours with longer tabs, my radio shack only has roller wheeled ones. I like my Foam body for this bot, it gives it a different character & is cheap & easy to shape with a pocket knife. I am going to expirement with hollowing it out & slipping the circuit board inside. I’ll break this out into a seprate project tonite.

There is a forum thread

There is a forum thread about where to find “Little 8”-components in the US, here

/ Fritsl

Code
Is the code used to enter into the Picaxe program? Sorry, I’m new to this

The PICAXE editor is
The PICAXE editor is installed on your PC. The code is entered into the editor and it compiles it and sends it to your robot.

Thanks
Thanks and I have one more question. What does that specific code tell it to do exactly?

Exactly what it does on the
Exactly what it does on the video!