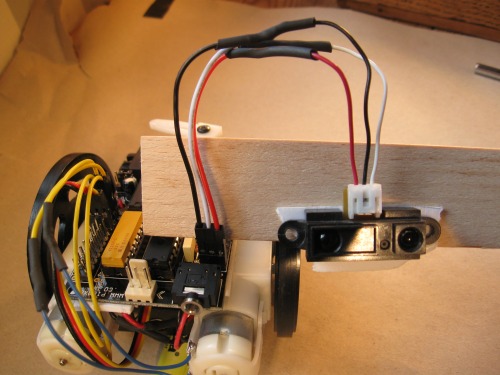
Your pictures are blurry where they need to be sharp But it appears to me that 2 wires on the sharp needs to be the other way around Hang on, will double check…
Yes, you are right, sorry, I could not tell from the original pictures.
OK; my next bet is that you have your test setup under “bad light” - try to work under a different light source. IR can be disrupted if the lamps are blinking in the same area. (none of this is visible) It is a well known issue with IR.
I turned all the lights off. The only device that could IR is a remote controlled speaker which is off, and the computer screen, which is turned the other way. The problem still persists.
I turned all the lights off. The only device that could IR is a remote controlled speaker which is off, and the computer screen, which is turned the other way. The problem still persists.
I turned all the lights off. The only device that could IR is a remote controlled speaker which is off, and the computer screen, which is turned the other way. The problem still persists.
Yep, I made a longer neck so the camera wouldn’t touch the wires all the time when looking around. But the higher it is, the more difficult it is to avoid obstacles that are low I think.
If I want a next project beyond this detailed tutorial, I need to really understand what I’m doing, and that might be a problem
I’ll just improve the programming for this one and maybe the body. And see how long my robot-attention-span lasts…
I recommend your next project is to take everything apart, find a speaker and an LED, and see if you can make a simple setup of a blinking LED and a beeping speaker
I am going to buy your controller but i have a few more questions:
Can i use a CA-53 cable to replace the CA-42 in your " Make your own FTDI cable" tutorial?
And to program the controller, can i program it using the code stated in the “Start Here” robot tutorial or do I have to modify the code to suit the ‘ubotino controller’? If so, can u tell me what changes should be made to the code? Or, could you send me a “Start Here” robot code written by yourself?
i just finished making the hardware part of the robot, and while downloading the codes to the micro-controller, i found out that i donot have the RS232 to usb adapter, (i bought the serial download cable for picaxe), so i wanted to know, will that make any difference if i use any serial to usb adapter? Or do i have to get the “Prolific USB adapters”. i dont want to wait long for ordering :( and its pretty expensive too. Please reply soon.
I am haiving some error with the sensor when using it, i am using the sharp 2Y0A21 F12…when used in my circuit, when only reading the adc values from the sensor, it gives back a constant reading of 90-100 even if nothing is in front of the sensor!! I tried putting a 10 uF electrolytic and .1 uF non-elec. between GND and VCC right on the sensor, but it only brought the maximum false reading down from 100-115. This is a huge problem, since it reduces the maximum distance into about 1/3 - 1/4 of the normal. As in, when I have the sensor pointed at the ceiling , it gives a reading of ~ 90-100. As such, it has greatly reduced my robot functionality. As I’ve said, when there is a object in range…the sensor works just fine, but when nothing is in front, it starts to act weird. Due to which i cannot initiate the programming…Please reply soon… Thankx


 But it appears to me that 2 wires on the sharp needs to be the other way around
  Hang on, will double check…