

How to Make a Drone / UAV – Lesson 1: Terminology
How to Make a Drone / UAV – Lesson 2: The Frame
How to Make a Drone / UAV – Lesson 3: Propulsion
How to Make a Drone / UAV – Lesson 4: Flight Controller
How to Make a Drone / UAV – Lesson 5: Assembly
How to Make a Drone / UAV – Lesson 6: Get it all working together
How to Make a Drone / UAV – Lesson 7: FPV & Long-range
How to Make a Drone / UAV - Lesson 8: Aircraft
Lessons 1 to 6 of this tutorial series involved the design considerations behind building a custom multirotor UAV / Drone. Lesson 7 however is entirely optional and describes the parts used in First Person View (FPV) applications, and long-range control. This article is oriented more towards “in field” RC applications as opposed to indoor flight or areas where wall outlets could provide power. Please take note that this article only covers a very small fraction of the information needed to properly understand an FPV / long range system and is intended primarily to make the reader more familiar with the concepts, terms, products and principles behind FPV and long-range drone operation.
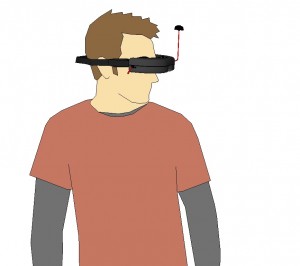 Drone FPV Headset
First Person View (FPV)
One of the main driving forces behind multirotor's skyrocketing popularity is the ability to get a completely different perspective (a "bird's eye view") of our planet and a sense of flight. Although adding a camera to an RC airplane or helicopter is nothing new, the relative ease of control, low price and availability of multirotor drones has made it easy to buy or create a UAV with a camera. First Person View (FPV) currently involves mounting a video camera to the drone which sends video in real time to the pilot or an assistant. Note that there are complete or semi-complete FPV systems on the market which include all the products required for a complete FPV system and come with the peace of mind that all parts are compatible with one another.Video Camera
Almost any video camera which can be connected to a video transmitter can be used for FPV, though it's important to consider weight since multirotor drones are constantly fighting gravity and do not have the advantages of winged aircraft for added lift. Video cameras come in a wide range of shapes and sizes, as well as video resolution, though very few are made specifically for multirotors at this time. Because of these size, weight and power restrictions, most cameras used in multirotor FPV systems are adapted from "action cameras" as well as from video surveillance and security industry applications (hidden cameras for example). Most of these cameras have a composite video out and power input, or analog output and power input via a 3 or 4 pin connector (GND, PWR, analog video signal and optional audio). Larger cameras such as DSLRs or larger video cameras tend to be used by professionals, but because of their weight, the drone required tends to be quite large.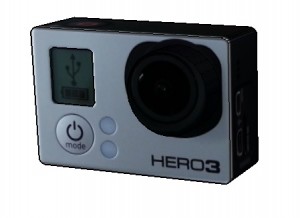 GoPro Hero 3
Some video cameras can be powered directly from a 5V power source (useful since most flight controllers operate at 5V as well, being powered from a BEC), while others may require 12V, or even have their own built-in rechargeable battery. The most popular camera currently used on multirotor drones is the GoPro. This is because of their ruggedness, small size, high video / image quality, built-in battery, range of accessories, and availability worldwide. GoPro cameras also have a USB output which can be used to transmit video, and many even have built-in WiFi for transmitting video over a short range. Given GoPro’s success, many other manufacturers have created their own similar lines of sports / action cameras, and the features, price and quality vary. Note that if you want 3D video, you will need two cameras, and a video transmitter capable of sending two signals.
Gimbal
A "gimbal" system comprises a mechanical frame, two or more motors (normally up to three for pan, tilt and roll), as well as sensors and electronics. The camera is mounted in such a way that the motors do not need to provide an angular force (torque) to keep the camera at a fixed angle ("balanced"). The axes in question allow the camera to be either panned, tilted or rolled. A single axis system which does not have its own sensor might be considered more of a pan or tilt system. The most popular design involves a two motor setup (normally BLDC motors specifically designed for use with gimbals) which controls the camera's tilt and roll. The camera therefore always faces the front of the drone, which also ensures the operator won't be disoriented if the camera is facing one direction while the front of the UAV faces another. A three axis gimbal adds panning (left and right) and is most useful in a two-operator setup, where one person flies the drone and the other can independently operate the camera. In such a two-person configuration, there can also be a second (fixed) camera for the pilot. There tends to be one of two kinds of gimbal systems:Brushless DC Gimbal
Brushless DC ("BLDC") motors offer fast response with minimal vibration, but require a separate (and specialized) brushless DC controller. In order to automatically keep the camera level, an Inertial Measurement Unit (IMU) comprised of an accelerometer and a gyroscope is mounted somewhere around the camera (normally beneath the camera mount) so that the orientation of the camera (with respect to the ground) can be tracked. The sensor readings are sent to a separate brushless DC controller board (often mounted just on top of the gimbal) which rotates the motors so the camera's position stays in a specific orientation despite any movement of the drone. This controller board includes an onboard microcontroller. The gimbal's brushless DC controller can often be connected directly to a channel on the receiver (as opposed to the flight controller) since its motion reacts to changes in the camera's orientation rather than the UAV's orientation and is therefore independent from the flight controller. Note that because GoPro is the post popular action camera, most brushless DC gimbals are made to be used with one or more GoPro models (based on the GoPro's size, center of mass, camera location etc). You will also notice that BLDC gimbals almost always have damping which minimizes vibration transmitted from the drone to the camera. GoPro 2-Axis Damped Brushless Gimbal
RC Servo Gimbal
An RC servo-based gimbal tends to offer slower response time than brushless gimbals and because of RC servo technology, there is a bit of added vibration. The upside is that servo-based systems are considerably less expensive than brushless systems, and the 3-pin RC servos can normally be connected directly to a flight controller; RC-based gimbal systems take advantage of the fact that the flight controller normally has a built-in IMU and as such it is the flight controller which determines if it is level with the ground and move the servos accordingly.Video Transmitter
Currently very few flight controllers (aside from those which are used on mass market commercial drones) have an integrated video transmitter, meaning a separate video transmitter is normally needed. Video transmitters used for RC systems are currently popular since they are lightweight and small. Other commercial video transmitters can be used, but some important considerations include connections for power (might need to be customized if the unit only accepts power from a barrel connector) as well as the input voltage; if a video unit operates at a voltage which you don't have readily available on the UAV, you might need additional electronics such as a voltage regulator. Non-RC video transmitter units rarely consider weight or size, and often have a protective (and sometimes unnecessarily heavy) protective case.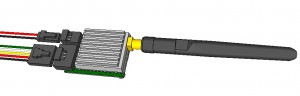 RC Video Transmitter + Antenna
Video Transmitter Power
Video transmitters are normally rated for a certain power output, but do not assume that anyone can use any power rating available on the market. Wireless frequencies and power are closely monitored & regulated and as such, we strongly suggest becoming familiar with your country's wireless regulations. The amateur radio operator's association is a great place to start. The power which a video transmitter consumes has a direct impact on its signals' maximum range. In north America, operating a wireless transmitter which consumes above a specific power (rated in Watts) requires that the operate have an amateur radio operator (HAM) license. For example in Canada a long-range FPV operator normally needs to have passed at least the "Basic amateur radio operator qualification test" in order to operate at the power needed for long-range wireless applications.10.1 Amateur Radio Operator Certificate with Basic QualificationThe holder of an Amateur Radio Operator Certificate with Basic Qualification is limited to a maximum transmitting power of:
(a) where expressed as direct-current input power, 250 W to the anode or collector circuit of the transmitter stage that supplies radio frequency energy to the antenna; or
(b) where expressed as radio frequency output power measured across an impedance-matched load,
(i) 560 W peak envelope power for transmitters that produce any type of single sideband emission, or
(ii) 190 W carrier power for transmitters that produce any other type of emission.10.2 Amateur Radio Operator Certificate with Advanced Qualification
The holder of an Amateur Radio Operator Certificate with Advanced Qualification is limited to a maximum transmitting power of:
(a) where expressed as direct-current input power, 1000 W to the anode or collector circuit of the transmitter stage that supplies radio frequency energy to the antenna; or
(b) where expressed as radio frequency output power measured across an impedance-matched load,
(i) 2,250 W peak envelope power for transmitters that produce any type of single sideband emission, or
(ii) 750 W carrier power for transmitters that produce any other type of emission.
If you don’t have any particular qualification, we strongly suggest keeping the video transmitter used to less than 200mW to avoid risking legal action (should your signal start to interfere with other wireless signals, the authorities may be contacted). The power rating is normally provided in the specifications of the video transmitter and certain video transmitters allow for user-selectable power (for example 200mW, 500mW, 1000mW or 2000mW). Power for the video transmitter is normally provided from the BEC from one of the ESCs which also powers the rest of the electronics. If you suspect that all of the electronics consume more current than one BEC can provide, you can use a BEC from a second ESC to power the video transmitter. We do not suggest using a separate battery to power the video transmitter.
Video Transmitter Frequencies / Channels
Most video transmitters operate using one of the following frequencies. Note that since you will likely already be using a standard RC transmitter which operates at a certain frequency, it's safest to choose a video transmitter which operates at a different frequency. For example if your RC radio operates at 2.4Ghz, you should really only consider selecting a video transmitter which operates at 900MHz, 1.2GHz or 5.8GHz. Frequency
- 900MHz (0.9GHz)
- Lower frequency signal more easily penetrates walls and trees
- DIY antennas are easy to make because low frequencies mean large antennas
- Picture quality is not as good as 5.8GHz
- May have a negative impact on GPS receivers
- Considered "older" technology
- All in all, best for medium range
- 1.2GHz (1.2 to 1.3Ghz)
- Used for longer range FPV flights as it offers good distance
- Many different antennas on the market
- Frequency tends to be used by many other devices
- Walls and obstructions have more effect than a lower frequency
- Medium / longer range
- 2.4GHz (2.3 to 2.4GHz)
- Used for long range FPV with few obstructions
- One of the most widely used frequencies for wireless devices
- Many accessories available (antennas, transmitters etc)
- Should not be used around 2.4GHz RC transmitters or other devices which may cause interference
- Can work with other frequencies, but will not be covered in this article.
- 5.8GHz
- Great for short range applications
- Walls and other obstructions have a significant impact on the range
- Antennas are small / compact
- Better for FPV racing applications
Video Transmitter Connectors
Video transmitters do not all have the same connections so it's important to know what connector is installed on your camera and see if it will be plug and play with the chosen video transmitter. The most popular connectors are composite, mini / micro USB and 0.1" connectors (analog). There are a number of adapters on the market, for example 0.1" FPV Tx connector to mini USB for use with a GoPro camera, which makes using products with different connectors a bit easier. Certain video transmitters also include audio input, though in most cases the noise from the rotors will tend to drown out any audio which you might hope to record. Should you want audio, be sure to position the microphone as far away from the rotors as possible (quite a bit of testing will be needed to find an optimal location) and choose a receiver which is compatible.Video Transmitter Antenna
Video transmitter antennas used on UAVs tend to be either "duck" or short whip. Duck antennas are the most widespread and have an advantage of being omnidirectional, compact, inexpensive and remain fixed in place during flight because of their small profile. The choice of antenna needs to correspond to the frequency of the video transmitter. Higher frequencies need smaller antennas, but the signals have more difficulty going through obstructions. Lower frequencies are less affected by obstructions but the antennas are larger / longer. A directional antenna is not used very often for video transmission since the UAV can essentially end up in any orientation in 3D space. Ideally the antenna should be placed somewhere on the UAV which is free from other wireless signals or electrical interference.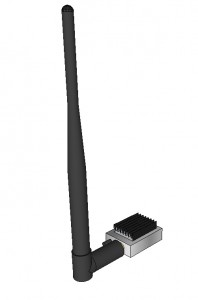 Video Transmitter
Video Receiver
A video receiver tends to be quite a bit (physically) larger and heavier than a video transmitter because the receiver is often stationary (connected to a screen) while the transmitter needs to be mounted to the drone and as such needs to be small and lightweight. In order to save space, certain LCD manufacturers have incorporated standard frequency wireless receivers into their displays. Many FPV enthusiasts mount either a cloverleaf or pinwheel antenna to their FPV glasses so they can orient their head in the direction of the UAV to get maximum signal strength. Certain manufacturers of FPV glasses have also continued this trend and include a wireless video receiver and antenna incorporated into or connected to their glasses.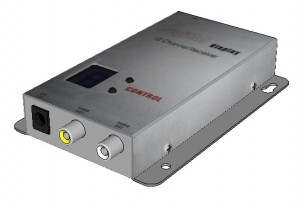 Video Receiver
It is evident that the frequency at which the video receiver operates must match that of the transmitter. Certain models of receivers however offer a range of channels which can be selected (one at time), making them compatible with a variety of video transmitters. The output of a video receiver tends to be either composite (most common) or HDMI. What you connect the output to (video display) is up to you, and some options are described below. Powering the receiver in field always involves using a battery which either outputs at the required operating voltage of the receiver, or a battery which is connected to a voltage regulator which provides the required voltage. Note there are no “long range” video receivers since the range of the signal relies on the power of the transmitter.
Video Receiver Antenna
Antennas used on video receivers can be omnidirectional (able to receive a signal from any direction) or directional. The most common antennas you see on a video receiver include a duck antenna, cloverleaf / pinwheel or in rare cases directional (Yagi for example). A directional antenna is used only when the UAV will be flying within a specific direction in relation to the operator and the drone will always be "in front" of the antenna to ensure the signal is not lost. Situations can include exploring a specific area (such as a field) or an area which is a distance away from the operator.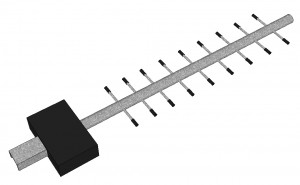 Yagi Antenna
Video Display
LCD Monitor
When considering an LCD monitor, it is important to know the distinction between a desktop / computer LCD monitor or LCD TV and one that is intended to be portable. A TV / computer monitor almost always has a power connector which is compatible with a standard computer power cable (taking A/C power directly), making it very difficult to use with a battery pack. An LCD / OLED display which is intended to be more portable often takes DC input and requires an external transformer in order to connect to the mains (A/C). The display size, refresh rate and quality of displays used for FPV applications vary, from small displays with grainy images which update a few times each second, to large displays which, when combined with the right video transmitter & receiver, display large HD images without any evident lag. Keep in mind that whatever 2D display you select will need to be powered and mounted somewhere - either within a base station (described below) or using an FPV monitor mount connected to the RC transmitter. One issue with monitors is glare, especially when used outdoors; this is why it is important to create (or in some cases purchase) a three-sided box around the monitor (top and sides) which is often removable (using Velcro) for easy transportation.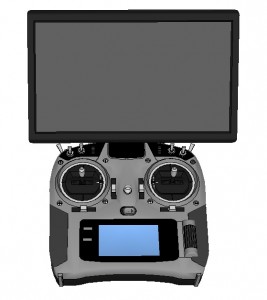 Transmitter LCD Display
FPV Glasses
2D glasses are widely used in FPV because of their lower price, compatibility with a single video source (from a single video camera) and ease of use with an external battery pack. Certain models include a video receiver, and kits are available with camera, video transmitter, FPV glasses (with built-in video receiver) and external battery, as well as both antennas. The video quality offered by inexpensive FPV glasses can be quite low, so if budget is a factor, consider you might get a better overall experience with a larger LCD monitor for the same price as FPV glasses.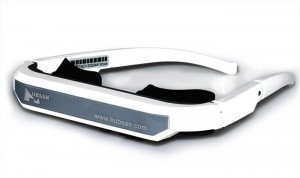 FPV Glasses
Head Tracking
Head tracking is essentially the same as motion tracking, but specifically measuring 3D orientation / angles as opposed to linear motion. Head tracking sensors are made up of MEMS accelerometer chips, gyroscopes or inertial measurement units (IMUs). The sensors are mounted (or built into) FPV / VR glasses and send data to a microcontroller to interpret the sensor data as angles, which then sends the data either via the RC remote system (for higher end models) or via a separate wireless transmission system. Ideally the head tracking system you use is compatible with the transmitter, so the angles can be sent via the transmitter using two free RC channels.3D / Virtual Reality
Occulus Rift, Samsung Gear, Morpheus, Smartphone-based VR glasses and a variety of other 3D / VR head mounted displays are being adapted for use with drones. Although these units are normally made for 3D computer / console games or as an alternative to a television, these devices are natively compatible with 3D and often have built-in head-tracking sensors and are becoming increasing attractive to the drone FPV community.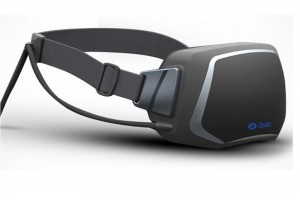 Oculus Rift 3D VR Glasses
Smart Devices
Smartphone, tablets or laptops can be used to display video in real time. Their batteries are built-in and the units are lightweight. The difficulty with using smart devices is that most receivers are not made to receive a video signal from a wireless video receiver (either hard wired or wirelessly). A laptop or tablet with an onboard or USB video capture card can take normal composite video. A smartphone currently works best with video sent via WiFi (WiFi camera or composite / serial to WiFi adapter). Using a GoPro's WiFi video signal and the GoPro app on a smartphone is one of the easiest ways to get set up for FPV, but note that the camera's WiFi signal range is very limited. Since smartphones are so widespread, and drones are all the rage, there are new products being released regularly by manufacturers which capitalize on these, so always do your homework before deciding. Galaxy Nexus Smartphone
On Screen Display (OSD)
An on screen display (OSD) allows the pilot to see various sensor data sent back from the drone. One of the easier ways to include on-screen data is to use a camera with analog output and place an on-screen display board between the camera output and the video transmitter. The OSD adapter board has inputs for various sensors and will overlay the data onto the video, so the pilot receives the video with the telemetry data already overlaid.Long Range Considerations
As you have seen, long-range operation relies primarily on the power of the transmitter (RC controller as well as video if applicable). Normally, RC transmitters include an RF system comprised of a joysticks and switches, electronics and an RF transmitter, and less expensive RC units this system is almost always a single unit. Higher-end models often have the RF module changeable as a box located at the rear of the transmitter. In North America, it is either a legal requirement that a UAV be kept within view of the pilot (personal use). However, laws are changing, so it's best to consult them before attempting long-range drone operations.Power
UAV / Drone
Your UAV / drone is comprised of many different parts, each requiring specific voltages. The most common electronics you will find on an FPV or long-range drone include:- Motors: Most medium sized UAV motors tend to operate at either 11.1V or 14.8V.
- Flight Controller, Receiver, GPS: These should ideally be powered by the BEC from one ESC.
- Head tracking receiver: This would be powered by the BEC.
- Servo-Based Gimbal: A servo-based gimbal system can be powered from one of the BECs in an ESC and operated at 5V.
- BLDC Gimbal: Some BLDC gimbals can connect to the charge connector of the main battery, while others need specific voltage. Check the specs of the model you purchase.
- Camera: Cameras used for FPV flight tend to operate at 5V (from a BEC) or 12V (main battery). Most action cameras include their own built-in battery.
- Video Transmitter: Most operate at 5V and can be powered by a BEC.
- Additional electronics (lights, parachute etc): 5V.
Operator
While a normal drone operator only needs to worry about an RC transmitter, the operator of a complete FPV setup may end up having to carry larger batteries, a variety of equipment- Handheld RC transmitter: Most RC transmitters have a AA battery option (4x AA or 8x AA), but for FPV, you might want to power the transmitter using an external battery pack
- Add-on RF transmitter: If you are not using the RF transmitter / receiver included with the remote, higher end models normally have power out to which this module can be hooked up. Alternatively, you can power it by splitting the battery pack used for the handheld remote.
- Head tracking transmitter: This unit can normally be powered at 5V
- Video receiver: Most require 12V, but often have a fairly wide voltage input range. The receiver likely comes with a wall adapter which you will not use / need in the field. Check the input voltage ranges to see if you can use one voltage to power both the transmitter and the receiver (7.4V or 12V for example).
- Video display: Be sure to select a portable LCD display which has a barrel connector input, allowing you to use a battery pack for input. FPV glasses normally have a barrel connector input as well, but be sure to check. The most common voltage for portable LCD displays is 12V, which might not be best for other devices.
- Antenna pointer: An antenna pointer is described below. This motorized device is often made up of RC servo motors, a microcontroller and additional sensors / electronics. There are very few commercial systems for the hobby market so should you pursue designing and building such a system, you will need to work out the power setup.
Base Station
As you can tell from the operator unit above, there is a lot of equipment the pilot needs to carry and power, which can be very cumbersome. Base stations are often used to relieve the operator of this load / mess and can be made up of any number of different equipment and compartments listed below. You can imagine that without a well-made base station, the spaghetti of wires linking all of these devices together can become an impeding factor when trying to get set up for a flight.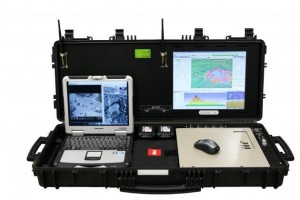 UAV Base Station
A base station can include:
- Primary battery, perhaps used to power the LCD monitor and/or FPV glasses and possibly the video receiver
- Secondary battery for the transmitter and / or video receiver
- Mounting for the LCD monitor and/or space for FPV glasses
- Mounting for the video receiver
- Space for storing the RC transmitter
- Mounting for long-range antenna (or space for a portable directional antenna)
- Space for a charger for the main battery(ies)
- Space for replacement parts for the drone (propellers, motors, batteries, frame components)
Antenna Tracker
An antenna tracker is an electromechanical device which tracks the drone's position in 3D space using GPS coordinates, and knowing the GPS location of the tracker unit, keeps a directional antenna pointed at the drone. Antenna trackers are normally used for long-range applications and not many commercial products exist on the market. A tracker is made up of a GPS receiver, a compass (and sometimes an IMU), a microcontroller, a data receiver (to receive the drone's GPS coordinates), one pan and one tilt motor, the mechanical frame, the directional antenna and a battery pack. In order to reduce the effect ob obstructions, antenna tracker systems are raised off the ground using a tripod.We hope you have enjoyed this series and welcome your feedback, questions and suggestions in the comments section below.
Have you built a custom UAV and want to show it off? Post it on the RobotShop Forum.
Are you looking to get feedback or advice on a custom build? Create a new topic under “Robots and Kits” on the RobotShop Forum.
This is a companion discussion topic for the original entry at https://community.robotshop.com/tutorials/show/how-to-make-a-drone-uav-lesson-7-fpv-amp-long-range