Help with Hexapod Lynxmotion Botboarduino and SSC-32u

Hello everyone!! OK, so, I had purchased a Hexapod chassis online (servos and all), and I didnt quite like the microcontroller the spider came with so I wanted to go the Lynxmotion botboarduino and SSC-32u route, and I bought a Lynxmotion PS2 wireless controller as well, all online and brand new! Ok, so having very little knowledge about the circuit boards but greater knowledge about research, I am really questioning my skills bc I can not find anything that will compile in Arduino pertaining to the hexapod, or anything else, as I found within the past posts from these forums! Perhaps I really over looked the ones that I need, or searching the terms correctly!
So, here is my question, is there any test source codes, or hexapod firmware, or anything I can use to get started programming this thing! I bought this thing last summer and have been working on it gradually up til now! Once again, I have followed the diagrams from this site, and those similar, but I can not find any codes that will render a compilation in arduino, much less, onto the botboarduino or SSC-32u! If you all need pics or videos, Ill be more than happy to entertain that, Im sure we could start up a series…, it would be hilarious! lol! Im more of a visual learner, and have even tried looking for online video tuts as well, and Ive found where ppl have theirs going and everything which makes me that much more jello, lol! However, not many, at all, goes into detail of how they started, unboxed, or anything like that! Any help would be great! I hope this email finds you all well, and I pray that someone out there will help!!

Thanks so much!!

Jason!

Here’s a quick run down for it:

The full example Phoenix code for 3 DoF / 4 DoF is available on the Lynxmotion GitHub. You can find it here. Here is a direct download for the 3 DoF version.
You will also need the PS2X library from Bill Porter (the Lynxmotion version). It is available here. Here is a direct download to import in the Arduino IDE.

Get the latest Arduino IDE version here (1.8.2 at the time of this post). Make sure to remove any previous PS2X library version from your libraries folder (Documents > Arduino > libraries). Then, follow this procedure to import the PS2X library.

As for connecting the robot together, aside from having a full built hexapod with all servomotors and brackets placed properly, you will need to do the following for the electronics:

  1. Connect all the servomotors to the SSC-32U to the proper channels. You can find those in the code here.
  2. Connect the power (6 V DC) to VS1 of the SSC-32U. Make sure the VS=VL jumper is not present. Also, make sure the VS1=VS2 jumpers (both of them) are present and properly placed (check the SSC-32U manual, page 10, bottom half).
  3. Power the SSC-32U with your 6 V power source and connect it by USB to your computer. Change its baud rate to 38400 (see details in SSC-32U manual, page 34, bottom half).
  4. Download and install Lynxterm. Change the setup to connect to the right COM port (you can find this under Ports (COM & LPT) under Device Manager) and the right baud rate (38400). (See image below for details)
  5. Connect to the SSC-32U and go to the black text box and type “ver” followed by the [return] key. The board should reply with its firmware version. (See image below for details)
  6. If all works up to now, try and move some of the servo channels using the right-side slider and buttons to change channels. Your motors should respond right away.
  7. (keep your fingers away from the robot) Click the All=1500 button. All of your motors will center themselves. You should normally get nice 90 degree angles from your robot legs. If some are quite off (many degrees), you may want to remove the brackets/horns and replace them to get as close to 90 degree angles as possible. Once done, press the Reg button to continue the calibration (fine-tuning).
    8] See the image below for details on calibration in the Reg menu. You will need to do it for each channel one by one.
  8. Once the calibration is done (you can confirm after pressing Write by pressing Read and confirming the values are saved properly), we move on to adding the BotBoarduino.
  9. Connect the BotBoarduino to the SSC-32U by pin 12/13 to the TX/RX. Also, make sure to have a common ground between them. You can see a wiring example using software serial (option #2) in the SSC-32U manual, page 21 (do not pay attention to the jumpers, they will differ from what was said above).
  10. Connect the VS2 screw terminal of the SSC-32U (while it is not powered) to the VL input of the BotBoarduino. Change its jumper to EXT (instead of USB) when using it with the hexapod / powered by battery. Change its jumper to USB if you wish to power/program it by USB only. You can simply leave it on EXT most of the time, unless you expect the programming done to make the robot move, then you may want to move to USB powered and cut-off power to the SSC-32U to prevent movement.
  11. For the PS2 adapter/receiver, follow the diagram on page 23 of the SSC-32U manual. You can check the actual data/cmd/att connection in the code here.

That should cover most of it. If you want more details concerning the BotBoarduino itself, check its manual here.

Sincerely,

Hey, thanks again for the detailed description of how to get this all together and going! Ok, so, im running into another issue! The Lynxmotion terminal isn’t working correctly, or something isn’t right! So, I followed the directions, downloaded the Lynxterm and installed it, have the battery in the ssc-32u 7.4 vlt, USB hooked up, servo on the 0, everything looks as it should as per the diagrams! The ssc-32u powers on, sufficient power, A and B indicators light up! On the terminal, the ports are correct, the Baud rate is set, and the set up port reflects the indicator next to the “disconnect” button! I go to the next step, type in “ver” in the black text box and hit return…, Nothing happens! it is suppose to reflect the version!!
So, I hit the “Reg” at the bottom left, next to the H2 Seq, and there is a pop up box that says “Error, Cant find SSC-32 card”! So, I then try to troubleshoot again: switching ports, unstalling and re-installing the program…, Nothing!!!
BUT…, I adjust the channel and the slider, to the right of the terminal, and SSC-32u responds as if it is receiving data from the terminal! The A and B flicker, along with the RX1, it flickers as well! However, the servo doesn’t move! and Ive tried a few servos, plus had the whole spider hooked up and still…, nothing! I even tried hitting the “All=1500” which suppose to center all servos, and that did nothing! Has this ever happened? is there a way to trouble shoot this? Thanks!!

Hi,

This sounds like you are having communication issues with your SSC-32U. When receiving data, the green LED blinks. If the red one blinks, it normally indicates a UART frame error. This is usually caused by using the wrong baud rate.

With the SSC-32U powered, please press the Baud button and check the baud rate of the SSC-32U (it should be 9600 by default). If you did do step 3, it should be 38400 by now.
When doing the setup in Lynxterm, please change the baud rate (step 3) to the appropriate value (see below).

https://www.robotshop.com/forum/download/file.php?id=7331

Also, please note that most RC servomotors can only function form 4.8-6.0 V DC. You mentioned using 7.4 V DC. Make sure your RC servomotors support it so that they do not get damaged (some support up-to 7.4 V DC).

Another possibility would be that the drivers you have installed for your FTDI VCP (Virtual COM Port) are not working well.

Sincerely,

Thanks for the quick reply, now listen to this…! Ok, so, I set the Lynx SSC-32 terminal back to default…, Baud rate “9600”, my ports are only “COM 1 and Com 3” from which only COM 3 is used…! Now, at these settings, the servo responds with slider, I can now register the servos, and I can get the version in the black text area…, like it suppose to! I go back and set the Baud rate back to 38,400…, and then it gives the same errors “Can not find SSC-32 card” and no response to the servos!

I know this sounds ridiculous, but when changing the baud rate, did you make sure to change it in both the Setup section of Lynxterm and with the Baud button on the SSC-32U?
If so, then it is a truly weird situation. I would recommend that you post a short video of you changing the baud rate of the SSC-32U from 9600 to 38400 just to be sure there is not anything weird happening during that time.
You can attach the video here directly (if it is very small or compressed well) or share it with a link to a video sharing site, such as Youtube (make sure it is not private/viewable to others).

In this video, show the following steps (starting with an unpowered SSC-32U, USB disconnected):

  1. Power the SSC-32U (make sure to show the PWR blue LED)
  2. Press the Baud button (make sure to show the A/B LED reaction); they should indicate 9600
  3. Press and hold the Baud button and change baud rate to 38400; wait for it to settle/get set
  4. Press the Baud button (make sure to show the A/B LED reaction); they should indicate 38400
  5. Power cycle the SSC-32U (cut off power, wait for all LEDs to turn off, power-up again)
  6. Again, press the Baud button (make sure to show the A/B LED reaction); they should indicate 38400
  7. Connect the USB cable to your computer
    8] Start-up Lynxterm (if it was already open, close it and re-open it), click Setup and change the COM port and set the baud rate to 38400.
  8. Try the VER command again.

This thorough procedure above should reveal where the issues is and, hopefully, how to fix it quickly.

Sincerely,

Sounds good, I’ll make a video about and put it up temporarily on my youtube channel! Ill have to do this when I get home though! Ill go through your procedure, and also add in what I have found to be “weird” as well! So, ill send you the link tomorrow morning (EST.)! Thank you!

Ok, here is the video! I didnt get very far but hopefully this will give you an idea of whats going on!!
youtube.com/watch?v=t2I9KVZoqWo

Hi,

Thanks for the great video! :slight_smile:

Unfortunately, we cannot really see all that well the baud rate on the SSC-32U physically. But, it does seem like changing the baud rate of your SSC-32U with the button is not working.

Therefore, lets do it using Lynxterm, instead! (see attached image for details)

It is a very straightforward process:

  1. Ensure your SSC-32U is at 9600 and connect it to your computer by USB.
  2. Start LynxTerm and connect to the SSC-32U at 9600 baud rate.
  3. Type VER[enter] to confirm the board is working.
  4. If it is, then type R4[enter] to see the baud rate. The SSC-32U should respond with “960”.
  5. Type r4=3840[enter] to change the baud rate to 38400.
  6. Once this is done, further commands will not work until you click Setup and change the baud rate to 38400.
  7. Once the baud rate is changed in the software, try VER[enter] and r4[enter] again and see if that works.

Good luck!

Sincerely,

Thanks for the compliments, and for your reply once again! I haven’t had a chance to test out the manual logic that you have above! however, I did hook up the right side of the spider (9 servos) to the SSc32u and began to adjust them via 90 degrees, as per the instructions, however, I came across a couple of burnt out servos…, so…, I ordered some for replacements! To add on to that, I reviewed the diagram for the botboarduino! I uploaded the program from arduino, as per your instruction, but the board isn’t responding the way i thought it would! Maybe im not doing it right or something! The Tx and Rx wires are in the right place, but all of the lights from the botboarduino shut off, and the receive for the remote doesn’t respond! I will have another video, (more detailed), later! I know that i wont get a response until monday about that!
Ok, so, Im under the impression that as soon as I upload the program to the botboarduino, and adjust the servos via lynxterm, and have all of the connections secure with the proper batteries, that Im able to control the spider via the PS2 controller and all would be go to go for just tweeking after that! But, when u see in the video that my unit just has to be “unique”, and I dunno why!! I really appreciate your help and Im trying not to make this more difficult than it really is! But I know I have all of the connections right, at least from what i understand!

Thanks!

Hey, so here is a video that I have so far!
youtu.be/asx9l_j74Ts
The situation now is, I can’t get the PS2 controller to operate, and I’m not too sure if everything works correctly despite how I have it all together! I appreciate the details that you’ve provided for me…, I just hope I’m doing itt all right!! Thanks!

Hi,

Oh well, lots to cover. Nice 3D printer, btw (and cool console stacking in the back :wink: )!

First, it is worth mentioning that if you want to use the USB port of the SSC-32U, it is recommended to remove the 3-pin jump on the TX/RX/GND headers of the SSC-32U (the ones @ 7m22s). In theory, the SSC-32U’s USB interface has priority, but it can still cause problems (whether or not the BotBoarduino is on/powered).

Now, around 4m50s you mention the register data. By default, the window is empty until you press Read. The data (once you press Write) is stored inside the EEPROM of the AVR chip on the SSC-32U. If you change the data, you have to press Write to ensure it is saved before closing this window or it will be discarded. We also recommend that you press Read again to confirm it was written to the chip properly.
If you only want to use the offsets, make sure they are enabled on the top right (see this previous image for details).

As for the wiring of the PS2 receiver (~6m30s) and the BotBoarduino, unfortunately the color coding for those wires has changed with nearly every single revision of the hardware, which makes it hard to keep a track of. That being said (and like you mentioned in the video), as long as that wiring matches the code, it will be fine.

Now, concerning the communication issue between the BotBoarduino and the SSC-32U, there are a few unknowns still. Answering those will most likely lead us to a solution:

  1. At around 3m45s you mention doing changes to the SSC-32U (assuming it is related to the baud rate from my last reply). I couldn’t see in the video, but is the SSC-32U now setup to 38400 baud rate?

If it is at 38400 and you are able to connect at that baud rate from Lynxterm, then we can proceed with more tests. If it is still at 9600, we will need to get it to change baud rates as a faster baud (38400) is needed for the hexapod code since it needs to update many servos quickly (18 or even 24!)

  1. With the BotBoarduino (set to EXTernal power) connected to the SSC-32U by TX/RX/GND (and no USB cable in the way), power it up. On your controller (assuming it is synced with the receiver), press Start. Does the BotBoarduino produce any sound when you do so (your buzzer jumper seems in place, so it should)?

Let us know about those and we should get this moving forward soon!

Sincerely,

Ok, Thanks so much about the printer and the game stack, I have em to play and to fix up! and the printer…, bc, reasons…, lmao!
Ok, about the Tx/rx/grd headers, I knew that they werent suppose to hooked up like that when using the USB cord, however, I saw no difference when I was maneuvering around trying to trouble shoot before I made the video! But Ill take everything off and redo the steps, no problem!

About the register, yeah, I didnt know any of that! lol! I still dont think that would have caused the spider not to function though, or am I wrong to assume that? The offsets never responded to anything, just the slider so thats why I had all zeros before! But your saying that I need to enable it in the top right, and I dont think I did that! but ill look again when i get home!

The PS2 controller was a %^&*$% but I yeah, Im just gonna stick to the actual code considering thats what the bot has in its code…

About the SSC-32u, Yes, the baud rate is now set at 38,400! That happens as soon as I upload the lynxterm with bot connected via USB! I can click setup, click the register, and verify by typing “ver” and get the response right away, so thats good to go!

now, as far as #2…, ok so I may have not dont that exact thing in that exact order…, maybe that was the problem! but I did try to unplug the usb, while powered up to the SSC32-u, switch to External, and thats what made everything light up like that…, however, After hitting all of the buttons, I didnt get a response! I will try again when I get home though! …, maybe I just didnt hit the start button hard enough or do it in the exact order from what you have stated, but Ill try again and make another video!

So, If any of this help to narrow down things to a solution of some sort…, please lemme know! However, I will do the steps that you have provided and make another video!! When I took on this project, I had no idea it was gonna be like this! Its challenging, dont get me wrong, just needs to be a little less cryptic! lol

Thanks bub!

Whelp…, yeah, ok! So, the order does matter! lol! Ill make another video soon! but she is a moving! I have to recalbrate the legs so the spider will actually “stand up” instead of belly flopping, lol! I know what ill do to recalibrate the legs! Ill just sit the body on something and land the legs and feet like that! That should also take care of any balance issue, im hoping! If not…, then Ill send you a video of a drunk spider…, either way, good stuff! lol!! Thanks again, ill hit you back up later with an update!

Ok, so I need to make a video of this, but ill try to explain it the best that i can!

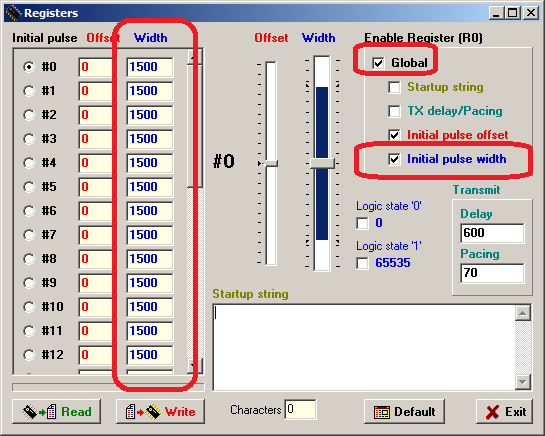
So, I have the USB hooked back up on the SSC32u and opened “lynxterm”. I power on the Spider using the 7.4v battery and the legs of the spider are all contorted, so I know that I will need to set and calibrate em! In the terminal, I click the “All 1500” to center all servos, and the spider goes into the crouching state (like a spider protecting itself, all of the legs inward against the body). So, at that time, I sit the spider body up on a platform and began to recalibrate the legs so that they would walk instead of belly floppin when I tried to make it walk! So, I click “read” on the “regs table” and all of the servos then read “0 (offset) and 1500 (for the slider part)”! The “write option” isnt clickable at this time, I guess I gotta make a change before I can “write”, makes sense!
So, I calibrate all of the legs so the spider would be “standing” and not “sitting”, all of the servos are recalibrated and all so i hit “write” and the pop up box verifies “write done”! BOOM, Im thinking that “Now, when ever I plug the battery in, I wont get that contorted look anymore, it sould be standing or something!”! I exit the terminal, unplug the the USB cable, attach the botboarduino via TX, RX, and Grd, apply the pos and neg into the proper terminals, switch the USB jumper to EXT, and then there were “LIGHTS”, awesome, good so far!! I grab the remote, hit “Start” after the buzzer sound, Im synced up!! Beautiful!!!
I take the spider, set it on the floor, and she is wobblin like a new born calf…, lol! So, I tried to make her walk, and she flops to the ground! Im puzzled at this point…, I play with a few more buttons, like stretching and retracting its arms while its laying of the floor…, and then I hit a button that made all of the legs pull toward the body back into protective mode (I guess)! and then it turns off, The battery must’ve came loose!
I tightened back up the terminals, and plugged the battery back in…, and the spider went right back into the contorted mode!.. At this time, I was thinking, “Ok, it must be a memory sorta thing to where it would need a power source to retain memory” and then it occurred to me that thats never happened to an of my arduinos, it shouldve burned onto the chip like downloading a code from an arduino!
I then take the botboarduino off correctly and start over with just the SSC32u once again! I place the contorted spider back up on the platform from before, hook up the USB (while powered on), opened up the terminal, verified the baud rate 38400, hit the “All 1500” and all servos centered up! I go back into the “Reg” table, and I hit “read”, it read out exactly what I wrote from before…! So, Im really confused at this point! Wasnt the spider suppose to go into the positive that i wrote it in and not the contorted position?
On the “reg” table, there is a “selection” tab, the number of the servo block, the “offset” block, and the “slider” setting block! So, I click the “servo selection” tab on the far left beside the servo “0” and that servo reacted…, I select the “servo selection 1” and that servo reacted…, I repeated through all of the rest of the servos and they all went back to what I wrote originally…, the spider is now in the standing position!

Ok, so hopefully you see my delima here, why did my spider contort after hooking back up the battery the second time after making it stand up and writing it to the ssc32? Why didnt my spider walk when I operated the remote, it just flopped to the ground?!! Why did I have to reset all of the servos when I hooked back into the Lynxmotion terminal? I have so many questions, lol! I really need to do video on this!!

Hi again!

I’m to know you’ve moved forward from “it does not work” into “now I just have to tune it”! :slight_smile:

It seems like your offsets are not being used at power-up. This would most likely mean that they are not activated in the settings. Go back to the REG window in Lynxterm and check that #4 and #5 are set, too (see this image for reference). Otherwise, the SSC-32U will not use the offset values on power-up.

For your future videos, I think it would be helpful if you also include a few screenshots (which can be attached to your post) for the parts where you show the screen. The text is too blurry and we cannot really read it… :slight_smile:

Sincerely,

OK, so I went back and checked to make sure that 4 and 5 were checked, and they were! As i remember,
they were previously selected from before! However, I went back and recalibrated the legs again, wrote the new calibration, and fumbling with the Offset part, and making sure the spider took the code, I hooked up everything from the botboarduino, hit start, and she was awesome! Except, with 3 or 4 busted servos, the poor thing just looked pitiful, lol!
So, I tried to make it walk and run through the cycles, and programs! and it still does some wierd stuff! and, as per my last issue, I unplugged the battery and hooked it back up, and the legs went back to contortioned mode until after I either hooked everything back up to the computer and hit “All 1500” OR just hit start on the controller, which then made the spider stand up!

Now, with that, and the video is on its way, i just wanted to ask this! Since we thought it was an offset issue, and I made sure that the Global and offset option (4 and 5) were selected, why did the spider go back into that contorted mode when I hooked up the battery?

To give a better idea of the contorted mode Im trying to describe, its like when you make the spider twist its body, except the spider is at Full twist, and the legs pulled inwards toward its body!

Im really sorry for all of these questions, I know I seem like a killer novice over here, lol!

And thanks, you have been an awesome help!

Sounds good! The calibration is obviously critical for proper walking algorithms (and positioning).

Yay! That sounds much better than a few posts ago!

What servomotors are you using? It seems like your servomotors do not like receiving no signal from the controller while powered***. Most RC servomotors we use tend to just stay idle (not holding) when they are powered but without a pulse. It is possible that some servomotors react differently to that situation, such as going towards one direction infinitely (and blocking/stalling there). Of course, that is not a great situation.

A possible fix would be to update the registers on your SSC-32U to also provide a starting position to the RC servomotors as soon as power is applied. This way, it will force them to go to that position. 1500 on everything should be quite a safe position to go to on power-up, so I recommend that (it also happens to be the default, so less stuff to change! :slight_smile: ). In Lynxterm, go back to the Reg window and press Read. All the default initial pulse width should be 1500 (in blue), which is good for our purposes. If you want something different, you can select channels one by one and change it there. Once done setting the pulse values for each channel, go under Enable Register (RO) and make sure to enable Global and Initial pulse width are enabled. Then, Write the result to the SSC-32U. (See the attached image below).

****quote=“Hex_brown”]Im really sorry for all of these questions, I know I seem like a killer novice over here, lol!No worries. Complex projects are, well, complex. And while a small robot with a few handfuls of servomotors sound simple, there are many layers of abstraction that all have to work correctly for the robot to move as expected. This is certainly no simple feat and there are many ways it can (and will) go wrong! :slight_smile:

No problem! :wink:

Looking forward to the next video!

*******: I do remember you mentioning before using a 7.2 V DC battery pack. Do your servomotors support that voltage properly? Most RC servomotors only officially support 4.8-6.0 V DC. This may explain the weird behavior and the busted servomotors.
Lynxterm - Setting initial pulse width.png

https://www.youtube.com/watch?v=�tween%Hey, sorry for the delay, I had some computer issues! But I made this new video! I did as u instructed but I have a new issue! As the video states, after assigning the servos the new commands from lynxterm, all servos are now default at 1500! Even when I hook up the battery, so that’s awesome! Now, when I hook up the botboarduino, made sure that all was set correctly, now the receiver isn’t working! I need some guidance on that, I hope I didn’t burn it up! I was running the spider with the remote right before I reset the servos via lynxterm (and of course I had the botboarduino disconnected and stuff! Please help! Thanx!
youtu.be/s3JEHl09qXo

Hey,

Hopefully your receiver is not damaged but its just some other issue.

The best test would be to (unfortunately) remove all connections (to SSC-32U, power, etc.) to the BotBoarduino and perform a thorough test of the device.
Then, set its power input to USB and connect it to your computer. Program it with the PS2X example (with debug enabled in the library; you can fine this file in Documents > Arduino > libraries > PS2X_lib).

Wire the PS2 receiver to it (make sure to have the right pins) and ensure the jumper for those pins is set to 5V.

You may also want to take a clear picture of that test setup making sure all components are visible.

Let us know how that goes.

Sincerely,