FrankenBoB

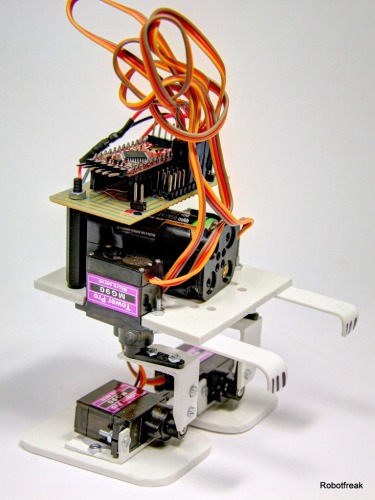
This is FrankenBoB, formerly known as WhiteBoB, my interpretation of BoB the Biped. It is named after Frankensteins creature, because it reminds me, when I see it first move.

Part list:

  • Arduino Mini clone Wattduino Pro 3,3V
  • 4 x 9G Servos 
  • 1 x 8x8 minature LED matrice
  • 1 x HC-SR04 ultrasonic sensor
  • 1 x 3mm Polystyrol Plate
  • 1 x 1mm Polystyrol Plate
  • 4 x AAA NiMH 
  • 4 AAA Battery holder
  • 1 x Mini Switch
  • 1 x 60x30mm card board
  • Connectors 2,54mm 
  • Wires of different colours
  • 2 x 30mm M3 Spacers

All electronics fits into BoBs head. It is slightly bigger than the original BoB with 60x60x60mm space inside the head. The batteries are placed between the hip servos. The Arduino Mini is attached on a small vero board,with connectors  for servos and sensors.

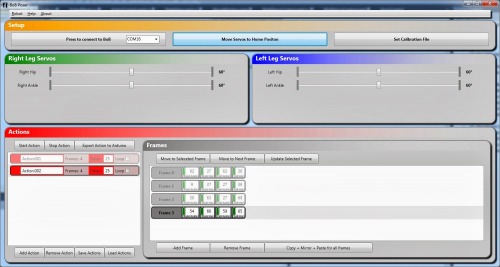
The most time intesive part of this project is the software. It is a little bit difficult to find the right sequences for the servos to move the robot forward. I found the FOBO GUI and adapted it from the 8-servo-FOBO to the 4-servo-BoB.  The adapted version is attached. It is very easy to create servo sequences and calibration files and remote control the robot. You can also create a runnable Arduino Sketch with just a mouse click.

Next Steps:

There is no turn sequence at the moment, and the HC-SR04 sensor doenst work. This will be fixed next.

Walks around, avoid obstacles

  • Actuators / output devices: 4 x G9 servos
  • CPU: Arduino
  • Power source: 4 x AAA NiMH
  • Programming language: Arduino C++
  • Sensors / input devices: HC-SR04 Ultra Sound
  • Target environment: indoor

This is a companion discussion topic for the original entry at https://community.robotshop.com/robots/show/frankenbob

Wow! This is one amaizing

Wow! This is one amaizing BOB, Peter! Artwork is on the spot as well! I love this one! :slight_smile:

Very cool. Fits him so well.

Very cool. Fits him so well. Great job.

HAHAThose little arms

HAHA

Those little arms sticking forward are a delightful detail :smiley: Love it :smiley:

Thank you, Vadim. I will

Thank you, Vadim. I will bring it to CP in London.

Thank you, JerZ

Thank you guys. I hope the BoBPoser Software will be helpfull for all BoB builders.

This is awesome!

This is awesome!

I like those arms very much

I like those arms very much :slight_smile: Very cool looking Bob clone!!!

perfect for halloween

VERY cool, it even inspired me to throw together something similiar.  And thx for posting your sw that could well be the proverbial straw for lots of folks


-

Riley 

Hi!,hast du es hinbekommen

Hi!,

hast du es hinbekommen mit dem Sonar? Ich habe mal ein wenig rumgespielt mit deinem Sketch und bei mir sieht es ganz gut aus.

Sonar hängt bei mir an 4 und 5. Ab "Entfernung < 10cm dreht der BOB auf der Stelle

long MeasureDistance()

{


#ifdef USE_SR04

   int dauer, entfernung;

  digitalWrite(triggerPin, HIGH);

  delayMicroseconds(100);

  digitalWrite(triggerPin, LOW);

   dauer = pulseIn(echoPin, HIGH);

   entfernung = (dauer / 2) / 29.1;

#endif


  return entfernung;


}


Hi Tapir, please only

Hi Tapir, please only English comments here. The German post for FrankenBoB is here (Tapier, bitte hier nur auf Englisch schreiben, der deutsche Artikel für FrakenBob ist hier.) http://wirmachenroboter.com/node/36035.

Welcome to LMR :slight_smile:

Sonar HC-SR04

I’m a total beginner to arduino. But if I see it right in your sketch you choose the sonar code for PING)))™ (3Pin Sonar Modul)  instead if HC-SR04 (4Pin Sonar Modul). ?!?

I replaced your code with:

// Ultrasonic Sensor Pin definitions

#ifdef USE_SR04
#define triggerPin 5
#define echoPin 4
#endif 


long MeasureDistance()
{
#ifdef USE_SR04
int dauer, entfernung;
digitalWrite(triggerPin, HIGH);
delayMicroseconds(100);
digitalWrite(triggerPin, LOW);
dauer = pulseIn(echoPin, HIGH);
entfernung = (dauer / 2) / 29.1;
Serial.print(“Hindernis in: “);
Serial.print(entfernung);
Serial.println(” cm”); 
#endif
return entfernung;
}


If you open the Serial Monitor you can see the correct distance in "cm"

best regards


Hi,–german--------Ja, der

Hi,

–german--------
Ja, der HC-SR04 funktioniert jetzt. Wird über die Servo Spannung mit 5V versorgt. Da der Arduino mit 3.3V läuft hängt der echoPin über einen Pegelwandler (Spannungsteiler) am Arduino

–english--------
Yes, the HC-SR04 is working now. Powered from the 5V servo voltage supply. Because the Arduino is running at 3.3V, the echoPin is connected to the Arduino via level shifter (voltage divider)