Push button and corresponding cables to connect to Arduino
[youtube 87IQhUYHtc4]
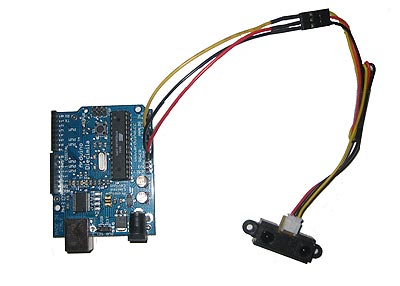
Infrared distance sensors are useful for measuring distances without actually touching a surface. The three wires protruding from a distance sensor represent +5V (in most cases), Gnd (Ground) and signal. These are almost always color coded with black as ground, red as +V and white or yellow as the signal. If your infrared distance sensor did not come with any wires, you will either need to find the appropriate connector, or solder wires directly to the leads (ensure the pins and solder do not contact one another) so you can attach wires.
Connect the yellow wire to an analog pin on the Arduino (in this case we chose A2)
Arduino 5 Minute Tutorials
Since the sensor is connected to the analog input of the Arduino, the code is identical to that of the potentiometer:
Upload this program to the board and change to the Serial Monitor. As you move the front of the distance sensor closer to and away from a solid object or wall, the values should change between 0 to 1023. You can now read values and use them within your code. Check the range for your sensor (not all sensors can read from zero cm); note that some sensors have a minimum distance - although it is always listed in the specifications, try to find it by experimentation. To convert the values to actual distances (in cm or inches), consult the user guide of the sensor.
Arduino and Push Buttons
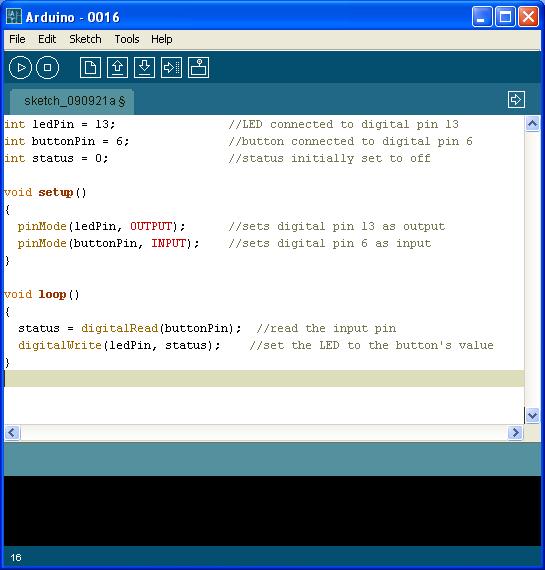
Connecting toggle switches, push buttons and momentary contact switches to the Arduino is straightforward. A push button is a simple device that completes a circuit. One end of the button is connected to source, usually a low voltage (5V on the Arduino is ideal) and the other connected to the digital pin. When the switch is flipped, pressed or toggled, the circuit is either opened or closed. The digital pin simply returns if there is 5V or 0V. The code associated with this is:
digitalRead(pin);
In the following simple program, a push button is used to turn on the LED connected to pin 13. The line
digitalWrite(ledPin, status);
turns the ledPin (in this case assigned to digital pin 13) HIGH (1) or LOW (0) depending on the status variable. We initially set the status to be low (0).
what about if i wanna install 4 infrared sensors in X position . do you have the codes that i do have to enter it. i am thinking adapt this arduino to my ardopilot controller. motors on my drone.
@elie at this time we don’t create custom code, but suggest you post your project on the RobotShop Forum and perhaps the community can provide some input.
Hello,
Can you help me to figure out this; I have one IR receiver and 5 remote controllers. I need to read all the different signals and categorize them . I can’t understand how to write the code.because each remote controller and buttons have different codes. Please help me.
@Rayan Can the IR receiver detect all signals from all remotes? If so, you’ll need to understand the signals from each button from each remote and all that code to the program. The Arduino won’t really care which remote the signal is being sent from (unless of course you have it in a lookup table). This lesson deals with IR distance as opposed to IR data, so if you need more information, we suggest creating a new topic on the RobotShop Forum.
@reetu It might be some time before I can start that tutorial, but in the meantime, the DFRobotShop Rover Bluetooth / XBee series is incredibly close to what you want to do (the DFRobotShop Rover V2 includes an Arduino Uno built-in and you control it from a PC. Take a look at the guide: https://www.robotshop.com/media/files/pdf/dfrobotshop-rover-user-guide.pdf
how to make aurdino code for controlling servo motors using 5 sensors
can u plzz help me???
suppose
in one condition we got all high and immediatly after that got 2nd condition then we have to perform some activity.
how can we code such conditions
@suyog You’ll need to write out in detail what you want the code to do (not just “some activity”). Take a look at existing code to see how to get sensor input and control servos using the servo library. You will need either logic (if, then), or case statements.
Hi I want to make a robot using servo motor and arduino.I want to turn the robot on slopes and control the speed of robot as well.no actuators is used for wheel, servo motor is only for steering purpose.so please please suggest me any IDEA.
Hi sir. how to make arduino code to decode the status of 5 IR sensors and display on 20cross4 LCD display.
there are 5 IR sensors fitted on 5 seat. it give information about the seat that is vacant are not. we have to decode the sensor status and count the number of activated sensors and display the total count on lcd display.
Hi Sir,
Just wondering about the push button code. It works as expected, when the input into pin6 goes high, the led turns on, but when the input into pin6 goes low, it take a few seconds for the led to turn off again. Can you explain this to me ?
Thank your for your time.
@Nathan Herr: This issue is probably due to the open circuit when the button is not pressed. When you activate a momentary on switch (like a push button), it shorts the connection between the two sides of the object. Therefore, if you have 5 V DC on one side and the Arduino input pin on the other, it will feed 5 V DC into the input pin and give you a “high” signal on the digitalRead instruction. The problem arises when you depress the button, in which case the circuit between the Arduino pin and the 5 V DC source is open. This leaves the Arduino pin “charged” with no place for the current to go, so it probably takes a little while for it to react and go to low again. This also leaves your input vulnerable to stray currents. We recommend that you add a “pull-down resistor” to this circuit, going from the Arduino input pin to GND. A 10 kOhm resistor is usually a good value. There is an example of this on the Arduino website, available here.
Can u help: I want to make a project in which there will be a sensor…and if anything crosses that sensor then a motor will start to move there by opening the door …what coding I have to do…I m from mechanical field and I know nothing about this coding of microcontrollers

