


- Lesson 1: Terminology
- Lesson 2: The Platform
- Lesson 3: Propulsion
- Lesson 4: Choose a flight controller
- Lesson 5: Assembly
- Lesson 6: Get it all working together
- Lesson 7: FPV & Long-range
- Lesson 8: Aircraft
The use of small unmanned aircraft for FPV and autonomous mapping is becoming increasingly popular, especially given the surge in the popularity of multirotors for FPV and the increasing availability of parts. This article covers several considerations when deciding if an airplane is suitable for your drone application, and if so, helping you to select the right type.

What advantages might an airplane offer over a multirotor? While a multirotor is great for fun / FPV / autonomous flying, the payload and flight times are still restricted because the propellers must be constantly turning (thus expending energy) to fight the pull of gravity and keep it airborne. Airplanes on the other hand use their wings to generate lift. So which type is best? Not considering common gear like the transmitter, receiver, FPV equipment, and flight controller, the points below seem most applicable:
Multirotors
- Able to take off and land vertically as well as hover in place
- Do not require much area in which to fly and are essentially "omnidirectional", able to change their orientation and speed very quickly
- The thrust generated by the propellers is what keeps the craft in the air
- Less intuitive to fly given the craft can change orientation and fly in almost any direction, and gimbals can easily cause disorientation
- "Medium-sized" multi-rotors of 400 to 600mm diameter are most common and tend to cost $200-$1000+ for a (custom) flight-ready setup.
- Although multi-rotors have significantly fewer moving parts than helicopters, almost any failure on a quadcopter will lead to a crash
Airplane
- Launched by hand, runway, or catapult, and generally lands on relatively flat grass or a runway
- Requires a large open space in which to fly since the airplane's maneuverability is limited (i.e. needs to always be moving forward)
- Wings/airfoils create the lift
- Higher potential payload capacity
- Foam models can be forgiving in the event of a crash, and most can be repaired
- Models with a 500mm to 1.8m wing span are most common for hobby use and a complete setup tends to cost $200 to $1000+.
- In case of an engine failure, there is still the potential to land without damaging the aircraft.
VTOL
- Designs incorporate wings and propellers (not many commercial products are available at this time)
- Control is still fairly complex to transition from vertical to horizontal flight
- Designs vary wildly from quadcopters with wings or using/extending a quadcopter's support arms to include wing profiles
- Will not be discussed further in this article
Considerations
- Location: A UAV / drone cannot and should not flow in densely populated areas, above buildings, or anywhere that could cause harm or damage to property. Airplanes ideally require large open areas whereas multirotors can be operated in more confined spaces. If you do not have an open space in which to fly, then a small multirotor may be best.
- Use: If you want aerial observation / FPV, a multirotor is likely best. Mapping and long-range flights are better with an airplane.
- Interest: If you are interested in one type of drone more than another, that should be one of the most important factors in your decision
- Budget: The most common multirotor (500mm range) will likely be more a bit expensive than a comparable airplane (~1.5m wing span), but not by much. How ready are you to lose the drone, either due to a crash, or loss of control, causing it to fly away?
- Flight Time: An average medium-sized quadcopter will remain in the air for around 10-15 minutes (though certain manufacturers are able to push this to 30~40 min), while an average, medium-sized electric airplane will provide around 20-60+ minutes under "normal" use (i.e. not full throttle), though there are many different factors to consider in both cases.
- Flight Controller: Not all flight controllers are able to control all types of airplanes. Before choosing one, ensure that the type of plane you are interested in is supported by the flight controller (should you intend to use one). How to configure the flight controller will not be covered in this article.

There are many different airframes used to make drones, but we have found that certain designs are much more widely used than others. As more and more manufacturers start producing custom-made airframes for autonomous use, gone are the unnecessary details like cockpits for scale model designs which were commonly found on RC airplanes in the past.
Delta Wing
 |
By far the simplest (and potentially the most popular) design is a flying/delta wing. A simple/rudimentary frame can be made using an inexpensive foam board and a basic Kline-Fogleman airfoil. These classically have only two control surfaces, meaning all turns are banked. The propeller is commonly found at the rear (to allow a camera to be mounted at the front), but flies just as well with the motor placed in the center or at the front, provided the center of gravity is correct. These are great for their simplicity and tend to need to fly at higher speeds. |
Motorized Sailplane / Glider
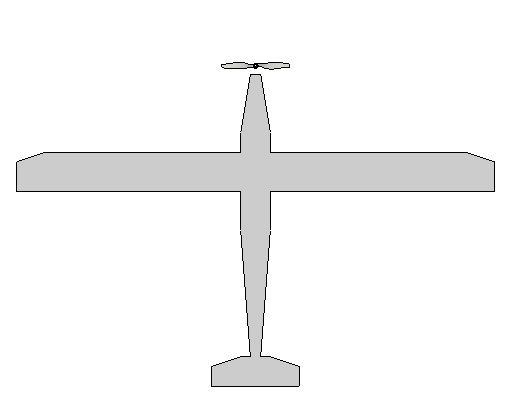 |
If you want to remain in the air as long as possible (i.e. longest flight time), this design is the best choice. These tend to have a mid-wing or high-wing design, and the tail is T or V-shaped. All of the frames here can be used for fun flight (or more), however, if you want it to last a long time in the air, you need to consider an aircraft that has a large wing, and this is where gliders excel. These are not meant to be the fastest (and are often the slowest) nor carry the greatest payload (they need to be as lightweight as possible), but a good design can stay in the air for many hours. Almost all have the propeller mounted at the front, so applications that require a camera normally need to have it mounted on the underside/belly of the fuselage. |
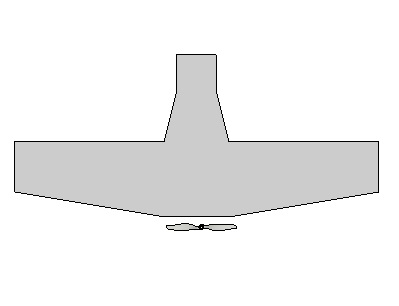
"Skywalker"
 |
The design here is a pusher where the propeller is mounted just behind the wings, and the tail support is mounted just below so as not to interfere. The wing is generally tapered or straight. An alternative design uses two supports (one on either side of the propeller, i.e. "twin-boom") to support the tail. The design is a compromise between a sailplane which has large wings and a normal aircraft for the fuselage size. The fact that the propeller is at the rear means the front can be equipped with a camera (unobstructed view). Having the propeller mounted quite high makes it easy to hand launch, and the propeller should never touch the ground in a normal landing (with or without landing gear). These designs tend to be good for payload capacity, decent speed, and decent flight time, and offer the greatest versatility. |
Conventional
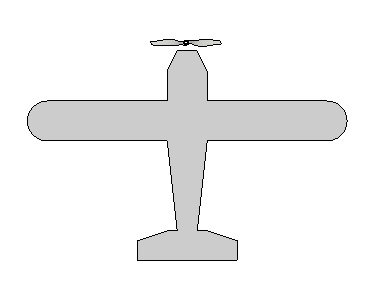 |
Normal RC planes are still often converted for use as drones, and designs range from Mustangs (sport) to Piper Cubs (trainer). Almost all have the propeller mounted at the front (puller). The wings have a generally straight leading / trailing edge (rectangular), though, for fighter plane replicas, the wing may be more tapered. These designs are most often used because they are the most common RC airplane and are easily available. Unfortunately, these aircraft are not purpose-built and include aesthetic elements which are unnecessary for drone applications. These are also not the easiest designs to work with when choosing an unobstructed mounting location for a camera and many of the designs use wood which is not forgiving at all in a crash. |
Non-Standard
 |
There are some non-standard designs available, of which the "Drak" is one (almost an inverted delta). This particular design has wings in an almost forward-swept configuration and a propeller at the rear. Advantages and disadvantages vary by model, though their unique appearance often gets quite a bit of attention. |
So how large should your airplane be? The criteria which are most often used, even before the application, is how will you be transporting it. Airplanes are (almost) always larger than multi-rotors, and since the area where you plan to fly may not be close to your home or business, most often transportation will need to be done by car. Because of this, airframe size for drones tends to be limited to 2m (wing span), and in most cases, the wings need to be removable from the fuselage for transport. A flying wing however may not have the option for removable wings, so they tend to have wing spans of less than around 1.2m to be able to easily fit in the back seat of a car. Classically, a standard-sized RC aircraft would have a ~0.5m to 2m wing span, so the availability of parts for this size (motor, ESC, battery, servos, etc) is incredibly good. The second question you might ask yourself would be how long you would like the airplane to remain airborne. If you plan to remotely control the airplane, note that after around 20-30 minutes, most people become physically / mentally tired and tend to want to land. Staying airborne for extended flights means you would be considering a glider with at least a 2m wing span (but not too much payload capacity). A third consideration of course is the potential application. A "drone" would not be a normal RC airplane, but rather have robotic elements to it. Common applications include FPV flight, mapping, as well as fully autonomous flight using sensors. For autonomous flight, you need a flight controller with GPS, as well as potentially adding sensors. We have found a mid-sized drone with around 1m to 2m wing span that allows for the most flexibility, and you don't need to worry too much about every gram.
Designing a custom airplane is rarely a priority for someone looking to get in the air for FPV or autonomous flight since it tends to either require significant research or proper knowledge of aerodynamics (not covered at all here). For this reason, frames designed specifically for FPV / drone applications are becoming more and more popular. However, given the widespread popularity of normal RC aircraft, many enthusiasts still turn to exist RC models (not necessarily scale models) and adapt them for FPV / autonomous use.
| RTF | "Ready to Fly"; The product includes everything you need to get in the air, and normally includes a fully assembled frame (likely broken down slightly for more compact shipping) with everything already installed (motor, ESC, servos, flaps, etc.), as well as the transmitter & receiver, battery, and charger. Normally you connect the wing(s) to the fuselage, charge, insert & connect the battery and you're good to go. This is the fastest way to get into the air but is rarely upgradeable. |
| BNF | “Bind and Fly“; the UAV comes almost fully assembled (likely broken down for more compact shipping) and the main items not included are the receiver/transmitter. Assembly is very fast given that all parts are already mounted/assembled. You need to connect your receiver to the servos and motor, mount the battery, and check the CG, then go through a basic startup checklist/calibration. Note that you will likely need to configure your radio for the model. This is the second fastest way to get in the air. |
| PNF | "Plug and Fly"; The airplane is essentially fully assembled (likely broken down for more compact shipping) and includes the motor, ESC, propellers, and servos, but does not include the transmitter, receiver, battery, or charger. You need to connect your receiver to the servos and motor, select and mount the battery (verifying the CG), then go through a basic startup checklist/calibration. Note that you will likely need to configure your radio for the model. |
| PNP | "Plug and Play"; is the same as PNF. |
| ARF | “Almost Ready to Fly“: products normally include the frame and some hardware and come partially assembled with almost all frame parts/components necessary to build the frame. Some gluing may be needed. You need to select your own transmitter, receiver, motor, ESC, and propeller servos as they are not included. |
| KIT | These days, kit airplanes include build plans, but takes the most time before the airplane is flight worthy. We suggest having some experience flying before trying a kit plane, as one crash (normally on the maiden flight) can mean many hours to rebuild it. |
| DIY | “Do It Yourself“ (scratch built), which, when talking about airplanes, normally means an entirely custom frame that the pilot may have designed. Normally the designer needs to select all the appropriate components and some trial and error is often needed. |
There are many different materials used to create the frame, wings, and tails of RC / drone airplanes. Although manned aircraft often use fiberglass, aluminum, and even carbon fiber, drone manufacturers have not yet adopted these for smaller unmanned planes. Below are the more common materials you will find in the industry:
| EPO | "Expanded PolyOlefin"; This type of foam is light, stiff, and tougher than EPS and can be molded to be quite smooth. In a crash, the foam will compress and if there is enough force, will break along in the weakest area(s). Parts normally remain whole and if the crash is not too severe, the parts can be glued back together. |
| EPP | "Expanded PolyPropylene"; This type of foam is flexible and rubbery and although it is a bit heavier than EPO is almost indestructible (for practical purposes). |
| EPS | "Expanded PolyStyrene"; This type of foam is normally used for packaging which you might find for televisions, and electrical appliances. helmets, inside ice boxes, and for road and home construction. EPS contains ~95-98% air. |
| Balsa Wood | In the past, most RC aircraft used balsa, which is an incredibly lightweight but decently rigid and easily cut wood, to build the frames, wings, and tail. Incredible care and time had to be invested during the construction, and even the lightest of impacts caused major damage to the frame (more significant crashes result in a complete loss). |
| Blow Mold Plastic | The process of blow molding plastic involves a closed mold into which semi-molten plastic is blown and then cooled in order to retain the mold's shape. This results in a durable hollow shell. Blow-molded plastic is most often used to create the fuselage (as opposed to the wings) and the customer is expected to make the appropriate cutouts. Blow-molded designs/kits can also include pre-cut balsa as reinforcement. Blow-molded plastic can withstand low-force impacts and tends to dent as opposed to shatter. |
| Vacuumed Plastic | The process of vacuum forming sheets involves heating a thin plastic sheet to the point it is flexible but not quite molten, and placing it onto a male mold; while it is flexible, the air between the mold and the sheet is removed (i.e. vacuumed out), causing the sheet to conform to the shape of the mold. The plastic is left to cool and the 3D shape is cut out from the surrounding material. There are many different types of plastics that can be vacuum formed and their properties can vary. Polycarbonate tends to be a good compromise between weight and impact resistance. |
| Corrugated Plastic | Although very few airplanes use this for the fuselage or wings, it is used quite often to create rigidity, doors, or wherever flat surfaces are needed. Corrugated plastic looks like corrugated cardboard, but is made out of plastic (think about a "For Sale" sign). It is very resistant to crashes and impacts, easy to work with without any special tools, and very smooth (aerodynamics). |
So which material to choose for an airplane? The vast majority of the FPV community uses EPO foam:
- Exponentially less time is invested in assembly as compared to balsa and therefore faster to get into the air.
- Relatively lightweight compared to other materials and decently rigid*, yet can be easily modified/cut.
- "Forgiving", in that it is able to withstand low force crashes and impacts and can often be re-glued and re-flown.
- Good value; Foam models range quite a lot in price since the creator needs to offset the cost of the design, prototypes, and mold and the cost of the frame is normally proportional to its size.
- Does not require specialized tools like a heated laminating iron
- Most frame kits include the major components needed (balsa models often required the additional purchase of laminating film, much of the hardware, and more).
*Foam models are rarely rigid enough on their own to withstand the loads on the wings and require reinforcement in the form of "spars" (long and thin rods, normally made of fiberglass or carbon fiber) to increase the rigidity. These spars often need to be glued in place in various strategic places on both the top and bottom of the wing (in pre-cut channels). Foam models can only be so large before this approach is no longer practical, which is why it's fairly rare to see models with more than a 2m wing span using foam.
Foam: It is important to note that one cannot use any glue on foam and certain glues will eat away at and degrade the foam. The most common glues used to bond EPO foam are Goop (name brand) and Gorilla Glue (name brand). Goop is clear and has the consistency of a thick syrup, and the bond is excellent. Gorilla glue on the other hand requires a bit of water for activation and its initial consistency is that of thick syrup. It then foams up to about 400% of its initial size and is yellow in color. Gorilla glue can be cut away in areas where it is unwanted, but be sure to impede areas you don't want it to leak into (using painter's tape for example) and use hot glue to tack parts in place which you don't want to move while the glue expands and hardens. It is normally easy to cut away foam using a sharp retractable knife, soldering gun (as opposed to a soldering iron), or heated wire. A hand saw tends to rip apart the foam and leave a very rough surface. Foam airplanes are often white, rarely black, and even more rarely grey or other colors. Customizing the appearance is a matter of adding color or designs which can be done using specific paint, laminate, or vinyl. Note that only certain paints are suggested for use with foam, as some can trigger a reaction and melt the foam.
Balsa: Cyanoacrylates are most commonly used for balsa wood - they are normally a very viscous liquid (almost like water) and create a very strong bond. Once the frame has been made, it needs to be covered using laminate (a plastic sheet with heat-activated glue on one side) in order to create an aerodynamic surface. Laminating film is heated/applied using a laminating iron and one of the properties is to become "tight" so the surface becomes hard. This means that the laminate will only be able to adhere to the balsa wood - it cannot be used to create 3D shapes.
Composites: It is still rare to see composites used to create small-sized aircraft (carbon fiber). These parts use epoxy (or a specific bonding agent) and are harder to cut manually, often requiring a CNC milling machine. Creating 3D shapes is also quite hard. Normally airplanes use composites for reinforcement.
An aircraft propulsion system consists of the motor, propeller, ESC, and battery. Choosing the appropriate parts for a frame should not be "guesswork" and it's best to see if the manufacturer of the frame has either a specific suggestion of motor + propeller or a range for a given payload. Most enthusiasts these days tend towards electric motors as opposed to gas (kerosene for example) because of the lowest cost of operation and ease of use. Solar is rarely used since the power which solar energy provides versus the added weight of the solar panels (which are used to charge the batteries) is still not advantageous. Choose a motor + propeller combination which can provide the thrust needed for your airframe which has a specific load. Some manufacturers of airframes provide some ideas of the thrust needed based on their own experimentation, which should give a general idea of the thrust range needed. Under-powering the plane would cause it to be unstable, "porpoise" or crash. An overpowered plane might be entirely unstable in flight. Given that almost all of the technology used to create airplane drones comes from the RC industry, there is an ample amount of information available regarding choosing the right thrust and servos for different applications. Center of mass: The center of mass is the point around which the frame can be placed so there is equal weight on all sides. Center of lift/moment coefficient This is the point where the sum total of all lift generated by the wings and control surfaces is and is usually located at the highest point of the airfoil. You normally want the center of mass to correspond with the center of lift.
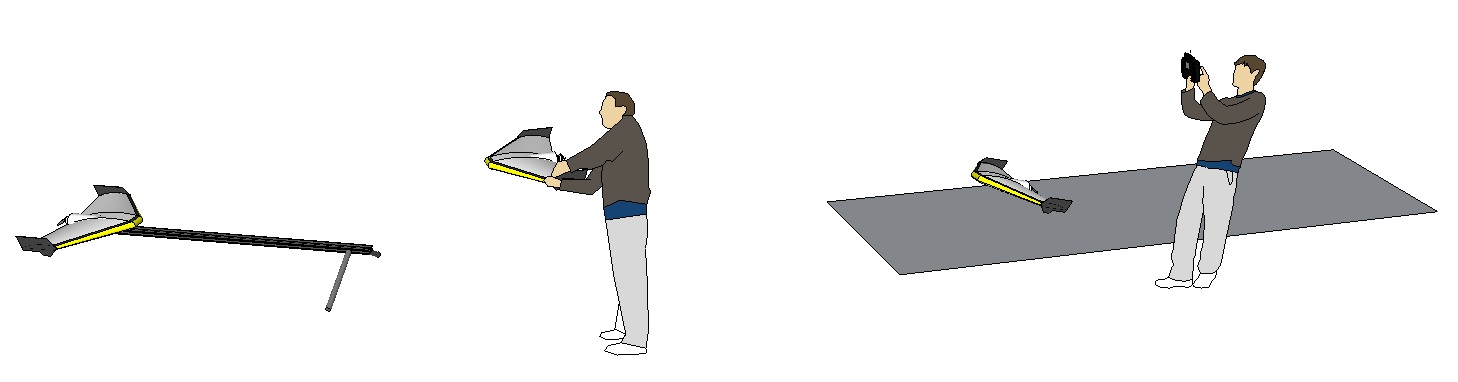
There are classically three ways to launch a small drone: a runway, by hand, or "catapult". If you have access to a flat field, unused and open paved surface, or runway (at an RC model club), then your airplane will need wheels and proper landing gear. Delta wings, gliders, and non-standard drone frames almost never have landing gear, and as such need to be hand launched or use a catapult.
Runway Launch / Land: In order to use a runway approach, your drone needs wheels, and the runway should be as flat as possible and ideally paved.
Hand Launch: There are two main types of hand launches: underhand swing, and overhead. The swing approach is similar to a discus launch (or skipping stones across water) where you try to get the drone up to speed as fast as possible using angular velocity. Alternatively, there is the overhead approach (it best to have a second person doing this) where you launch the plane upwards
Catapult Launch: A catapult uses one of a variety of different methods to get the drone up to speed as fast as possible: bungee cable, winch or even compressed air. Catapults are not easy to transport and require additional investment and troubleshooting.
Hand Catch: It's not too hard to catch a small drone by hand, provided the propeller is not rotating but takes some practice and skill
Skid Landing: The most commonly used landing method is a skid landing on a decently flat surface such as grass. This method is used because fewer and fewer drones have landing gear (and a runway is not available), forcing the airplane to simply land in any flat area possible. Normally before a flight, the pilot will find a suitable place to do a skid landing. The aircraft should ideally have replaceable skid plates due to wear and tear.
Net "Landing": Although more commonly used by the military for small drones, using a net to catch a drone is quite effective where other types of landing or retrieval are impeded. Setting up a net system however takes time, and for most enthusiasts, other types of landing or retrieval are preferable.
Are you looking to design or build a drone based on a wing? We would love to see what you create and encourage you to join letsmakerobots.com and post your project. Is there any information you would have liked here but did not find? Feel free to provide your comments and feedback below.