

I am building an outdoor robot named Yard Gnome to help around the house. I'm starting from a mobility scooter, kettcar and other parts.
Cost so far:
- One used mobility scooter (craigslist): $50
- One used kettcar pedal car (craigslist): $20
- Two new 12V 18aH SLA batteries (eBay): $77
- One used Futaba Digital Proportional Remote Control 6-channel transmitter and receiver (local hobby shop): $50
- DC-DC Step Down Converter (eBay): $20
- 24VDC 30 rpm 41 in-lbs motor (eBay): $20
- Initial Plans:
- Test (and likely replace) batteries, which are old
- Fill tires
- Test drive as-is to get an idea of the speed and power
Improvements:
- Lose the chair, steering column, etc.
- Bigger, more all-terrain tires
- Fabricate new steering mechanism (2 front wheels)
- Suspension (similar to a go-kart)
- Towing hooks
- Payload area (for carrying rocks, wood, dirt, etc)
- Driver and control board
- Wireless remote control
Update 2010-06-07
My motor arrived from eBay. It was a bit smaller than I thought it would be, but with 41 in-lbs of torque, I hope it will be up for the job of steering Yard Gnome.
I did a quick test with my H-bridge and servo controller (hacked from a hobby servo). It still jitters when under servo control. I think it is because the controller is not tuned for this motor. I’ll keep working on it.
Update 2010-06-02
I discovered some good news today while my son was playing on the Yard Gnome. Actually, he discovered it a while ago and explained it to me.
I had thought that the forward/reverse control was a simple toggle. It turns out that the control is proportional. The more you press the thumb lever forward, the faster you go! There is a separate speed control knob that sets the maximum speed.

The upshot is, instead of having a dedicated servo for controlling the speed knob, and a separate one for forward/reverse, now I can just set the knob manually at the maximum speed desired, and the proportional lever will set the speed based on servo position. That's one less servo to worry about, and one more RC channel (and eventually uP output) for controlling other cool stuff (lights, manipulator, etc.)
Yea!
Update 2010-05-28
Purchased a DC-DC step down converter so I can get drop the 24V from the two 12V batteries down to 5V with 5 amps for the electronics and servos. The converter can actually handler voltage input from 10V to 30V, which is perfect for running off batteries.
I also tested the remote I bought with a few servos. At first I thought it was broken because nothing happened with the first servo I connected. Turned out to be a smoked servo. I'll have to tear it apart and see what's wrong. Two other servos worked just fine.
Next steps are to build a servo mount for the forward/reverse control, and anther for the speed control.
Update 2010-05-25
It's been a while since I've had time to tinker on this. However, today I stopped by a local hobby shop (www.3dxhobbies.com) and picked up what I hope is a good deal. It's a programmable 6-channel remote controller intended for RC airplanes. It came with a 7-channel receiver as well.
Now I can start figuring out power sources and mounting servos to control forward and reverse, speed and steering. Coolness awaits.
Update 2010-05-06
Yesterday I finished mounting the transaxle, controls and wiring. It was time for a test drive. My son assisted as cameraman and my daughter as test co-pilot and occasionally payload. The video (available shortly) shows some of the design features and how the platform performs.
There was one minor glitch, the way I attached the transaxle was opposite it's original orientation on the mobility scooter. The result... backwards and forwards were reversed. In reverse the mobility scooter was designed to go slower than forward at the same setting... for safety, I'm sure. There's also an annoying (yah, safety) beep that keeps going as long as you are in reverse.
Today I corrected that problem by reversing the two motor wires, so that's all fixed.
This phase of testing is pretty much complete. I'll start adding some tow hooks and other easy stuff. The big job to come is automating the steering.
Update 2010-05-05
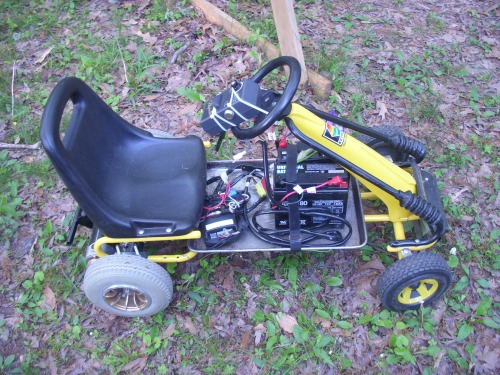
After some fun test driving the scooter around the driveway with the kids, it was time to get serious. I broke down all the unneeded parts from the kettcar and set them aside. Then I removed the rear wheels/motor/transaxle, controls, batteries and wiring harness from the scooter.
I found I needed a platform for the batteries. I had this old cooking sheet lying around, that got integrated into the project. I almost threw that out last week while cleaning up the basement. ; j

I need to buy some U-bolts to connect the axles to the frame. Some steel flat angle will get bent at 90 degrees and hold the axles fixed to the frame so they don’t slip at all. Then I just need to attach the controls, put a seat back on and wire everthing up.
Update 2010-05-04
Woot! My batteries came in and as an extra surprise, they were already fully charged. Took a quick test ride inside the garage and the scooter seems to work fine in forward and reverse. This afternoon I hope I’ll have time to take it outside and test at various speeds.
I also go in a spring scale to help me estimate how much force I need for a servo to turn the steering wheels. More on that later…
Update 2010-04-29

After looking over the kettcar I aquired above, I decided it would be easier to build on this as my robot frame than to use the mobility chair frame. Although the chair frame is stronger, this will solve a lot of problems, and I can always reinforce the frame.

The most important thing about the kettcar frame is that it already as two front wheels that can be steered, instead of a single wheel like the mobility chair. I will need a way to actuate the steering linkage. I don't think a servo is practical for this size and weight robot. Any suggestions? A linear actuator, maybe?

I’m going to remove the kettcar seat, rear wheels and axle, pedals, chain and sprockets. I will bolt the rear power section of the mobility scooter to the existing kettcar frame. Most of the frame of the power section shown above will be removed and I will bolt the axles right to the kettcar frame.

You can see above that the front kettcar wheels are smaller than the mobility chair wheels. The original rear kettcar wheels were even larger than the mobility chair wheels. These nice grey wheels are rubber with inner tubes, and I think I will get better traction, plus more torque by keeping them. Plus I don’t have to mess with adapting the kettcar rear wheels to the mobility chair axles.

I'm hoping to re-use the control box from the mobility chair. That will help simplify battery charging, braking, motor control, etc.

As you can see from the original controls of the mobility chair, you get forward and reverse (hard to see in this pic; they are a rocking-thumb lever in the center), a knob for speed control, and LED bar for power indicator, and even a horn (I am SOOOOO keeping the horn).
I think I can replace the forward/reverse switch with transistor and relay control. I have to figure out how to translate the power knob to microprocessor control, but it shouldn't be too hard.
I can't wait 'till my new batteries show up!
Update: 2010-04-27
Today I purchased some new batteries from eBay. The original ones are old and won't hold a charge any more. These are 18aH batteries, which is only a little better than the original 17aH batteries. I could have paid more and gotten some 22aH ones, but I'm trying to keep costs down.

This evening I’ll go pick up the kettcar, which I’m getting for a great deal. I need the wheels and more importantly the steering mechanism. I want to upgrade the single front wheel to two front wheels. Rather than fabricate it all from scratch, I’m going to steal it from this pedal car.

Other parts may come in handy for this or future projects. I didn’t think my son would appreciate it if I ripped parts from his own pedal car. ; j
Original Post
I just bought a used mobility scooter, the kind elderly or infirm people use. It was a great price so I just had to go for it. It looks a little bit like this one:

The model I have is discontinued and I cannot find the manual for it online. I have contacted the manufacturer for whatever documentation they can provide.
The motor is by a Chinese company, has no specifications plate on it, and I cannot find documentation. However I know this is a 24V DC system, and the motor looks fairly beefy. It has to be to carry a 300 lbs person, after all!
The plan is to build an outdoor robot that can assist with yardwork and chores such as taking the trash to the end of the driveway, hauling wood, etc. If it can haul a human around, this sort of thing ought to be no problem.
The platform is not perfect for the job. The scooter is a 3-wheel version with only one motor. I would have preferred a four wheel version or at least one with 2 motors so I could do differential steering. However, the price was right and I will work with what I have.
There's a transmission system bolted to the motor, which I plan to keep. I'll likely ditch all the electronics and build a custom driver and controls.
Initial Plans:
- Test (and likely replace) batteries, which are old
- Fill tires
- Test drive as-is to get an idea of the speed and power
Improvements:
- Lose the chair, steering column, etc.
- Bigger, more all-terrain tires
- Fabricate new steering mechanism (2 front wheels)
- Suspension (similar to a go-kart)
- Towing hooks
- Payload area (for carrying rocks, wood, dirt, etc)
- Driver and control board
- Wireless remote control
https://www.youtube.com/watch?v=ThDM2T_LjeM