Wavecrafter_V1.2.asm (12429Bytes)
So, a little while back I made a posting about adding a low-cost ADC module to micros for various reasons. At the same time as I was testing this concept out, I was also experimenting with 4-bit resistor network DACs for producing slightly higher quality audio (compared to 1-bit) for piezo speakers on small projects.
What better way to play with these ideas than to build a small project that made use of them? Previously I've tried to integrate experimental circuits into large projects, which invariably ends up being a headache, as the whole project is slowed down while I mess around with the new gear.
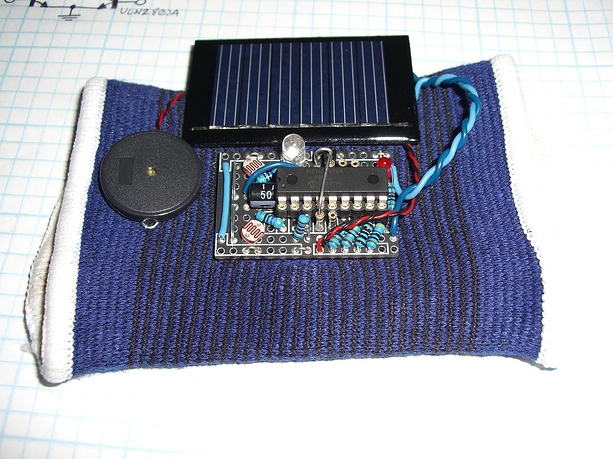
As such, the Wavecrafter was born. Using only cheap parts, a small circuit board, and fairly minimal programming, it was the perfect platform to demonstrate and experiment with the concepts I was developing. The Wavecrafter is stitched onto a cheap wristband using clear fishing line so that it can be worn, which is useful for testing it out in the real world without being too much of a pain (and fashionable as well, I'm sure =3).
Basically there are 3 parts to the Wavecrafter, all tied together by a PIC16LF628A micro (I have a huge tube of these little guys so I use them for everything =D):
• Solar power circuit - a small 4V solar cell provides power to the circuit via a 100µF electrolytic cap, which is hidden under the micro. The micro also has an input dedicated to detecting whether the solar cell is providing power or not, so the micro can conserve power when it's scarce.
• Sensor & ADC suite - the Wavecrafter uses a 1µF electrolytic cap (sticking out the front from under the micro) and a few resistors to implement the DIY ADC configuration as per the tip I posted. The sensors it can read from are 2x CdS LDRs, an IR phototransistor, and an NTC thermistor. Each of these sensors has an enable line, which means I can read from them sequentially. The Wavecrafter also has a small antenna that can pick up static, nearby AC lines, etc.
• 4b Piezo sound output - to report back on the data received from the sensors, the Wavecrafter produces various noises from the 4b piezo speaker driver. This is convenient as you don't have to look at the Wavecrafter, it requires very little power, and can convey a significant amount of information to the user. There is also a small red LED that the Wavecrafter can use as a secondary output, but this is only used when power from the solar cell is plentiful.
The actual sound the Wavecrafter makes depends on what program I've loaded onto it at the time. I've attached a copy of the current program to this post.
Earlier programs made continuous noise by firing out the sensor data via the speaker without modifying it much, if at all. This really, really was not very pleasant, although it was good for testing response speed and sensitivity.
The most recent iteration of the Wavecrafter code takes the LDR and phototransistor readings, and uses them to make a set of 3 short tones. The tones are played like beats from a drum machine, with the pattern determined by the combined readings, and the tempo set based on the thermistor reading. The antenna modulates the output sound by inverting the waves back and forth whenever it picks something up.
One thing I noticed while walking around with the Wavecrafter on is just how much the human eye and brain calibrate out, in terms of ambient light variation. A cloud would pass over the sun, and the sounds coming from the Wavecrafter would completely change even though I barely noticed a difference in light levels. Pretty interesting stuff IMHO.
https://www.youtube.com/watch?v=hU8Ldzkhjmw


