

I have a couple of headset microphones, and I would like to use them as sound sensors…
I tried to amplify the signal using LM386, but it doens´t work… can someone help me on this?
There is also something
There is also something called acoustic triangulation. Which isnt really using a single microphone as a sensor, but using multiple microphones to detect things. I stumbled upon this extremely interesting write up, very informative, very intelligent, very long, very easy to understand. Maybe it could help you:
http://courses.cit.cornell.edu/ee476/FinalProjects/s2007/ai45_hkc2_sbs43/ai45_hkc2_sbs43/index.html
I didn’t know, myself, that so much was involved in making one of these guys.
very interesting project and
very interesting project and inspiring, I was thinking in doing something similar but more simple, maybe it won´t be so accurate… we´ll see the result 
can you tell me if these
can you tell me if these micros are electret?

Please post…
Please keep up on this thread and be sure to include all your schematics and results… I’m quite interested in this one.
What are your sensing needs?
Are you trying to sample some sound, or meausure sound levels? Or are you making a sound "trigger"?
I need to measure sound
I need to measure sound level, I will have two or more microphones installed on the robot, and I want the robot to detect where is the sound coming from so it can move in the sound direction.
What do you mean by "sample sound" ?
"sound sampling"
means “sound recording” digitally
That is farway of what I
That is farway of what I need. Thank you rik
I was not putting the
I was not putting the microphone wires correctly, I supose that red is + and white is GND, but with this micros seems to be the opposite… so I swap the wires and I started to get signal input readings
The Rev ed version works good, seems to be ultra sensitive to the sound wich is cool, I forgot to buy the 47k potenciometer, and with a 22k resistor seems to work good for me.
I will try again the circuit with the LM386 this time plugging the wires correctly.
Finally I have some time to
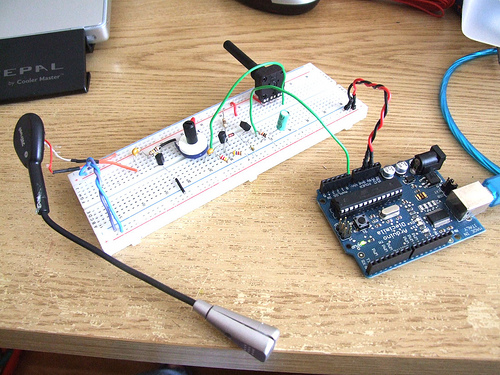
Finally I have some time to continue with this investigation and great improvements were achieved with the circuit provided by Ant: http://www.rev-ed.co.uk/docs/picaxe_sound.pdf
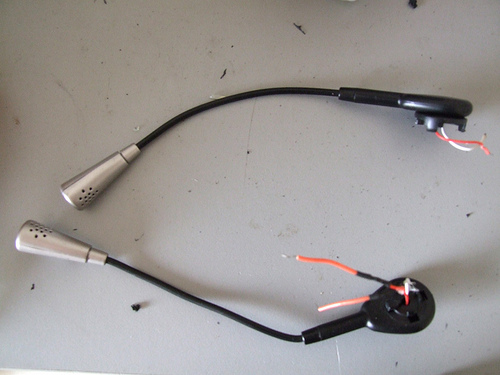
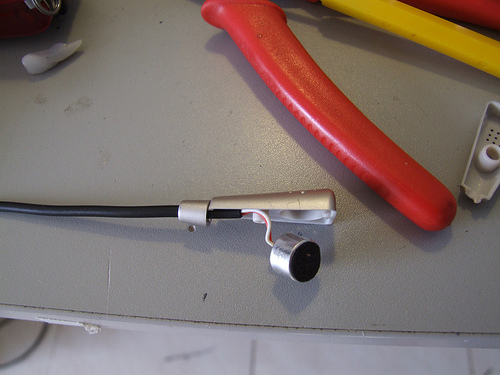
First here are the photos deleted by mistake from flickr:
Headsets microphones
Electrec thingey inside.
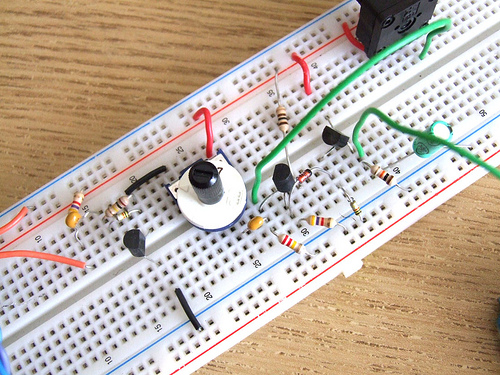
The circuit
This is a closeup of the circuit, I´ve added a 10uF capacitor to stabilize the output signal (it´s the green cap on the right).
The problem here is that I can´t imagine myself soldering all this components onto a pcb, I would like to have at least two of these, four would be awesome.
Below is a video showing the data visualization and code for Arduino and Processing:
I don´t know why the video doesn´t show up.. here´s the link: http://www.flickr.com/photos/guibot/3497408152/
/* ****************************************************
Arduino Code
**************************************************** */
int analogValue;
int val;
void setup()
{
// start serial port at 9600 bps:
Serial.begin(9600);
}
void loop()
{
// read analog input
analogValue = analogRead(0);
// send values to processing
Serial.println(analogValue, DEC);
// pause for 10 milliseconds:
delay(10);
}
/* ****************************************************
Processing Code
**************************************************** */
// import the Processing serial library
import processing.serial.*;
// declare a font variable
PFont font48;
int linefeed = 10; // Linefeed in ASCII
Serial myPort; // The serial port
// value recieved from the serialport / arduino
int sensorValue;
// mapped value
float sensorValueMap;
// - - - - - - - - - - - - - - - - - - - - - - - - - - - - - - - - - - - - - - - - - Setup
void setup() {
myPort = new Serial(this, Serial.list()[0], 9600);
// read bytes into a buffer until you get a linefeed (ASCII 10):
myPort.bufferUntil(linefeed);
size (800, 600);
background (0);
//smooth();
// you need to have this font in your machine, if not go to
// Tools - Creat Font - and create your own font
font48 = loadFont(”alask_48.vlw”);
textFont(font48);
}
// - - - - - - - - - - - - - - - - - - - - - - - - - - - - - - - - - - - - - - - - - Serial Event
void serialEvent(Serial myPort) {
// read the serial buffer:
String myString = myPort.readStringUntil(linefeed);
// if you got any bytes other than the linefeed:
if (myString != null) {
myString = trim(myString);
//println(myString);
// split the string at the commas
// and convert the sections into integers:
int sensors[] = int(split(myString, ‘,’));
// print out the values you got:
for (int sensorNum = 0; sensorNum < sensors.length; sensorNum++) {
//print(”Sensor ” + sensorNum + “: ” + sensors[sensorNum] + “\n”);
// sensor
sensorValue = sensors[0];
//sensorValueSmooth = sensors[1];
}
}
}
// - - - - - - - - - - - - - - - - - - - - - - - - - - - - - - - - - - - - - - - - - Draw
void draw() {
// set the black backgrounf
background(0);
// run the displayText() function
displayText();
// map the recieved values
sensorValueMap = map(sensorValue, 0, 1024, 0, 800);
// draw a rectangle based on the variable sensorValueMap
rect (0, 100, width, sensorValueMap);
}
// - - - - - - - - - - - - - - - - - - - - - - - - - - - - - - - - - - - - - - - - - Display Text
void displayText() {
text(”Sensor Value”, 20, 80);
text(sensorValue, 450, 80);
}
// - - - - - - - - - - - - - - - - - - - - - - - - - - - - - - - - - - - - - - - - - Save image
void keyPressed(){
if(key==’s’)
saveFrame(”sound-######.png”);
}