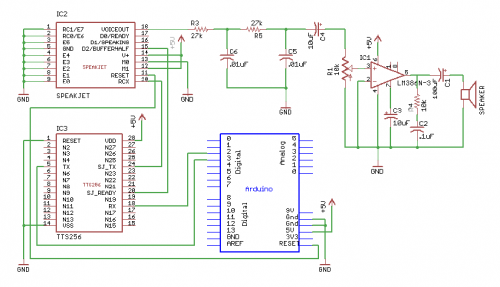
SpeakJetTTS_Schematic_0.PNG (7932Bytes)
This how-to article describes an easy way to add unlimited text-to-speech to your Arduino projects (with a bit of modification to my source code below, the PicAxe, Stamp BS2 or almost any other microcontroller can also be used). This article uses the popular SpeakJet speech synthesizer/complex sound IC. However, the SpeakJet can be a bit tricky to program! Wouldn't it be great if you could just send English text to the SpeakJet, and simply have it say what you just typed, without spending so much time looking up the SpeakJet speech codes just to speak a few words? Yes, it actually is possible! I will get to that in a moment...
In Ants original SpeakJet how-to, and in my first blog about the SpeakJet, PhraseALator software is used to help generate the SpeakJet speech codes. This is a bit easier than looking up the speech codes within the SpeakJet user manual, but as many of you who have tried PhraseALator have found out, PhraseALator is limited to the words stored within its dictionary file.
For this how-to article, I will be taking a different approach, one that will provide your SpeakJet projects with the ability to produce unlimited speech. One that can take English text and translate it to speech codes to be directly sent to the SpeakJet (a text-to-speech translator using the the SpeakJet).
You could take either a software approach or a hardware approach to add text-to-speech to the SpeakJet. As I write this, I don't know of an easy software "text-to-speech" solution for the SpeakJet , and I don't have the time to develop one myself (although I am aware of one being developed by LetsMakeRobots member Ro-Bot-X). However, I have run across a hardware solution where someone has already put a text-to-speech algorithm onto an IC! This component is known as the TTS256 Text-to-Code processor which was custom designed for the SpeakJet. By adding this IC to my SpeakJet circuit, we now have text-to-speech capability! Adding speech to your projects becomes almost as easy as adding a few lines of code and typing in what you want it to say. One of the benefits of this approach is that it requires very little from the Arduino or other CPU as far as I/O and memory.
Parts needed: Most of the parts should be available through many large electronics retailers on the web (such as DigiKey, Mouser, or Jameco) or your local electronics parts outlet. Where they are not, I've added links to vendors for the component.
1 - Arduino (Refer to Arduino website on where to buy and how to setup your Arduino. In the prototype project built in this article (seen in my first video), I used an AdaFruit BoArduino, but you could use nearly any Arduino or Freeduino clone.)
1 - SpeakJet
1 - TTS256 text-to-speech processor
1 - LM386N amplifier IC
2 - .01uF capacitors
2 - .1uF capacitor
1 - 10uF electrolytic capacitor
1 - 100uF electrolytic capacitor
1 - 10K resistor
2 - 27K resistors
1 - 10K potentiometer (set to approx middle of range to start)
My schematic is based on information and examples shown in both the SpeakJet (pdf) and TTS256 (pdf) user manuals. The following is the schematic that I built this project from.

See file attachment for a larger image...
The following sketch for the Arduino is an example of how to make this work. As you can see, just regular English text, no more mysterious looking speech codes! The first video demonstrates the sketch below. You can modify the text in the sketch to make it say almost anything you want!
// SpeakJet text-to-speech "All LMR are belong to us" demo
//set up a SoftwareSerial port for Speakjet Shield
//rxPin: the pin on which to receive serial data from TTS256
//txPin: the pin on which to transmit serial data to the TTS256
#include <SoftwareSerial.h>
#define txPin 2
#define rxPin 3
SoftwareSerial sjSerial = SoftwareSerial(rxPin, txPin);
void setup(){
// initialize the serial communications with the TTS256/SpeakJet
pinMode(rxPin, INPUT);
pinMode(txPin, OUTPUT);
sjSerial.begin(9600);// set the data rate for the SoftwareSerial port
delay(1000); // wait a second for the Arduino resets to finish (speaks "ready")
sjSerial.println("All L.M.R. are belong to us!"); // send the text to speak to the TTS256
}
void loop()
{}
I have found the TTS256 does a pretty good job with most English words. Some words have to be "creatively misspelled" in order to get them to sound correct. One example I found right away is "robot". Apparently "robot" is an exception to the phonetic rules written into the TTS256 as it comes out sounding more like "raw bot" rather than "row bot". Sometimes when working with small micros such as the Arduino you have to put up with a little quirkiness. :-) For speech in my projects, I can put up with a little misspelling once in awhile!
Also, with the circuit as shown here, it is pretty easy to "overflow" the SpeakJet buffer with too much text (the SpeakJet will either stop speaking, or spews out random words from your text). Adding a few well placed "delay(milliseconds)" functions can help, but you could also monitor the SpeakJets "buffer-half" or "d1/speaking" lines to determine when you are about to overflow.
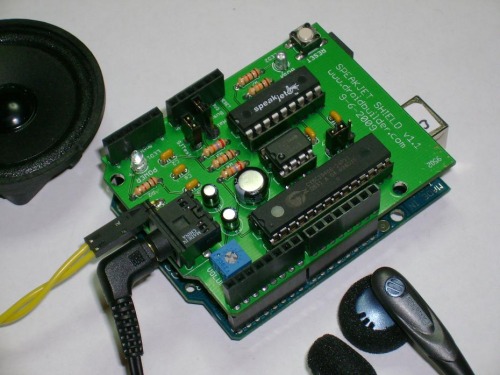
The photo below and the star in my second video show an Arduino shield PCB I made based on the above circuit. I have added more noise shielding, headphone/speaker connections, busy/buffer-half monitoring and easy switching between the SpeakJet and TTS256 configurations to it. At this point, I don't know how much interest there may be in LMR-land (and beyond) for this shield, but if there are enough people interested in buying one, I can make boards/kits available...

More comments available on my original SpeakJet text-to-speech blog post...
2010 Jan 20 Update:
Revised schematic uploaded...
https://www.youtube.com/watch?v=brTbNNFFpdQ


