

SpeakJetTTS_Schematic_0.PNG (7932Bytes)
2009-11-29
This blog article describes an easy way to add unlimited speech to your Arduino projects (PicAxe, BS2, or any other microcontroller for that matter). It goes beyond simply adding a SpeakJet, which is a popular (and common) approach, however the SpeakJet can be a bit tricky to program. Wouldn't it be great if the SpeakJet could just say what you want it to, without spending so much time looking up the speech codes to simply speak a few words? In my previous blog I used PhraseALator software to help, but PhraseALator is limited to the words stored within it as well.
Apparently I could take either a software approach or a hardware approach to add text-to-speech to the SpeakJet. At this time, I don't know where to find a software "text-to-speech" solution for the SpeakJet, and I don't have the time to develop one - but someone did beat me to it by putting "text-to-speech" onto an IC! So this is my hardware solution! By adding just one additional IC to my original circuit (the TTS256 Text-to-Code processor) we now have text-to-speech capability for the SpeakJet! Adding speech to your projects is almost as easy as simply typing what you want it to say. One of the benefits of this approach is it requires very little from the Arduino as far as I/O and memory.
Parts needed (if you built the prototype from my first blog posting you will have nearly all of these parts). Most of the parts should be available through most large electronics retailers on the web (such as DigiKey, Mouser, or Jameco). Where they are not, I've added links to the component.
1 - Arduino (Refer to Arduino website on where to buy and how to setup your Arduino. For the first video, I used an AdaFruit BoArduino, but you could use nearly any Arduino or Freeduino clone.)
1 - SpeakJet
1 - TTS256 text-to-speech processor
1 - LM386N amplifier IC
2 - .01uF capacitors
2 - .1uF capacitor
1 - 10uF electrolytic capacitor
1 - 100uF electrolytic capacitor
1 - 10K resistor
2 - 27K resistors
1 - 10K potentiometer (set to approx middle of range to start)
My schematic is based on information and examples shown in both the SpeakJet (pdf) and TTS256 (pdf) user manuals. Essentially this is a modification to my earlier blog posting with connections added to accomodate the TTS256. This is the schematic that I built this project from...

A larger image of schematic is available below (just above the comments) as a file attachment...
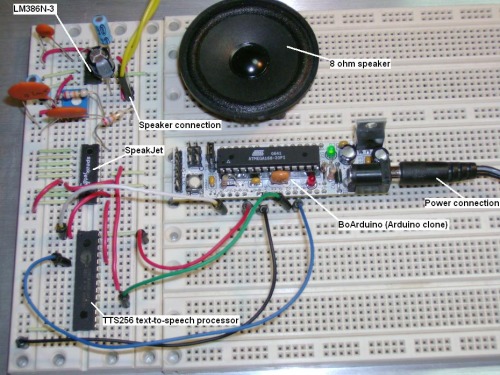
This is a photo of the project I built on a couple solderless breadboards:
The following sketch for the Arduino is an example of how to make this work. As you can see, just regular English text, no more mysterious looking speech codes! The first video demonstrates the sketch below. You can modify the text in the sketch to make it say almost anything you want!
// SpeakJet text-to-speech “All LMR are belong to us” demo
//set up a SoftwareSerial port for Speakjet Shield
//rxPin: the pin on which to receive serial data from TTS256
//txPin: the pin on which to transmit serial data to the TTS256
#include <SoftwareSerial.h>
#define txPin 2
#define rxPin 3
SoftwareSerial sjSerial = SoftwareSerial(rxPin, txPin);
void setup(){
// initialize the serial communications with the TTS256/SpeakJet
pinMode(rxPin, INPUT);
pinMode(txPin, OUTPUT);
sjSerial.begin(9600);// set the data rate for the SoftwareSerial port
delay(1000); // wait a second for the Arduino resets to finish (speaks “ready”)
sjSerial.println(“All L.M.R. are belong to us!”); // send the text to speak to the TTS256
}
void loop()
{}
I have found the TTS256 does a pretty good job with most English words. Some you have to “creatively misspell” in order to get it to sound correct. One example I found right away is “robot”. Apparently “robot” is an exception to the phonetic rules written into the TTS256 as it comes out sounding more like “raw bot” rather than “row bot”. Such is life, sometimes when working with small micros such as the Arduino or PicAxe you have to put up with a little quirkiness.
 For speech in my projects I can put up with a little misspelling once in awhile!
Also, with the circuit as shown here, it is pretty easy to “overflow” the SpeakJet buffer with too much text (the SpeakJet will either stop speaking, or spews out random words from your text). Adding a few well placed “delay(milliseconds)” functions help, but you could also monitor the SpeakJets “buffer-half” or “d1/speaking” lines to determine when you are about to overflow.
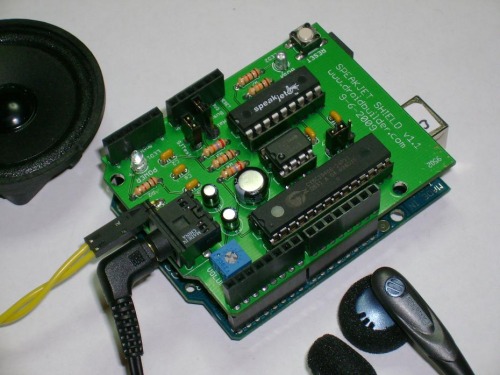
The photo below and second video show an Arduino shield PCB I made based on the above circuit. I have added more noise shielding, headphone/speaker connections, busy/buffer-half monitoring and easy switching between the SpeakJet and TTS256 configurations to it. At this point, I don’t know how much interest there may be in LMR-land (and beyond) for this shield, but I can make boards/kits available if there are enough people interested in buying one…
2009-11-29 UPDATE!
I was not happy with how my schematic image rendered above. Since apparently LMR won't let me post a higher-res (greater than 500x500 pixel) version, I changed the image colors a bit to at least try to make it more readable. I re-uploaded the schematic image - yeah it's still smallish, but at least (to me anyway) a bit more readable than my original. Later I will add a link to a higher res image when I figure out how...
2009-12-1 UPDATE!
I made this post a tip/walk-through (after a bit more editing). I have also linked a larger schematic to both postings. Sorry for the redundancy. I may delete this one later. When I first posted it here I wasn't thinking of it as a walk-through, but decided later that it obviously should be. Click here for the walk-through...
Thanks!
2010-1-20 UPDATE!
Revised schematic uploaded.
https://www.youtube.com/watch?v=brTbNNFFpdQ