This is Sebastian (A.K.A. "Sebbie"), a little palm-sized robot I built as a present for my partner since I figured it was about time I built something for her =)
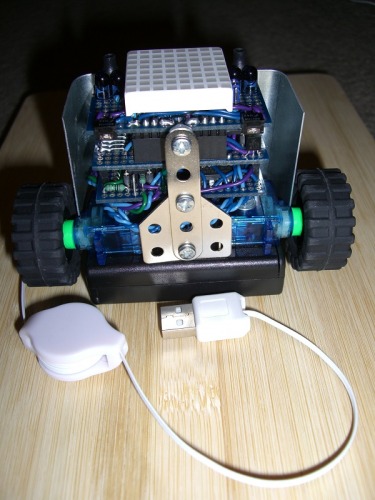
Sebastian wanders around on smooth desktops, floors, etc, using his two QRD1114 IR reflectance sensors to avoid going off any edges or steep inclines. The DIY IR sensor pairs on the front left and right are used for obstacle avoidance, but they're over-sensitive so Sebastian is often blinded until he's right up against the object anyway. Two hacked (continuous rotation) micro servos are used to move Sebastian around in combination with the small skid under his front. Sebastian's centre of gravity is only slightly forward of his wheels, so his front will often tip up a little when he goes from forward to reverse suddenly.
The orange 8x8 LED matrix on the front serves as Sebastian's face, and is used to display what task he's currently performing. There's a small piezo speaker behind the LED matrix, but the sound tends to get swamped out by the servos so I haven't really made use of it. The black battery box on the back contains 3 NiMH AA cells which power the whole system - these can be removed for charging as normal, or charged via the retractable USB cable. When the USB cable is plugged in, Sebastian's servos are disabled to prevent him from yanking the cable out accidentally. The USB cable reel has a little magnet glued to it which is paired with another magnet on the back of the battery box to keep it out of the way when Sebastian's not being charged.
Even better than Meccano, it’s a cheap Meccano rip-off =D Usually I just use it for prototyping, but in this case the added weight was actually needed to counter-balance the batteries.
As far as the “orange” tag goes… not sure what I was thinking there, maybe I was supposed to type “orange LED” or something…
Totally awesome little robot there. Very nice compact and fun design. Great idea to use that matrix display for eyes. I wonder if a mouth could be put on there too, so if your robot had moods it could display those. Maybe that is an idea for later.
I also very much enjoyed looking through your pic asm code, great job there. Very easy to read the code with comments on every line. I am just starting out with PIC I have a little experience with AVRs, mostly C, but I love asm code, I like getting very thing I can out of the little micro with very little waist.
I just love Pic asm its going to be a challenge, but I’m sure its going to be a blast
Thanks for the comments! This robot was a gift, but maybe I’ll borrow him back and perform a few upgrades. After that video was taken I finished the code for the forward IR sensors so he can actually avoid objects now, at least most of the time =)
If you want an easier intro to working with low-level ASM stuff (considering your previous experience), don’t forget that you can “mix and match” by inserting ASM instructions into C. This allows you to use the flexibility and convenience of C, while still keeping the level of control that ASM allows for really critical high-speed tasks. I still use pure ASM for smaller micros like the ones used in this project, but when working on larger devices (16 and 32bit micros for example) C+ASM is a really nice combination =D
Yes C and asm could be great together, and I am amazed how small the C (GCC) compiler can produce code, but even I can make smaller code than the compiler, and I’m more or less a beginner. Of course I"m very wet behind the ears when it comes to Pic asm.
My take on this is high level languages are nice for programers, but there is a price. Look at the software we have today, we need Fast computers with large amounts of memory even for basic tasks. I remember back in the good old days when 64k was seriouse memory, and programers could do totally amazing things with such limited resouces.
Your using IR leds for your forward sensor. and for cliff detection. I totally love that. I know you can get sharp IR range finders and such, but you need at least 4.5 volts to run them, they are larger and consume more current. I do like the sharp IR range finders, because they are so easy to use, and for me they have worked without any real issues. But the challenge of using simple componets and getting them to perform the task of avoiding objects and avoiding falling off a table is one of the reasons I love the powerful little 8bit microprocessors, and what you can do with simple basic setups.
I’m looking foward to what next you will do with this little robot.
I’m building a kind of Sebastian clone, without all the nice bit
Hiya TeleFox. I have been working through your Sebastian code, as I build a clone Sebastian of sorts. I am using a pic16f887 which is a nice 40pin chip with 8k code space and a truck load of goodies minus usb. The usb doesn’t matter as I have a mega8 doing usb to ttl conversions. Which is handy for debugging, and getting a handle on these pic chips.
My driver is a L293D, and I’m using some sfh 309fa phototransistors with sfh 409 emitters. I have found these give good response over
a wide range. I will only have two edge detectors on the front of the robot, mainly to keep things simple as possible for me :) and the LD293 will be turned on and off by using the enable pins… I have not used PWM once again to keep it as simple as possible.
I really liked how you used a serial link between the two processors. If your chips supported i2c would you have used that instead or
is serial alot easier to work with. I have played around with i2c on the avrs, and a little with jalv2 on the pic, I am thinking serial is easier
but i2c gives you alot more options with different devices.
Hey again, great to hear this little project has been a useful resource for you =)
Straight-up serial was perfect for this project since there was only one master and one slave, so having a super simple, efficient and robust protocol was really good. Excluding the initialisation it only takes 2 ASM opcodes to load and send a byte of data (tiny!).
If there was ever the possibility of expanding this project to include other parts (more procs, external EEPROMs, ADCs or whatever) then I’d have gone for I2C instead - it’s only a little bit more effort to set up, but saves a lot of hassle when building a larger comms network. A good compromise between efficiency and flexibility in my opinion.