

Ok as this is hopefully going to be a ongoing project for a while i decided to put it in the robot section. Years ago i started getting a magazine called Real Robots and i started building the robot .... unfortunately i got so far then they stopped selling the magazine in my area leaving me with a part made robot. This got put away in a press and forgotton about ... until recently when i decided id like to learn about electronics and robots.
So now i have decided to hack this bot .... yes i want to remove the electronic boards but keep the body and motor and wheels to make a robot from. And hopefully i can learn a bit from doing this.
As building robots and learning about electronics is expensive i think it would be a terrible waste to leave it sitting in a press doing nothing.
So the plan is

A) To hook up the motors to my L298N Motor Driver board
B) Put my MEGA1280 (Arduino MEGA Compatible) in this shell and hopelly attach some sort of object detection method be it a ir led and receiver or a ultrasonic sesnor ...
also there is allready two photoresistors in the body so will be trying to connect these to my Arduino to use them and there is also a line follower in the base so i will be trying to connect this up as well.
Hopefully if i manage all this i will learn a lot in the proccess.
So what have i managed so far ...... well besides removing the old boards that were in this robot .... not much .... just started to day so did a bit and then decided to do this write up.
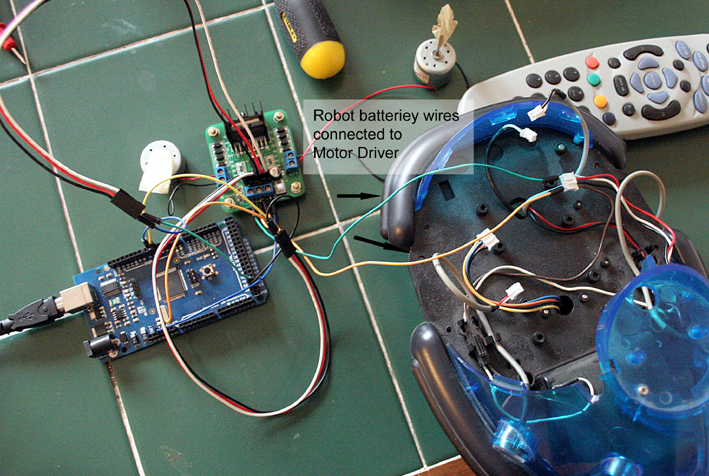
But i have hit a strange problem allready ......... First i wanted to see if the connectors for the batteries worked so i connected the 6v batterie connectors form the robot to my motor board ....which had two motors connected. I then hooked motor board up to the Arduino .. then ran a motor program to run motors one way ..... then stop them ...... and then run them the other way and then to continue in a loop. All went well motors ran and if i turned the switch on the robot to off motors stopped.
Decided to connect the motors form the robot up to the motor board then but heres where im having a problem ...... where as in previous example both motors ran and did what they were supposed to do ..... the robot motors didnt .... when i turned them on one ran then stopped then the other kicked in and ran the opposite way then stopped and it continued this loop ........... so its like there both running but only doing half the coded program each ..... even though if i connect the two other motors i had for testing they both run together no problems ??????.
So if anyone has any suggestions on why this might be happening id love to hear from you.
Ok did a another test on it ...... on old set up robot ran fine on batteries ..... with new set up dosent seem to be as much power going through to the motors. So i disconnected motor board from 6v robot connections and hooked up to a 9v batterie. And both wheels turn as should then stop and then reverse together.Tried connecting the wires to the 9v connectors on robot and run through motor board but nothing happens only runs whenyou connect to the 6v connections .....
Ok here i have connected the motors to the original 6v power set up of the robot ..... wanted to see how it ran ... and it runs perfectly ... seems to have plenty of power and no problems ... yet if i add my new motor board it wont run on this 6v power ?????
6/2/2012
Ok got a HY-SRF05 sensor today ..... cost $4.75 on ebay and took 21 days to get here .... (got 5 solar panels as well) total cost just under $10 and no shipping .... so worth the wait.
Any way back to the sensor .... after googling LMR and other places finally figured out how to set this up to work.
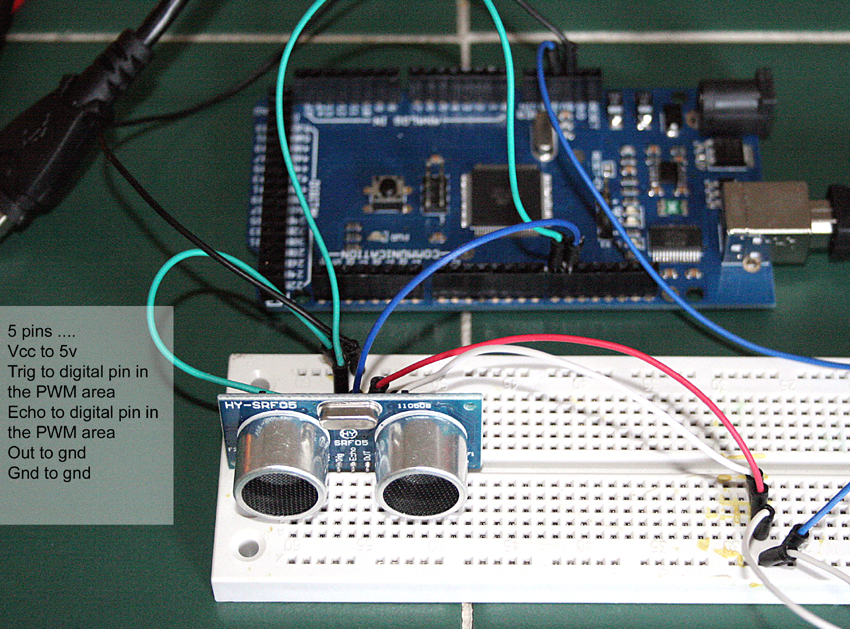
Got the code here ... http://www.elechouse.com/elechouse/images/product/Arduino%20Ultrasonic%20Range%20Detect
ion%20Sensor/Arduino%20Ultrasonic%20Range%20Detector.pdf ........ ( Address was to long so had to split it).
Delighted to get it working ... Wouldnt say its 100% reliable ... find it can be a bit jumpy ... so if anyone wants to look at the code and see if its that id be delighted ... i did change the delay at the end from 100 to 500 to slow it down a bit and this seems to make it a bit better ... but i have only ran it once .
Next i have to get it working with a servo.
6/2/2012
Another quick update managed to create a code to get sensor to operate and if it detects a object and its = or closer than 10cm the servo will turn to a set position. If it dosent detect or detects a object further away than 10cm it turns to the front or if allready in that position stays facing front.
Basic stuff for most out there i guess ...... but for me this is pretty big and Im very happy ... Hopefully i should be able to build on this and program a robot for objection detection and avoidance.
8/2/2012
Ok managed to get some batterys to day so after a crazy rig up to get 9v into my new driver board .... this now gives enough power to drive the motors (which only require 6v in old set up LOL) ... not sure how much the motor board uses as my multimeter battery died so couldnt test. Heres a video of my crazy set up and test .... http://www.youtube.com/watch?v=4-JVXUuExzw&feature=youtu.be .... after I ran this i uplugged Arduino board from computer and shortly after i heard a funny buzzing sizziling noise ... and i unhookde all wire connections ...... when i went looking i found one of the batterys in the small battery holder leaking. Luckyl nothing is damaged as i replaced battery and re-ran test and all was fine.
Next i need to get a better set up for the 9v needed for running the motors .
Then i need to combine the code for the motors with the code for the servo and sensor ....
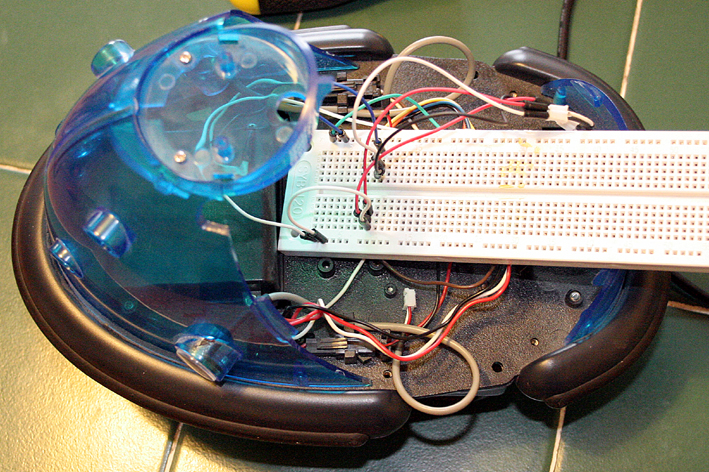
Then lump everything into the robot chassie and take a test drive ..... will do a simple program eg drive forward detect wall and stop .... and work at building up program from there.
9/2/2012
Quick update ... managed to find a 3v battery holder .... so combined
it with the 6v battery holder allready in the robot to give me 9v .... works out nice as the on off swithch works and dont have to add a seprate one for the extra 3v ..... will try later to see if i replace the batterys with rechargable ones will i have enough power but i dont think the 7.2v total from the rechargables will be enough and i dont have any more battery holders to add in.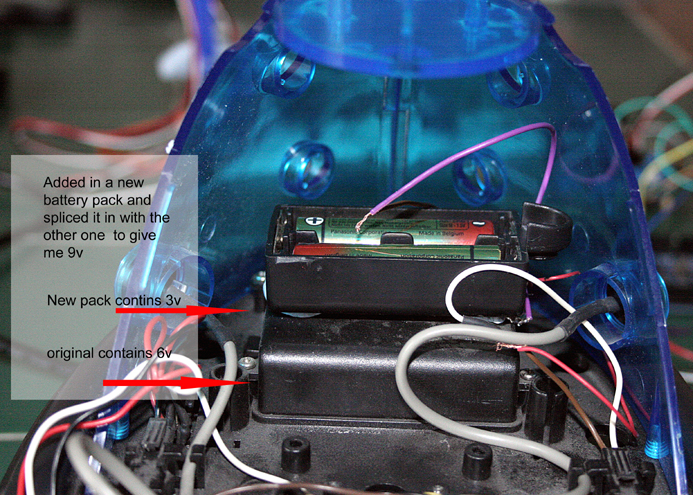
This is the power for the motors and motor board sorted .... there is also a 9v battery holder at the back of robot this will power the Arduino board.
So now to look at providing powrer for the sensor and the servo .....
Any advice welcome ..... do i split some from the 9v going to the motors and use that.
10/2/2012
Well with a bit of help from members i have sorted the motor board problem .... i have been shown how to use the original board that came with this robot (can be seen here .... and how to use it with my arduino board ... https://www.robotshop.com/letsmakerobots/node/31164 )
so Im no longer going to use the L928N board. Also the original board that came with the robot which im now going to use is smaller and takes up less space. Have taken it for a test run ... just programed it to go froward for 3 seconds stop for 1 second then reverse for 3 seconds stop for 1 and then loop. Works fine bar one problem ... the front castor wheel sticks so dosent go in a straight line .... so have to work on that now too.
Hopefully later on ill get the sensor and servo rigged up and make a basic program to control the lot and see how I get on.
Hopefully navigate around via ir sensor or similar .... follow light, line follower
- CPU: Arduino Mega 1280
- Power source: 9v and 6v power supplies
- Target environment: indoor
This is a companion discussion topic for the original entry at https://community.robotshop.com/robots/show/robot-hack-to-make-test-platform
 someone I knew got pretty much all the magazines, and never built any of it, so they gave all the bits to me one day.