

Introduction
Now, for the last in a series of reviews on Ro-Bot-X's boards. This one is for the uBotino Microcontroller Kit. It was designed specifically for the beginner robot maker who would like to do something like the Start Here robot with an Arduino. Accordingly, it is a small single board that includes the ATMEGA328 processor with Arduino bootloader pre-installed, a SN754410 dual h-bridge motor driver chip, pins wired for two DC motor interfaces, and convenient pins for interfacing additional servos and sensors, and a voltage regulator. Of course, for those interested in making something different than the Start Here robot, the board offers plenty of flexibility.

One of the nicest things about this board is that it has everything you need to get started. Many Arduino users start out with an Arduino Duemilanove or Uno, and then have to buy a shield (or more than one), to get a working robot. Here you have everything in one compact 2 inch square package (about 5 cm square for your metric types).
The Kit
The uBotino is available in three options.
- Stand alone board (un-populated)
- A kit with all of the components needed to populate it
- Fully assembled:
I recommend the kit, unless you already have most of the part in stock yourself. Ro-Bot-X provides the kit parts at a price I couldn't beat searching for them myself.
Here's what you get:

-
- (1) uBotino board
- (1) ATMEGA328P-PU microprocessor with the Arduino boot loader and blink sketch pre-loaded
- (1) 28-pin DIP socket (for the above microprocessor)
- (1) SN754410NE dual h-bridge motor driver
- (1) 16-pin DIPsocket (for the above motor driver)
- (1) 2-pin keyed header (for power)
- (1) 2-pin keyed connector and crimp pins (for power)
- (2) 220uF 16V electrolytic capacitors
- (3) 10uF 25V electrolytic capacitors
- (6) 0.1uF ceramic capacitors
- (2) 0.022uF ceramic capacitors
- (1) 16 MHz crystal oscillator
- (1) 5mm green LED
- (1) 5mm red LED
- (1) LM294 1A low drop out voltage regulator
- (2) 1k ohm 1/8 watt resistors
- (1) 10k ohm 1/8 watt resistor
- (5) 6-pin male headers (for the sensors A0-A5, the FTDI interface, and part of the UART/D0-D4 interface)
- (5) 5-pin male headers (for servos D9-D13 and the rest of the UART/D0-D4 interface)
- (3) 3-pin male headers (for Vcc/Vin power selection (J1), the ISP interface and part of the UART interface)
- (4) 2-pin male headers (for two motor interfaces, a jumper to disconnect servo power (J2), and the D13 LED jumper (J3))
- (1) momentary reset button
- (1) single pole, single throw power switch
- (3) 2-pin jumpers (to select J1, J2, and J3)
The kit itself is no frills and no nonsense. You get parts in a plastic bag, without printed instructions.
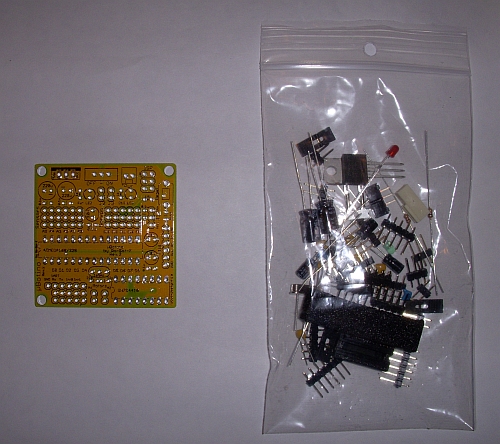
Ro-Bot-X provides an assembly guide on his website, which walks you through each step.
Assembly
Assembly was pretty easy, if you know how to solder. The contacts on the back of the board are very small, so follow the advice in teh assembly guide and use a fine tip on your soldering iron.
Finished Product
Here are a couple of pictures of the board installed on Why Tri, a robot still in progress.

You can see how the nice compact size make it easy to mount on a small robot.
Having everything on one board also makes for a minimum of wiring. The red and black wires are for the battery power. The blue wires are for the motor. Why Tri still needs his steering servo and Sharp IR sensor installed, but that will only make for two more 3-pin connectors.
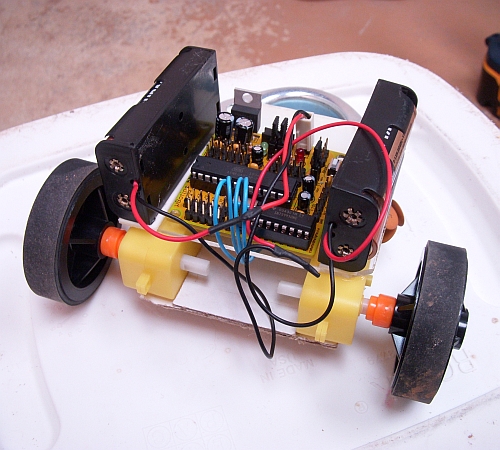
The board also has mounting holes in three of the corners. The fourth corner is taken by the motor driver. I do prefer a board with mounting holes in all four corners, but you have to compromise sometimes, and the small size of this board helps keep it both compact and inexpensive.
Notes
Power
The low drop out (LDO) voltage regulator should keep you running with a clean 5V output down to 5.5V from your batteries. It supplies up to 1A, which should be fine for the microprocessor and any sensors.
Servo power is direct from the batteries, with 0.1uF and 10uF capacitors installed right next to each bank of servo ports.
Interfaces
All the interface pins are broken out on the 3-pin male headers along with power and ground, except for the motor interfaces, which are 2-pin connectors. The power for the digital pins is directly from the battery, isolated from the microcontroller and analog pin power through the voltage regulator.
Filtering Capacitors
There are 0.1uF and 10uF caps for the servos, motor controller, the analog interface block, and the D0-D1/UART port.
Silk Screen
The board is very nicely and clearly labeled in Ro-Bot-X's preferred black on yellow background.
Programming
One of the ways Ro-Bot-X keeps this board small and keeps the parts cost/count low is to leave off the USB to serial translation circuitry you get on a Duemilanove or Uno. So to program the board, you need an FTDI to USB cable.
Ro-Bot-X actually posted a very nice tip on how to make a compatible cable for about $5. I have followed his tip and the cable works well for me.
Nit Picks
Labeling
The D0-D4 interface ports are only labeled with their alternative functions.
- D0 = UART RX
- D1 = UART TX
- D2 = Interrupt 0
- D3 = Interrupt 1
For those unfamiliar with the Arduino interfaces, this could be confusing.
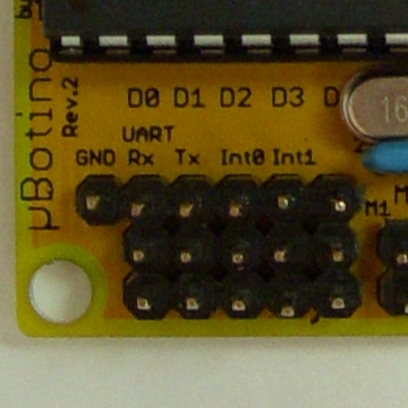
On his newer board, the uBotino, Ro-Bot-X managed to squeeze in both pin function labels. Maybe he could address this if there is ever a Rev.3.
Purchasing
You can buy the bare board or the kit from http://robotxdesigns.ca/ using PayPal. Various shipping options are provided, if you are in a hurry and can spend the extra money for quicker shipping. There's an option to add tracking, even for the economy shipping, but that does add to the cost. (These are Canadian Post costs, not Ro-Bot-X's.)
You can also buy the board fully assembled at: http://creatroninc.com/ardrb-001000.html
Summary
This is a very inexpensive Arduino based all in one robot board. It is easy and compact and gets you going with up to 2 DC motors, plenty of interfaces for servos or other actuators, and 6 analog inputs for sensors. It could easily be used as the basis of a Start Here robot for the Arduino, or for many other robotics projects.
------------------------------------------------------------------------------------
Also see... the Robot Builder's Shield V2 Review.