


Review for Motor Driver MDD10A
1 OVERVIWE:
This is review for the motor driver from Cytron Technologies “MDD10A”. It is dual H-bridge motor driver with high current capability. In this review, I try to show the main advantage of the driver comparing with Module L298N. This review will show how to use MDD10A with Raspberry pi and how to control the direction and speed of the motors using PWM.
2 Opening the box:
I received the driver MDD10A directly from Cytron, the box very nice for shipping and the driver well packaged in anti-static bags. The box contains:
1. One MDD10A Dual Channel 10A DC Motor Driver.
2. One piece of 2510 PCB Connector female five pins.
3. Five 2510 Iron Pins.
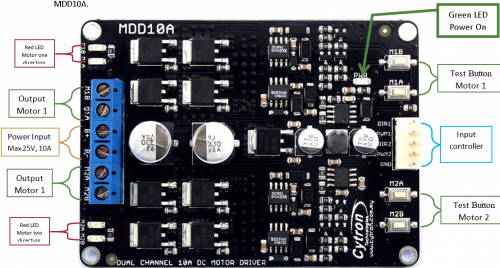
MDD10A Driver size 62mmX84.5mm, from the user manual next image show the main parts of MDD10A.
3 Controlling MDD10A:
There is two way to controlling MDD10A:
3.1 Button controlling:
In this way, you can control the direction of the motors, and check if you connect the motors in the current way but cannot control the speed of the motors. When you push M1A button, current flows from output M1A to M1B and the Red LED M1A will light as well as for button M1B current flows from output M1B to M1A and the Red LED M1B will light.
3.2 Pins Input controlling:
MDD10A proved four pins for controlling the Driver and the fifth is ground.

- 2. PWM1: PWM input for speed control (Motor 1), Max 20Hz
- 3. DIR2 : Direction input (Motor 2) , low (0-0.5v), high (3-5.5v)
- 4. PWM2: PWM input for speed control (Motor 2), Max 20Hz
- 5. GND: Ground
3.3 Logic controller
PWM | DIR | Current Flows |
Low | X(Don’t care) | Both output A & B are Low |
High | Low | From A to B |
High | High | From B to A |
Example: for motor one:
PWM1 | DIR1 | M1A | M1B | LED M1A | LED M1B |
Low | X | Low | Low | Off | Off |
High | Low | High | Low | On | Off |
High | High | Low | High | Off | On |
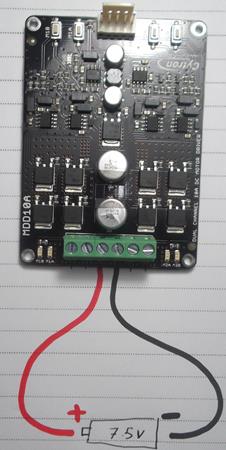
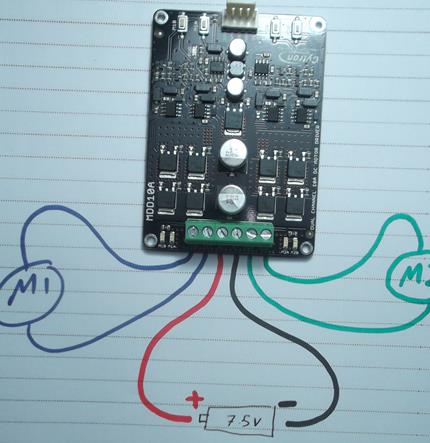
4 Controlling Rover 5 with MDD10A using test button
As see in the next figure shows how I connect the motors of Rover 5 with the Driver MDD10A.

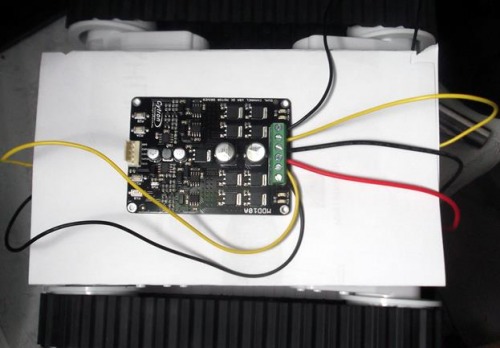
The Next video show MDD10A controlling Rover 5 using test button.
5 Controlling Rover 5 with MDD10A using Raspberry Pi
5.1 Prerequisite:
1. Raspberry pi have OS installed.
2. Raspberry pi connect to Wi-Fi network.
5.2 Pins connection

5.3 Python Code
5.3.1 MDD10A.py Module
1. #!/usr/bin/env python
2. # coding: latin-1
3. # I am Mohammad Omar, this module is builded to interface with the Driver MDD10A, to control two DC motors.
4. # the original code designed by Ingmar Stapel ,www.raspberry-pi-car.com to control two motors with a L298N H-Bridge
5. # The pins configuration for Model B Revision 1.0
6.
7. # How to Use this module: 1- creating an instance of the class. 2- call the Init function, 3- call commands functions
8. # Example:
9. # import MDD10A
10. # Motors = MDD10A.MDD10A()
11.
12. # Import the libraries the class needs
13. import RPi.GPIO as io
14. io.setmode(io.BCM)
15.
16. # Constant values,
17. PWM_MAX = 100
18.
19. # Disable warning from GPIO
20. io.setwarnings(False)
21.
22. # Here we configure the GPIO settings for the left and right motors spinning direction.
23. # as described in the user manual of MDD10A https://www.robotshop.com/media/files/pdf/user-manual-mdd10a.pdf
24. # there are four input PWM1-DIR1-PWM2-DIR2
25. # WITH MAX Frequency 20 Hz, and it works as follow,
26. # Input DIR Output-A Output-B
27. # PWM off X off off
28. # PWM on off on off
29. # PWM on on off on
30.
31. # The pins configuration for Model B Revision 1.0
32. leftMotor_DIR_pin = 22
33. io.setup(leftMotor_DIR_pin, io.OUT)
34.
35. rightMotor_DIR_pin = 23
36. io.setup(rightMotor_DIR_pin, io.OUT)
37.
38. io.output(leftMotor_DIR_pin, False)
39.
40. io.output(rightMotor_DIR_pin, False)
41.
42.
43. # Here we configure the GPIO settings for the left and right motors spinning speed.
44.
45. leftMotor_PWM_pin = 17
46. rightMotor_PWM_pin = 18
47.
48. io.setup(leftMotor_PWM_pin, io.OUT)
49. io.setup(rightMotor_PWM_pin, io.OUT)
50.
51. # MAX Frequency 20 Hz
52. leftMotorPWM = io.PWM(leftMotor_PWM_pin,20)
53. rightMotorPWM = io.PWM(rightMotor_PWM_pin,20)
54.
55. leftMotorPWM.start(0)
56. leftMotorPWM.ChangeDutyCycle(0)
57.
58. rightMotorPWM.start(0)
59. rightMotorPWM.ChangeDutyCycle(0)
60.
61. leftMotorPower = 0
62. rightMotorPower = 0
63.
64. def getMotorPowers():
65.
66. return (leftMotorPower,rightMotorPower)
67.
68. def setMotorLeft(power):
69.
70. # SetMotorLeft(power)
71.
72. # Sets the drive level for the left motor, from +1 (max) to -1 (min).
73.
74. # This is a short explanation for a better understanding:
75. # SetMotorLeft(0) -> left motor is stopped
76. # SetMotorLeft(0.75) -> left motor moving forward at 75% power
77. # SetMotorLeft(-0.5) -> left motor moving reverse at 50% power
78. # SetMotorLeft(1) -> left motor moving forward at 100% power
79.
80. if power < 0:
81. # Reverse mode for the left motor
82. io.output(leftMotor_DIR_pin, False)
83. pwm = -int(PWM_MAX * power)
84. if pwm > PWM_MAX:
85. pwm = PWM_MAX
86. elif power > 0:
87. # Forward mode for the left motor
88. io.output(leftMotor_DIR_pin, True)
89. pwm = int(PWM_MAX * power)
90. if pwm > PWM_MAX:
91. pwm = PWM_MAX
92. else:
93. # Stopp mode for the left motor
94. io.output(leftMotor_DIR_pin, False)
95. pwm = 0
96. # print "SetMotorLeft", pwm
97. leftMotorPower = pwm
98. leftMotorPWM.ChangeDutyCycle(pwm)
99.
100. def setMotorRight(power):
101.
102. # SetMotorRight(power)
103.
104. # Sets the drive level for the right motor, from +1 (max) to -1 (min).
105.
106. # This is a short explanation for a better understanding:
107. # SetMotorRight(0) -> right motor is stopped
108. # SetMotorRight(0.75) -> right motor moving forward at 75% power
109. # SetMotorRight(-0.5) -> right motor moving reverse at 50% power
110. # SetMotorRight(1) -> right motor moving forward at 100% power
111.
112. if power < 0:
113. # Reverse mode for the right motor
114. io.output(rightMotor_DIR_pin, True)
115. pwm = -int(PWM_MAX * power)
116. if pwm > PWM_MAX:
117. pwm = PWM_MAX
118. elif power > 0:
119. # Forward mode for the right motor
120. io.output(rightMotor_DIR_pin, False)
121. pwm = int(PWM_MAX * power)
122. if pwm > PWM_MAX:
123. pwm = PWM_MAX
124. else:
125. # Stopp mode for the right motor
126. io.output(rightMotor_DIR_pin, False)
127. pwm = 0
128. # print "SetMotorRight", pwm
129. rightMotorPower = pwm
130. rightMotorPWM.ChangeDutyCycle(pwm)
131.
132. def exit():
133. # Program will clean up all GPIO settings and terminates
134. io.output(leftMotor_DIR_pin, False)
135. io.output(rightMotor_DIR_pin, False)
136. io.cleanup()
Test MDD10A
1. # I am Mohammad Omar, this module is builded to interface with the Driver MDD10A, to control two DC motors.
2. # the original code designed by Ingmar Stapel ,www.raspberry-pi-car.com to control two motors with a L298N H-Bridge
3. # The pins configuration for Model B Revision 1.0
4.
5. import sys, tty, termios, os
6. import MDD10A as HBridge
7.
8. speedleft = 0
9. speedright = 0
10.
11. # Instructions for when the user has an interface
12. print("w/s: direction")
13. print("a/d: steering")
14. print("q: stops the motors")
15. print("p: print motor speed (L/R)")
16. print("x: exit")
17.
18. # The catch method can determine which key has been pressed
19. # by the user on the keyboard.
20. def getch():
21. fd = sys.stdin.fileno()
22. old_settings = termios.tcgetattr(fd)
23. try:
24. tty.setraw(sys.stdin.fileno())
25. ch = sys.stdin.read(1)
26. finally:
27. termios.tcsetattr(fd, termios.TCSADRAIN, old_settings)
28. return ch
29.
30. # Infinite loop
31. # The loop will not end until the user presses the
32. # exit key 'X' or the program crashes...
33.
34. def printscreen():
35. # Print the motor speed just for interest
36. os.system('clear')
37. print("w/s: direction")
38. print("a/d: steering")
39. print("q: stops the motors")
40. print("x: exit")
41. print("========== Speed Control ==========")
42. print "left motor: ", speedleft
43. print "right motor: ", speedright
44.
45. while True:
46. # Keyboard character retrieval method. This method will save
47. # the pressed key into the variable char
48. char = getch()
49.
50.
51.
52. # The car will drive forward when the "w" key is pressed
53. if(char == "w"):
54.
55. # synchronize after a turning the motor speed
56.
57. # if speedleft > speedright:
58. # speedleft = speedright
59.
60. # if speedright > speedleft:
61. # speedright = speedleft
62.
63. # accelerate the RaPi car
64. speedleft = speedleft + 0.1
65. speedright = speedright + 0.1
66.
67. if speedleft > 1:
68. speedleft = 1
69. if speedright > 1:
70. speedright = 1
71.
72. HBridge.setMotorLeft(speedleft)
73. HBridge.setMotorRight(speedright)
74. printscreen()
75.
76. # The car will reverse when the "s" key is pressed
77. if(char == "s"):
78.
79. # synchronize after a turning the motor speed
80.
81. # if speedleft > speedright:
82. # speedleft = speedright
83.
84. # if speedright > speedleft:
85. # speedright = speedleft
86.
87. # slow down the RaPi car
88. speedleft = speedleft - 0.1
89. speedright = speedright - 0.1
90.
91. if speedleft < -1:
92. speedleft = -1
93. if speedright < -1:
94. speedright = -1
95.
96. HBridge.setMotorLeft(speedleft)
97. HBridge.setMotorRight(speedright)
98. printscreen()
99.
100. # Stop the motors
101. if(char == "q"):
102. speedleft = 0
103. speedright = 0
104. HBridge.setMotorLeft(speedleft)
105. HBridge.setMotorRight(speedright)
106. printscreen()
107.
108. # The "d" key will toggle the steering right
109. if(char == "d"):
110. #if speedright > speedleft:
111. speedright = speedright - 0.1
112. speedleft = speedleft + 0.1
113.
114. if speedright < -1:
115. speedright = -1
116.
117. if speedleft > 1:
118. speedleft = 1
119.
120. HBridge.setMotorLeft(speedleft)
121. HBridge.setMotorRight(speedright)
122. printscreen()
123.
124. # The "a" key will toggle the steering left
125. if(char == "a"):
126. #if speedleft > speedright:
127. speedleft = speedleft - 0.1
128. speedright = speedright + 0.1
129.
130. if speedleft < -1:
131. speedleft = -1
132.
133. if speedright > 1:
134. speedright = 1
135.
136. HBridge.setMotorLeft(speedleft)
137. HBridge.setMotorRight(speedright)
138. printscreen()
139.
140. # The "x" key will break the loop and exit the program
141. if(char == "x"):
142. HBridge.setMotorLeft(0)
143. HBridge.setMotorRight(0)
144. HBridge.exit()
145. print("Program Ended")
146. break
147.
148. # The keyboard character variable char has to be set blank. We need
149. # to set it blank to save the next key pressed by the user
150. char = ""
151. # End
https://www.youtube.com/watch?v=SAo6BLmjZ_U