

so i finally got the ps2 controller to operate the lynxmotion robot arm wireless and the one piece that has the pins broke, the small board that comes with the kit, i need a replacement part, can i purchase just this part alone? can someone please provide a part number for it.
Is this what you mean?
https://www.robotshop.com/en/ps2-connector-breakout-board.html
Exactly what we need! thank you
Now our issue is the instructions for the software is very outdated.
we put the robotic arm code into arduino software and it uploads when we try to move with keyboard it does not do anything. right now the servos in the arm just slightly move.
right now we are trying to control with a laptop since the part broke for the controller, we will need to order the part you mentioned above.
we believe our wiring is done correctly. we have the battery pack for the servos connected as well as the battery for the board.
do we need to downloard or purchase the software from robotshop? is this a free download?
https://www.robotshop.com/en/lynxmotion-al5d-4-degrees-freedom-robotic-arm-combo-kit.html
If you have the version with the BotBoarduino, what code are you using, and based on the notes in the code, what is the intended input?
Without a PS2 connected to the BotBoarduino, you’d have to create a bit of code and use the Arduino servo library.
The alternative would be to modify the PS2 controller code to replace it with keyboard input.
There’s no separate software to be purchased for the AL5D which uses the BotBoarduino.
What is the intended application / use? There’s not much sample code simply because each person’s intended use is so different, the code is almost entirely custom for each application.
We are using the keyboard code, for keyboard use.
BotBoarduino_AL5D_without_PS2_-_3_KeyboardControl.ino
This robotic will need to be controlled via a ps2 controlle but the part broke, so we will need to purchase the part, but for now we atleast need it working through a laptop, with use of a keyboard.
This robotic arm will be mounted on a Radio Controlled Rover, where it will be controlled to move the arm to pick up small objects. we will be the ones controlling the arm to pick up the objects.
Ok, appreciate the info. We’ll get there.
- Can you provide the link to the code / GitHub page as there are several versions?
- Can you confirm you’re using the correct keyboard commands which relate to the code?
- Can you provide the specs or URL for the battery you’re using? Have you checked that it’s fully charged?
- Can you provide a clear photo (or two or three) of top-down views of the BotBoarduino so we can clearly see all connections and jumper positions?
-
Arms/BotBoarduino_AL5D_without_PS2_-_3_KeyboardControl at Botboarduino · Lynxmotion/Arms · GitHub
-
We found the commands for the ps2 controller but have yet to find the commands for the keyboard.
-
https://www.robotshop.com/en/6v-2800mah-nimh-battery.html . actually we are not sure if its fully charge, we do not have a charger for it. can you provide the charger for it.


Here are the issues which are clearly visible:
- The servo cable to pin 3 on the BotBoarduino is reversed
- The jumpers corresponding to pins 2-5 and 10-13 are still set to 5V, which means they will never get power from the battery
- The VL=VS jumper is still in place, meaning your USB port is fighting with the battery. Please read through the BotBoarduino manual to understand these and how the logic (VL) and servos (VS) are powered.
- You’ll certainly need to recharge the battery at some point, if it’s not already discharged. Link below to the most common one.
- Triple check that when you use servo extension cables that they are yellow to yellow, black to black.
- The 9V connector is optional - in your case you likely don’t need it if you set VL-LS
- Although not mentioned as a possible issue, be sure the shoulder and elbow brackets from steps 4 and 10 in the Arm Assembly Guide are not overtightened.
In robotics, never rush into making connections or powering things - you actually need to be very detail oriented and read through manuals in their entirety.
Three areas in purple:
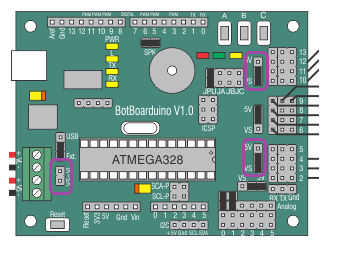
BotBoarduino guide:
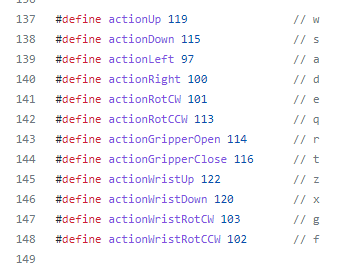
The controls in the code are here:
We got it working! we are now experiencing issues with the grip servo, for some reason its not working and not wanting to grasp, it just doesn’t move, we have used other servos to ensure if its not a servo issue but still not working. that is the only one that is not working at the moment.
@Jesse123 The two main issues with the gripper are the following:
- Gripper “fingers” are reversed. Although it may look “ok”, if the gripper fingers don’t wrap around the center, then they are the wrong way around which would prevent proper operation of the gripper.
- When installing the servo, the output spline needs to be centered, and the gripper fingers need to be roughly 1" apart (halfway open / closed).
What to do:
- Remove the servo from the gripper by unscrewing it, and verify that it can rotate correctly.
- Send a centered signal to the servo (1500us)
- Verify the rotation of the gripper, specifically the two arms, and position the fingers at ~1" apart
- Reinstall the servo
NOTE: Do not send a signal which causes the gripper servo to move the fingers to a position which is blocked (for example a position which would be beyond the fully closed position) - the servo is not intelligent so will still try to get to this unattainable position and burn.
Hello,
ok we verified and confirmed that the servo is working.
When we try to operate the servo for the gripper you can feel it move inside a bit but not enough to rotate the gear on the servo.
we even plugged the servo into another pin connection, we tried the gripper from pin 11 and moved to pin 5 to see if it would work, and still no luck.
Also, not sure what you mean when you say the gripper is reversed. i believe they are installed correctly per the installation manual.
In the image below, notice how the fingers are not straight, but sort of "arcs:, the center of which is intended to wrap around the center of the pivot. If the horn is rotate in the direction opposite to what is shown, the fingers will still appear to wrap. but instead will jam and not work properly.

It also sounds like the servo may be at the wrong angular position when you connect the horn to the spline within the gripper (or not connected at all?). Could it also be that you have the servo rotating the wrong direction?
Aside, please ensure that the gripper servo’s wiring is connected properly to the servo extension cable (yellow to yellow, black to black) and all servo wiring is connected correctly to the board, and that the jumpers on the board are set correctly.
What you can do to confirm all this is remove the servo, add the white horn again (not needing to screw it in), and align the gripper horn as you think it should be. Slowly rotate the servo and simultaneously rotate the gripper horn to see what would be happening were the two connected. You might find that the gripper horn jams when the servo horn wants to be rotating, the servo is actually rotating the gripper in the wrong direction (or something else) meaning something’s wrong with the setup.
If you still have issues, please send some clear photos of the electronics so we can see the wiring to the board, the jumpers and the power connections. If you can also make a short (and slow) video of the above showing the servo outside the gripper with the horn, and how you suspect the gripper horn should be rotating (YouTube video for example) it would help us troubleshoot.