When I did the Web Clicker, I picked up a copy of ViewPort for debugging and it was a lifesaver. ViewPort was designed by Hanno Sander. He also developed an alternate IDE for the Prop called 12Blocks.
I first saw 12Blocks at the Propeller Expo in Ohio last year & I dismissed it as a kids toy: great for blinking an LED, but not enough flexibility to do 'real' projects. Last week, I took a second look at it and was very surprised. It's a lot more useful and powerful than I expected.
What Is 12Blocks?
12Blocks is an alternate IDE for the Propeller. It lets you lay out your code in graphical blocks so you don't need to worry about the idiosyncrasies of a programming language and you can focus on the program logic. I've been playing with for a few weeks now and I really like it for a few reasons;
- It's still Spin Just hit CTRL+U and you can view / edit the code. You can also import your own Spin objects
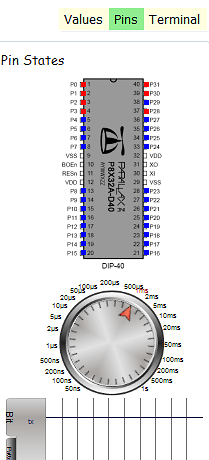
- Built-in Debugger ViewPort is integrated with 12Blocks so you can see how variables change, the state of pins, and send terminal commands.
- Tons of Blocks There are blocks built in for stuff like LCD displays, VGA, speech synthesis, and more.
I think it's useful for beginners who have never coded before or are new to spin. It's also great for prototyping user interfaces and graphical displays - getting video graphics running on the prop is a little obtuse, and this makes it super-simple.
If you've got a Propeller Platform, Protoboard, Demoboard, or whatever, grab a copy of 12Blocks and follow the video above - I'll show you how to make your first program. My program notes are below.
Your First Program
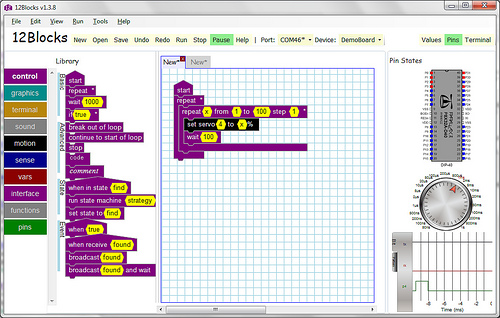
First, familiarize yourself with the 12Blocks UI:

On the far left are the block libraries:
Click on each rectangle to reveal each block in the library. Control contains 'start' 'stop' 'IF' and the like. Graphics is for TV and VGA displays, motion is for motors, and so on.
In the middle is the program area:
This is where you'll create your program. Programs begin with a 'Start' Block. If you want a program to end, you'll also need an 'End' block, both are in the control library.
The right is for ViewPort debugging:
By default, this area is hidden. Just click on the Values, Pins, or Terminal boxes on top to make it appear.
Here's your first program;
If you have any trouble finding the blocks, note that they're color coded - the black blocks come from the black 'motion' library. Also, you'll see values in yellow on the blocks. In the Servo Block, the 4 = the pin the servo control line is connected to.
Your Second Program
This first sets a variable (x) to the distance measured by a ping sensor, then if X is > 100, it sets x to 75, otherwise the measured value is used to ramp a servo connected to Pin 4.
Next Steps
There are plenty of additional blocks available in 12Blocks and you can even add your own code. I'm pretty impressed so far, download it and give it a whirl!
https://vimeo.com/14842448


