Phoenix Hexapod

Hey guys.

So I have read through quite a few tutorials and think I have followed all the steps but can’t seem to get the phoenix 3 dof hexapod to work properly.

Hardware used:

Laptop

]Windows 10, i7, 16GB ram./:m]

Hexapod

]18 servos Towardpro MG996R/:m]
]SSC32U/:m]
]Botboarduino./:m]

The aim is to get this hexapod walking autonomously(can anyone guide me to a tutorial or any info on this? Have found quite a bit regarding PS2 but nothing on autonomous navigation for the phoenix ).

So currently I have the servos hooked up to the SSC32, and the botboarduino is hooked up to the SSC32 as per the tutorials.

I don’t think I can attach images here, so the links to the photos for the below are linked accordingly.

Image of SSC32U and Botboarduino connected together can be seen here

Now the issues are.

]When I power up the micro controllers and servos the left legs curl up upwards and the right legs sort of stretch out. This can be seen here. And they seem to want to keep on going if that makes and sense./:m]
]I have downloaded the SSC32 Servo Sequencer. It connects but I cant move the servos with the slider. lynxmotion.com/p-895-free-download-ssc-32-servo-sequencer-utility-created-using-flowbotics-studio.aspx/:m]
]I have downloaded the hexapod calibration program and tried holding A to start the robot in calibration mode but the program just says not connected. The steps followed can be found here. /:m]
One thing I am really not sure about. I am not using a PS2 controller at all. Will this effect and give me these strange results? Shouldn’t I still be able to connect to the SSC 32 and control the servos?

If there’s any more info I can provide please do let me know and thanks in advance.

Hi,

Here are answers to your questions/comments:

What kind of robot autonomy do you wish to have? More details would be required here to give proper advice. In most basic cases with mobile robots, you would usually add some kind of collision detection (such as a sonar or other range finder, such as laser-based) and control autonomous movement to prevent collisions. You could even go a step further and use a small camera and computer vision software to interact with the environment around the robot.

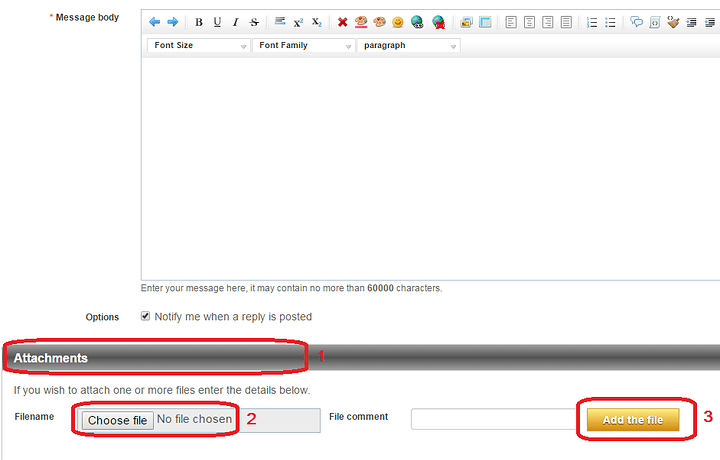
You can attach images (and other files, such as a code examples and such) directly to your posts on the forum. Simply go in Full Editor mode and you fill find the Attachments bar near the Submit button. See the attached image for details. :slight_smile:

All your wiring seems good!

This is normally due to the servomotors on-board controllers causing a small amount of movement on power-up when no signal is provided (the RC control signal). By default, the SSC-32U does not send any signal to the motors until told to do so. If you want, you can change this by changing some of the register values to define a starting position on power-up. To do this, follow these steps:

]Simply disconnect the TX/RX/GND between the SSC-32U & the BotBoarduino and connect to the SSC-32U by USB directly with your computer./:m]
]Make sure the SSC-32U is powered with at least 6 V DC from VS1/VS2 (the connection on VL is not needed anymore with the SSC-32U)./:m]
]Once powered and connected by USB, download and run the Lynxterm diagnostic utility./:m]
]In Lynxterm, open the Setup window (top left) and change the COM port and baud rate (9600 by default). You can check the baud rate of the SSC-32U by pressing the BAUD button near the XBee socket/USB port. You can check page 34 of the SSC-32U manual concerning the baud rate value and how to change it. We recommend that you change it to 38400 since that is what is required for the Phoenix code to function (it expects that baud rate)./:m]
]Once the setup is done, click on Connect. Then, in the black text box below, type “VER” followed by return]. The SSC-32U should respond with its firmware version./:m]
]You can then click on Reg. to get access to the registers. These will allow you to change the pulse offsets (calibration) and also the initial position (default position on start-up). Please see the attached image for details.

/:m]

We recommend that you use Lynxterm (see link & details above) to perform any calibration and testing. Also, as mentioned above, you will have to connect it to the SSC-32U directly, not through the BotBoarduino.

Please use Lynxterm instead. See step #6 and the attached image for details on how to enter the calibration data. Before going into Reg., you can press the All=1500 button on the bottom right. This will set all your servomotors to their center position. Then, go into the registers’ window and change the pulse offsets until all the servomotors are centered properly. If you cannot center them with the pulse offset (too far off center), you may have to disassemble some parts and reassemble them after turning the servomotor to a proper position.

As mentioned above, you would need to connect to the SSC-32U directly. If you wish to use a different input than a PS2 controller, you will have to either use your own code on the BotBoarduino or modify the example code we offer to use a different input method.

We hope this helps!

Sincerely,