PartyBot

PartyBot is a modular robot which was designed for the main purpose of being an educative platform to be shown at Campus Parties. This robot was created for the Asociación de Robotica y Domotica de España (which is a non-profit, nation-wide robotic association in Spain) will use it at those events to teach the youngest and/or robotic newcomers some first steps in robotics.

So as an educative robot, it was designed modular. Modular means that there are four parts well separated: the chassis, and 3 different PCBs (the power supply PCB, the sensors/actuators hub PCB, and the control PCB). Addtionally to the physical part,  it is the software part, that uses an easy to program brain as control part, that is a Pinguino board.

As you can see in the previous link, Pinguino is an Arduino-like board which is based on Microchip PIC microcontroller. PartyBot uses the Pinguino with PIC 18F2550.

The best of Pinguino is that it is an open source & open collaboration project. There is a community making Pinguino to evolve and improve. And resources and Pinguino supporters in the net is growing everyday. Also there are already a good set of libraries available which have been used to program the PartyBot.

Just for those of you who wants to know more about Pinguino, here you have a colection of links with almost all that has been created for it up to now:

Pinguino Wiki

Pinguino Comunity 

Pinguino Blog


The goal of the PartyBot robot is to solve labyrinths/mazes and that's why uses 4 sharp IR sensors pointing in the four directions of the robot.

It has also recycled mouse sensors as encoders and mouse buttons as switch bumpers.

A funny part for me in the creation process was to firstly design everything in a 3D designer program. This program is also a free one. I used Google SketchUp to produce these images of the robot before starting to build it physically:


The chassis was finally made of methacrylate. Vertical rods are threaded bars of 4 mm in diameter. All PCBs and methacrylate sheets have three holes to be inserted from the top part of the robot in those bars. Nuts are used to get part fixed in this vertical structure. Methacrylate is a little bit delicated when drilling or cuting it. So both cuts and drills were done by hand using a low speed saw and drill (so basically manual saw and a brace for drills).

All the chassis and PCBs have been finished (well there are a couple of improvements I want to make on some PCB, so I will create a new one), but the programming is the step where I'm right now working on.


In the videos you can see the structure (in the first one), and a short demo that just uses bumpers and motors. It is a kind of tutorial in order to show how to create a program in C using the Pinguino IDE for controlling minimally the robot. The tricky part is that those are in spanish. If people are interested I could subtitle them.

If you want more details about how the robot was build, more pics, or some tricks you can visit the Wiki page of PartyBot and the Blog of PartyBot just for tracking improvements (also in spanish, sorry).

Some pics of the chassis without boards:


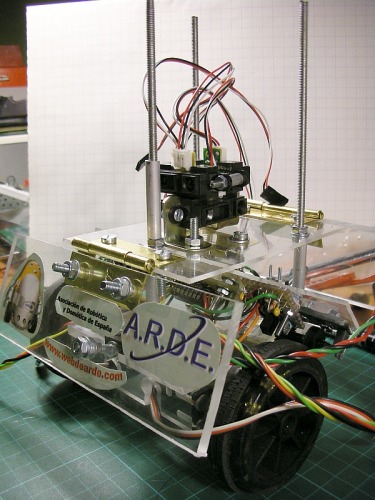
Here some images about the control PCB, which has a Pinguino board piggybacked:


solves laberythms

  • Actuators / output devices: Continuous rotation servos x2
  • Control method: autonomous
  • CPU: Pinguino version 18F2550
  • Operating system: none
  • Power source: external connector, 7.5V LiPo Battery
  • Programming language: C
  • Sensors / input devices: Sharp GP2D120 IR sensor x4, Bumper switches x2, ps2 mouse encoders x2
  • Target environment: indoor maze

This is a companion discussion topic for the original entry at https://community.robotshop.com/robots/show/partybot

excelent

The Penguin board, I discovered a couple of weeks and I liked a lot, excellent Arduino clone. and

I’ve always used PIC, and Software like PIC 18 Simulator IDE to programan a micrcontroller, but this platform is very good with it using the Bootloader.

The great thing is its compatibility with Mac, and that supports Prossesing.


Congratulation on your project


Thanks Neododo!It’s really

Thanks Neododo!

It’s really easy to program Pinguino with its IDE. It is based on SDCC 2.9.9 (the latest I guess), which is also a open source compiler for PICs and other microcontrollers, and the online documentation and examples help a lot.

I prefer to work in a Linux enviroment, I get used to that, but I’ve also tried from Windows 7 and windows XP and it works without problems.

Anyway, jpmandon, the original developer is always open to listen for improvement proposals.

Really nice.

may i know whats the

may i know whats the material used for chassis ?..

Material used for chassis

Ah! Yes. I should put that in the description (I will do it).

It’s transparent methacrylate. I’ve used sheets of 5 and 2 milimeters thick. The vertical rods are threaded bars of 4 milimiters in diameter.

Screws used to join methacrylate parts perpendicularly are 2.9 milimiters in diameter on holes of 2.5 milimiters in diameter. Maybe methacrylate is not the best matterial for such structure, but it worked well. The thing is that it is a little bit flexible, but not so. When drilled may get broken if you don’t treated with care. For sure there are other matterials that could fit better for PartyBot.

More and more ARDE bots on LMR

Welcome!

Interesting initiative: open source bootloader for PIC. Will read more about the Pinguino!

Great work Sphinx!

Like the modularity of your bot, on electronics, mechanics and software!

Your videos are ready for the tip/walkthough section, and if you ever subtitle them to English many people will be glad to watch!

Welcome to LMR!!!

**ok **

well. It is interesting how easy to program and educational approach has is excellent.

I saw that you use the PIC18F2550 and tiny4550 board, I instead opt for the PIC 18F4550, simply because the number of ports it offers.

I liked a lot, this system penguin, so far I’ve finished my thesis project ing. electronics, and have generated a development board (it is detected as a HID device) for use in the laboratory, based on a pic microcontroller and a GUI in visual basic. But this concept of Penguin, has given me the idea to migrate to this platform and evolve this board, making it more versatile, simple, cheap and easy to repair.

I will develop some things with Penguin and Prossesing, and shared in this way.

Thanks rik. Let me know if I

Thanks rik. Let me know if I may help.

Ok, I will. I wonder if

Thanks !

Ok, I will. I wonder if youtube allows to add subtitles without reload the whole video again… do you know ?

I think this link has the data

http://www.google.com/support/youtube/bin/answer.py?answer=100077 

But I haven’t tried myself :slight_smile:


Wow, sorry for ripping off

Wow, sorry for ripping off your name, only just saw that now :9

https://www.robotshop.com/letsmakerobots/node/23453

Well, great minds think alike. No, honestly, I am sorry, what are the odds? But you did come first!

Don’t worry. It doesn’t

Don’t worry. It doesn’t matter… we can have a robot fight to death to keep the name…hehehe, of course I’m kidding…My poor robot has not event arms, and the wheels no power enought to fight…  :wink:

The “Party” concept in my case was related to Campus Party events: http://www.campus-party.org/home-en.html


Nice ! I will try

Nice !  I will try it.

Thanks rodrim.

First video now counts on

First video now counts on english subtitles in youtube. Those should be activated by the viewer. It’s one of the controls at the bottom -right part of the video frame…