

this is my first robot using arduino , it uses a l239d motor driver and is basicaly my atempt at making a start here robot .
Parts list :
1) arduino starter pack X1 http://www.robotgear.com.au/Product.aspx/Details/337
2) solarbotics g8 motors and wheels X2 http://www.robotgear.com.au/Product.aspx/Details/316
3) motor mounts for the g8s http://www.robotgear.com.au/Product.aspx/Details/323 (i didnt use them but they would be beter)X2
4) infrared sensors X2 http://www.robotgear.com.au/Product.aspx/Details/309
5) breadboard (about the same size as arduino )
6) micro servos X2
7) l293d motor controller http://www.robotgear.com.au/Product.aspx/Details/345
8) some header pins (cut into 3 and solder wires to each pin)
Things you can add :
http://www.robotgear.com.au/Product.aspx/Details/286
http://www.robotgear.com.au/Product.aspx/Details/347
instructions:
1) cut thin scrap wood (about 8 millimeters thick) in to 2 squares of 13.5 cm x 13.5 cm
2) in one of the squares cut hole the same size as your servo base , about 1cm from one of the edges .
3) paint desired colour
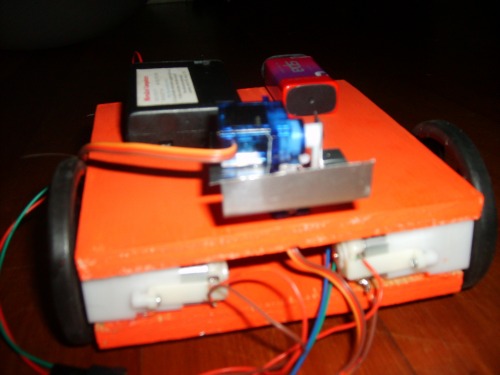
4) useing a hot glue gun glue the motors in place (as shown in top picture), with some small screws ,screw in the arduino .
the breadboard will have adhesive tape on the back, peel of plastic and stick in place.
5) useing this walk through set up your motor controler https://www.robotshop.com/letsmakerobots/node/2074
6) drill 2 holes in the back corners of the wood to fit your spacers and one above the arduino (do the same for the 2nd piece of wood .
7) put your servo in place , and srew into wood ,
8) made a pan/tilt system with a bit of scrap metal , (you can do the same if you wish but is not needed )
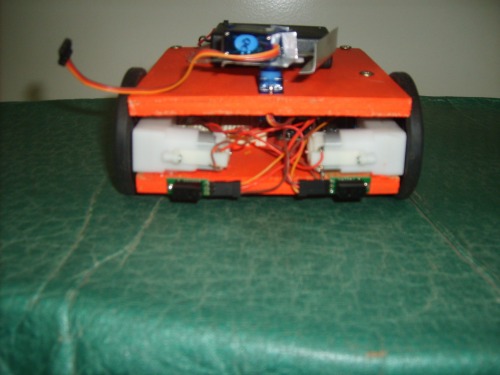
9) screw in your infrared sensers(as shown below) attach header pins (look on the sensor connect VIN and GND to the bread board power lines and OUT to a digital pin on your arduino.
10) program!!!!!!!!!!
The code:
const int infra=3;
const int infra2=4;
void setup()
{ Serial.begin(9600);
pinMode(13,OUTPUT);
pinMode(12,OUTPUT);
pinMode (11,OUTPUT);
pinMode (10,OUTPUT);
pinMode (infra,INPUT);
pinMode (infra2,INPUT);
}
void loop() { if (digitalRead(infra)== HIGH)
{ driveforward(); }
if(digitalRead(infra) == LOW)
{ stopmot();
delay (500);
reverse();
delay (500);
right();
delay (2000);
}
else if (digitalRead(infra2)== LOW)
{ stopmot(); delay (500);
reverse();
delay (500);
left();
delay (2000);
}
}
void driveforward()
{ digitalWrite(13,HIGH); digitalWrite(10,HIGH);
digitalWrite (11,LOW);
digitalWrite (12,LOW);
}
void stopmot()
{ digitalWrite(13,LOW);
digitalWrite(12,LOW);
digitalWrite(11,LOW);
digitalWrite(10,LOW);
}
void reverse()
{ digitalWrite(12,HIGH);
digitalWrite(11,HIGH);
digitalWrite (13,LOW);
digitalWrite (10,LOW);
}
void right()
{ digitalWrite (10,HIGH);
digitalWrite (13,LOW);
digitalWrite (12,LOW);
digitalWrite (11,LOW);
}
void left()
{ digitalWrite (13,HIGH);
digitalWrite (11,LOW);
digitalWrite (12,LOW);
digitalWrite (10,LOW);
}
be patient with your codeing ,it took me a little while ( and the help of guys on this site) to get the code working
so this is my etempt at a robot that will teach me arduino , hopefully i will add some i2c devices ,an ultrsound sensor ,lcd, real time clock ,epeerom etc.
update: well, i want to get back to this as soon as posible,but i need a new motor driver so im thinking when i get that i may as well plan a complete rebuild of him, maybe redeisgn him with an arm? what do you guys think?
This is a companion discussion topic for the original entry at https://community.robotshop.com/robots/show/my-start-here-arduino-robot