My Mouse Is Running Away!

When, Why, What:

I work for an IT management company and am always looking for cool little ways to show off my engineering talents. I came up with the idea for this bot after purchasing a lot of cheap mini geared motors from eBay and tried to find something to do with them. I don’t have 3D printer handy so finding lightweight easy to tool plastics is sometimes difficult. I ended up coming across a box of old PS2 mice laying around and the ideas started flowing. I started looking online for different mouse bots but most seemed to draw attention to the fact that the mouse was modified. My idea was to make this little guy look like a normal mouse laying around. More importantly a mouse that got so tired of being “pushed around” that he ripped his cord and tried to run away. I spent roughly 10 hours making the first prototype and everybody I show him off too either laugh or ask how I did it. The best part of all is the little guy fits in with our IT Office. In fact my Company just built our first headquarters in a brand new top of the line building. Since we are also a computer repair shop I was commissioned to build 5 of these which we currently allow to run around our lobby autonomously during the day and entertain the walk-in customers. People really get a kick out of it. Such a great conversation starter and inadvertently cheers people up when they come into the bench with computer problems.

How:

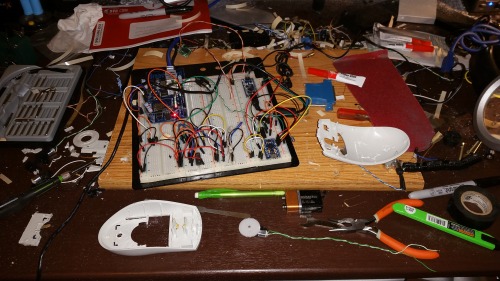
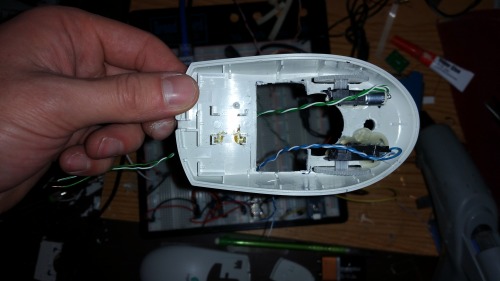
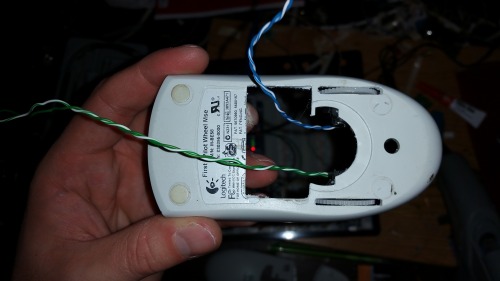
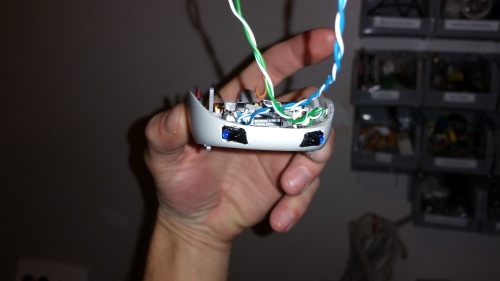
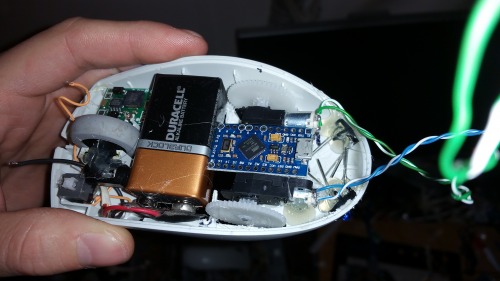
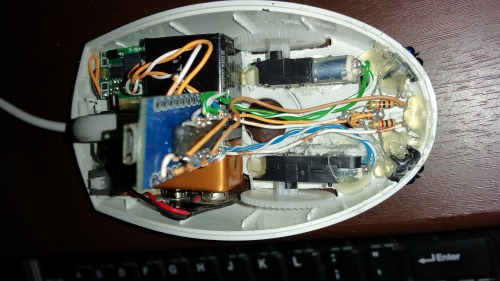
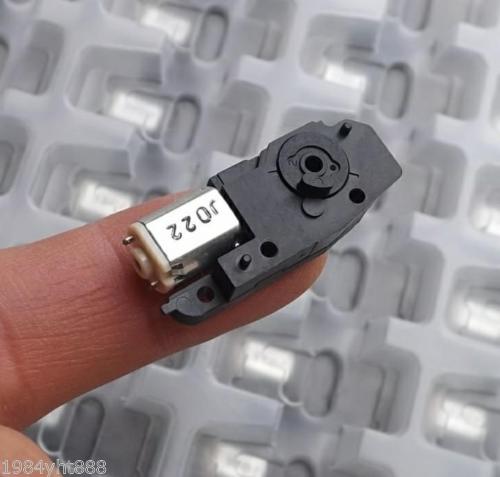
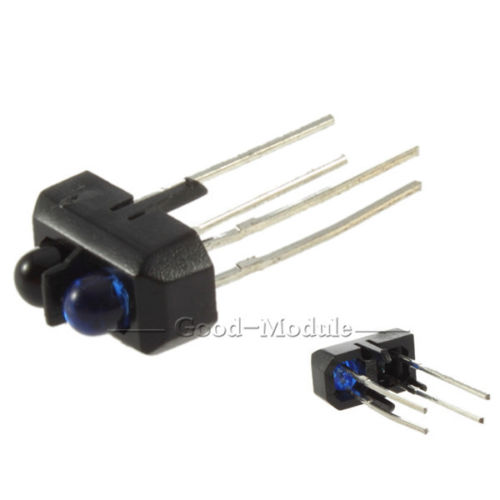
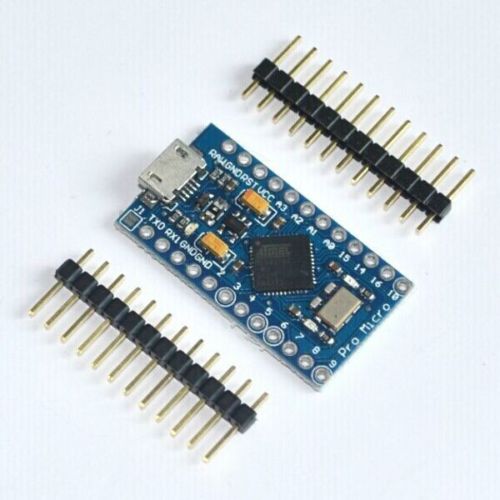
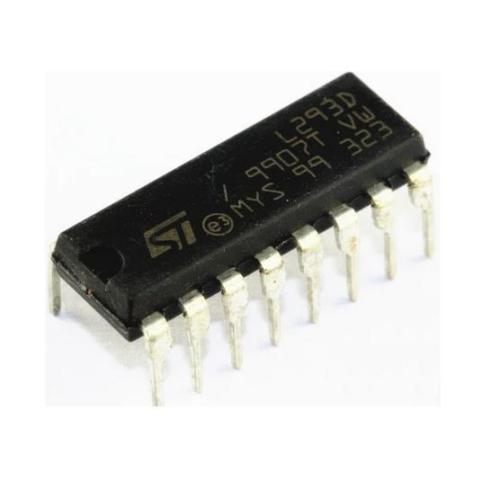
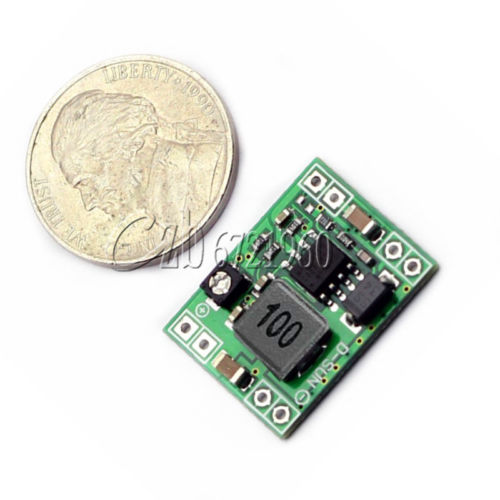
I spent a lot of time collecting the right sized parts and checking fit. Also carefully modifying the mouse body chassis to keep things looking normal on the outside while leaving me the space for everything on the inside. The hardest part was getting the wheels (22mm plastic gears) affixed to the motor outputs which were flat plates, a center hole, and a offset plastic tab. Broke 3 inner motor gears trying to screw into the center hole. Ended up taking a small piece of coat hanger and putting it in a drill while turning down with sand paper and files to the correct diameter of both the gear wheel and the inner motor hole. Then filed down a slot on the gear collar to fit the notch on the motor for extra strength. Everything pressed in perfectly and finished off with some carefully placed super glue. I wanted to keep the scroll wheel intact and moveable. This was easy to accomplish but took up a lot of room. Luckily found a cheap QTY of tiny adjustable voltage regulators that fit perfectly. Also reused the right mouse button as the power switch for the robot. Both buttons sit on a hot glue hinge to preserve their hand feel and you even allow youto hear the nice click on the button. Battery was pretty easy 9V high capacity why not right, but just barely fit in and allowed the mouse to close without leaving anything peeking out. I wanted some logic to this bot but still wanted the look while giving it some basic object avoidance and driving patterns. Tiny IR Sensors placed on either side of the front bottom lip worked out great. Also had based this guy off an ATTiny for size but found out the Pro Micro fit just right and gave me a lot more flexibility with programming, sensors and motor controls. Used L293D IC affixed under the pro micro and between its outputs for the motor controls, reversing and such. The best part was being able to use PWM pins for speed control to adjust for different driving surfaces.

Surprises:

I am still a little shocked at how well all of this worked together and how quickly this one went from my head to driving around my desk. I have done an increasing amount of these types of projects lately and they don’t ever go this well. Total cost for parts was probably around $25 if you account for parts broken during trial and error. They are amazingly durable as many have been kicked, pushed on by hands, forced around, or subjected to countless hours of office carpet driving. Also just love how people get a rise out of common objects with new life like this. It even gives people a shock but they just don't expect them to move on their own. To me this project was one of my very own personal favorites and hope you enjoy.

Also want to thank the LMR team for putting this site together. This is my first post and am so happy to start sharing my ideas and creations with like-minded people.

By Popular Demand!!! 

Parts List:

Mouse: Old PS2 or USB mouse with scroll wheel. (One used in project was Logitech physical ball)

Motors: (Ebay Search  “3v 5v Worm Gear Motor Variable Speed”)

IR Sensors: TCRT5000L Reflective Optical Sensor (Ebay Search “TCRT5000L”)

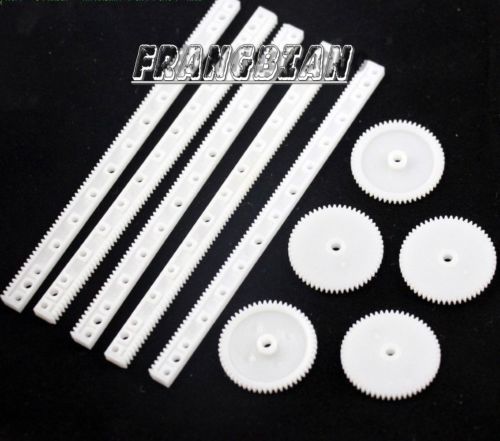
Wheels: 22mm Plastic Gears (Ebay Search “gear rack drive plastic”)

Microcontroller: Leonardo Pro Micro ATmega 32U4 (Ebay Search “Leonardo Pro Micro”)

Motor Driver: L293D IC (Ebay Search: “l293d”)

Drive Shafts: 3” piece of wire coat hanger (for attaching wheels to motor output)

Wire: CAT5e solid and removed from cable jacket. 

Voltage Regulator: MP1584EN (Ebay Search “mini 3amp dc module”)

Resistors: 320r to 510r (Emitter Brightness 1 can be used for both sensors), 10Kr (One for each receiver to arduino analogue input) 

Battery: 9V battery clip and battery


Power Button: Latching Contact Push Button Switch (Ebay Search ” Latching Contact Push Button Switch”)


This is a companion discussion topic for the original entry at https://community.robotshop.com/robots/show/my-mouse-is-running-away

I love it!And I’m planning

I love it!

And I’m planning doing one myself.

Would it be possible to add to the post the list of materials you used, prices, and maybe steps? Or maybe create an entry in http://www.instructables.com/, I’m sure you would be in good shape to win some of the robotics challenges they make.

I know most of the work won’t be exactly the same, but will help to avoid getting into the same problems you needed to solve by your own.

Congratulations for the awesome work!

Functional Mouse

Classic yet creative! Next step is to retain the functionality of a normal mouse and have it “run away” when people reach for it.

LOL it’s a wonder haven’t

LOL it’s a wonder haven’t seen a bot like this here before! A parts list, schematic, and a bit of your early code would be really helpful for any of the newbies here. Is that a pair of IR LEDs/sensors I’m seeing on the back (or is that the front) of your mouse? I assume you are doing some collision detection as well?

I imagine were going to start seeing lots of runaway mice posted here soon. Congratulations on building an awesome little robot!

DB

Run Away

Only run away when someone else tries to use it. Normal functionality for me!!!


Follow-up Response

Hey Guys,

Thanks for all of the support I am already enjoying being a memeber of this site. I am really excited to share more with you guys and I am amazed at all of the other wonderful creations that the other members have posted. I appologize for the late response I have in fact been busy on another project (the biggest and most complex i have built to date) that I will start sharing with you guys shortly. 

Unfortunatly mouse bot and his brothers were thrown together in a couple of nights and I was more wooried at the time of finishing quickly than documenting each step of the build. Rest assured my current and future projects will have documented step by steps to help out in replication or expansiono of any of my posted projects. I currently do not have youtube or instrucatables accounts so sorry about the limited info on the build. But I would highly suggest getting the parts together first amd then starting to see how things fit. As stated before the hardest part was getting the wheels on the motors and I am willing to answer any questions if someone gets stuck on any portion of the build.

Sorry more bad news but the parts list is a little tricky as well. I buy 99% of my parts on Ebay for a few really good reasons but the problem is posting links as the URLs change. I get my parts on ebay because I can normally get new parts at cheap prices (mostly parts from China, Korrea…), they have good lots of used parts, and most are free shipping. Run searches on ebay for things like mini geared motors, mini volatge regulator, plastic gears, arduino pro micro, ir sensors and using my posted pitcures you should be able to find everything you need. I have been slowly building up my collection of parts and pretty much have gotten everything I need from ebay and local scrap opportunities to build almost anything I want as soon as I get an idea. So nice to be at this point in my life and I have collected a lot of metal fab tools and electrical equipment to be able to modify things as I see fit. 

I am happy to help out with the code as I have an early copy (no judgment I am still a newbie) that will get you up and running as this was the original prototype copy. 

In answer to the other questions yes those are IR emitters and sensors on the front of the robot. What I call the front used to be the back. What was really the deciding factor on the front to back issue was the spacing on the motors which would not fit in the narrow original back end. Also I likes the ripped cord as kind of a little tail and did not want the mouse to trip on the cord if it was pushed towards it.

I liked the idea of making this guy a functional mouse but in the end this thing seemed to fit together for a reason and couldn’t even imagen trying to squeeze anything else into that tiny space. I had to use tweezers in some cases just to bend the IR pins to fit in the correct places so they did not touch each other. 

Good luck and keep on building. 

Prototype Code

const int optsens1 = 0;

const int optsens2 = 1;         

const int mtrR1 = 5;   

const int mtrR2 = 6;   

const int mtrL1 = 7;   

const int mtrL2 = 8;


void setup() {

Serial.begin(9600);

pinMode(optsens1, INPUT);

pinMode(optsens2, INPUT);

pinMode(mtrR1, OUTPUT);

pinMode(mtrR2, OUTPUT);

pinMode(mtrL1, OUTPUT);

pinMode(mtrL2, OUTPUT);

}


void reverse() {

digitalWrite(mtrR1, HIGH);

digitalWrite(mtrR2, LOW);

digitalWrite(mtrL1, HIGH);

digitalWrite(mtrL2, LOW);

}


void forward() {

digitalWrite(mtrR1, LOW);

digitalWrite(mtrR2, HIGH);

digitalWrite(mtrL1, LOW);

digitalWrite(mtrL2, HIGH);

}


void TurnL() {

digitalWrite(mtrR1, LOW);

digitalWrite(mtrR2, HIGH);

digitalWrite(mtrL1, HIGH);

digitalWrite(mtrL2, LOW);

}


void TurnR() {

digitalWrite(mtrR1, HIGH);

digitalWrite(mtrR2, LOW);

digitalWrite(mtrL1, LOW);

digitalWrite(mtrL2, HIGH);

}


void loop() {

int sens1 = analogRead(optsens1);

int sens2 = analogRead(optsens2);

Serial.println(sens1);

Serial.println(sens2);

//if (sens1 == 0 && (sens2) == 0) {

forward();

//delayMicroseconds(300);

//reverse();

//delayMicroseconds(1000 - 100);


if (sens2 > 15) {

reverse();

delay(500);

TurnR();

delay(1000);

}


if (sens1 > 15) {

reverse();

delay(500);

TurnL();

delay(1000);

}

}


video ?

Post videos!  :)

Awesome

This is freaking awesome.  I want to make some.  Can you at least list the parts, no need for links, if you could just list the model #s we could find a supplier ourselves.

Extremely cool.

I want one!!!

What an awesome use of an old mouse! Love it!