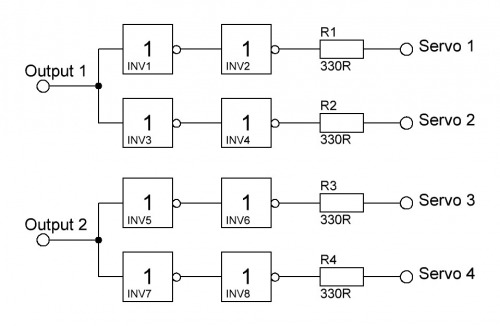
As two wheel alignment servos always moving simultaneously, they can be controlled by one output via inverters:
2011.3.2
Started to program my rover and came up with following idea for obstacle avoidance:
The Sharp IR will be moved by a servo to 11 positions. On every position the distance will be measured and stored in a word variable. If one of measured distances exceeds a given level, the rover will turn on the spot to the opposite side to avoid the obstacle. If none of the 11 distances exceeds a given level, the ∑ of w0 to w4 and the ∑ of w6 to w10 will be built. Then it will be evaluated if the ∑ of w0 to w4 > ∑ of w6 to w10 or ∑ of w0 to w4 < ∑ of w6 to w10 and the according positive difference calculated. If the difference exceeds not a defined value, the rover moves forward. If the difference exceeds a defined value the rover also starts a obstacle avoidance by turning on the spot away from the according side.
Please decribe the advantages of this suspension. I’ sure many people here think Mars rovers are cool, but never understood why exactly.
Plus: huh? Inverters in series nullify each other, don’t they? And how is inverting a servo pulse … erhm … why is inverting … grhegblbq … que?! Inverters? wtf?!
Rocker bogie suspension allows the rover to climb over obstacles, such as rocks, that are up to twice the wheel’s diameter in size while keeping all wheels on the ground: http://en.wikipedia.org/wiki/Rocker-bogie
Two inverters act as a buffer, you get a clean signal for each servo, even two servos are conntected to one output pin of the CPU.
The rocker bogie suspension is very cool. As Markus says, it can clear obstacles in a very impressive manner. The only disadvantage is that it only works at slow speeds (which is fine for the Mars rovers). Essentially, when the front wheel encounters an obstacle, it climbs the surface. At higher speeds, this would slam the vehicle into objects too hard.
Nice work, Markus. I’m a big admirer of this suspension.
It would be helpful here if robot builders adhere to the ‘Start Here’ design principal before posting pictures and videos of completed work. The ‘Start Here’ design principal forms the very foundation of this website. The idea being that the individual component is more important than the whole. This would serve two purposes. To aid the beginner in learning and secondly (but more importantly) to improve upon the design of the original.
To demonstrate you would start with the wheel assembly. Then move on to the articulating wheel assembly. Follow on with attaching the articulating wheel assembly to the strut assembly. And so on and so forth until voila you have a 4WD rocker-bogie suspension rover.
I am really unsure if Machina’s comment was directed at Markus or at the general public. I love to see these pictures. And when I have questions about them, I make sure to ask them. Here in this thread, where it is relevant. Feels educational to me.
Robot pages are really nice for showing the finished project. A lot of people do a blog associated with their project that has some detail on the build. When an especially cool idea or component is involved, people often request the creator to make a tip/walk-through page.
Basically, if you have a lot of questions on someone’s project… ask. Most people are happy to respond to questions about their creations. Without questions, it may not be clear to the author of a post what people would be most interested in.
Dunno how anyone can look at the “Start Here” project and arrive at the conclusion that it restricts creativity? The level of detail documented in that work inspires the beginner to replicate the project or improve on it’s design.
Furthermore, I was merely suggesting an adherence to a documentation format, or style.
Disassemble the project.
Photograph or video the individual component assemblies.
Post it for comments or instruction.
Progress to the next component assembly in series.
Repeat step 2 - 4
End result – A completed robot project.
As an example, I suggested the wheel assembly, as a bottom up approach. But one could conceivably start from the top down, or left to right, or reverse order, or even from a discarded purchase receipt. Where you start documenting the project is immaterial to the beginner.
With repects to MarkusB, I am passionately interested in this project, because in my opinion, it represents the current state of autonomous rover design in robotics today. More than that, I am interested in building a rocker-bogey suspension platform using off the shelf components.
So kindly take me, step by step, through the universe of your mind and like the title of this website states – ‘let’s make robots’
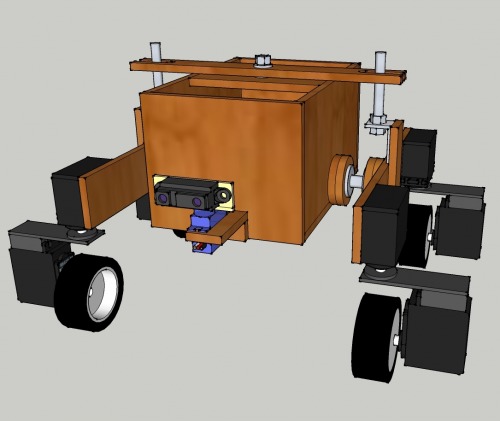
I do not know your skills, but I think this robot is not a “start here” project. Anyhow I have attached the 3-D-sketchup model of my robot. This should be more useful than any describtion. If you don’t have sketchup, just download it, it is freeware. You can watch the robot from all sides, disassemble it, measure etc.
Personally I know if i documented exactly how to make every one of my project how I did it then I would have no time to make projects.
There is a tutorial section and if something is posted in there then it is expected for it to be well documented, but I think the general construction, photos, and pictures suffices as a good robot page. Not every one will learn from what you did, but some times we do not have the time to be constantly teaching.
Build robots and have fun doing it, anything more than that is just gravy.
For some reasons I felt the joint in between servos seems weak to carry the heavier weight, and it might cause the servo above the wheel have sorta contact with the wheel??
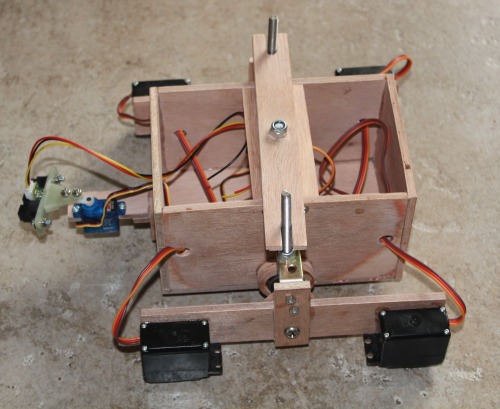
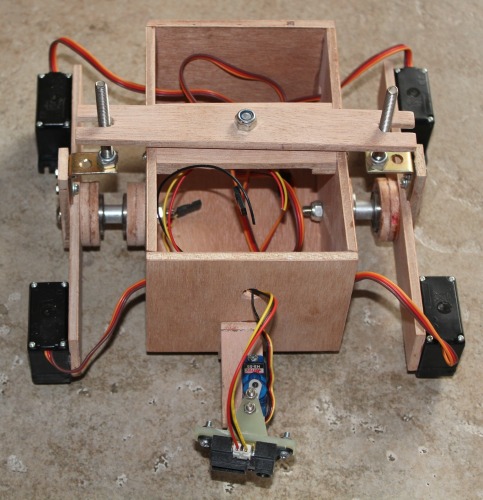
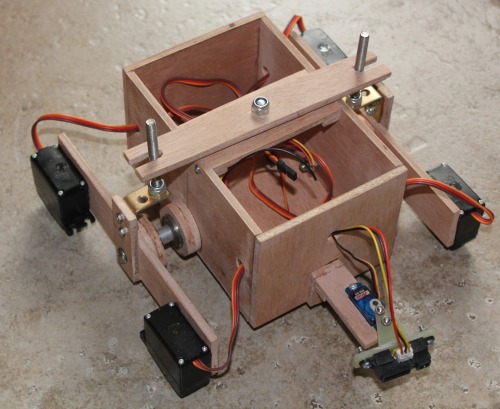
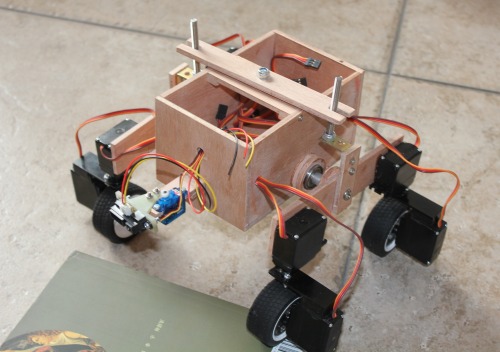
The picture below shows the construction. The part which carry the weight is made from 2 mm epoxy sheet. Epoxy sheets can carry a lot of weight and it is also a little bit flexible, so it acts on every wheel as a kind of little shock absorber.
Can’t wait for video. Great documentation too. You even texture and paint your sketchups. I have heard of the rocker-bogie suspension, but never saw it. Facinating.
On another note, your robots are extremely well crafted with the a great diversity of material (steel, epoxy sheet, wood, aluminum, etc). If i remember correctly you work at a university in China. Do you put together your projects in the university shops? What tools and machines do you use the most? Could you show us some pictures perhaps?
That’s cool~ I haven’t use epoxy before. Is it strong enough to hold different material? Personally I love to use servo to do precise movement. Love to see it in action. This bot reminds me the one I saw in http://robots.taobao.com/
I work with a Chinese university in my free time for the Google Lunar X Prize.
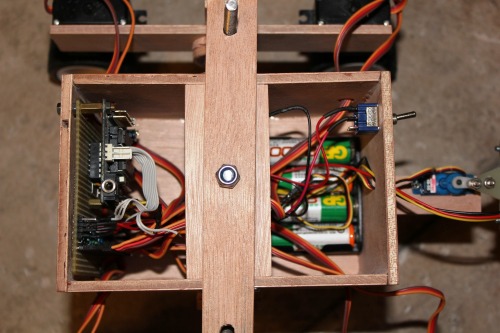
The robot was built in my workshop/lab at home. I do not have too much tools, a small battery drill, a metal saw, a Dremel clone, some files, that’s it. I like to use materials witch I have already and to improvise. The bearrings and joints I used for this robot for example are from a rollerblade