

Finally started on building Mortimer after ooh-ing and ahh-ing over all the pretty new parts. I'm hoping to get the soldering on his board done this next week, and if I can find a video camera to borrow, I can get some video of him in action!
I did do some tests with a motor on the breadboard, so I felt a bit more like I knew what I was doing. I was a bit hesitant to start bulding, but decided it would be best to dive in headfirst!
So far this has ben an exciting build. I've had experience in programming, and TONS of experience in electronics, but have never had the chance to put them together. This will be my step-by-step record of Mortimer.

Front shot of Mortimer. Hot glue is my friend, and is what's holding him together.
I know the stick on the left looks crooked, but I had to make sure mortimer could turn his head and not knock into the motors. Deal with it.
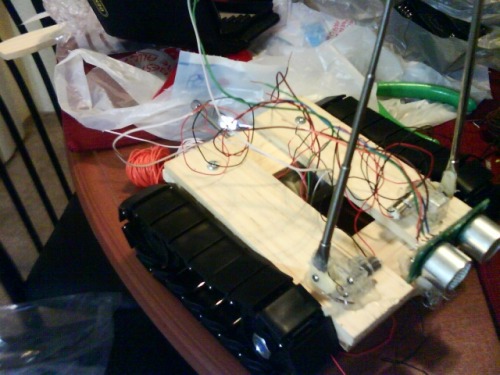
His body was built from two paint stir sticks I got for free from the hardware store, just like fritsl's. The hole in the middle makes it easy to run wires up to the board.
Oh, if only he had a brain....
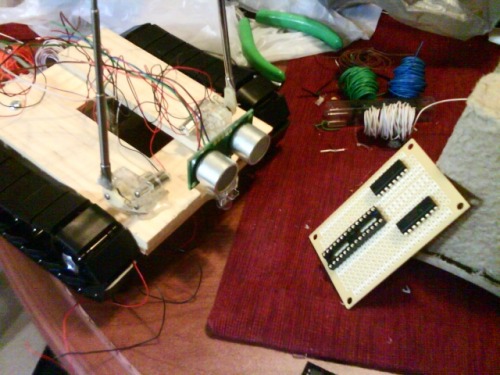
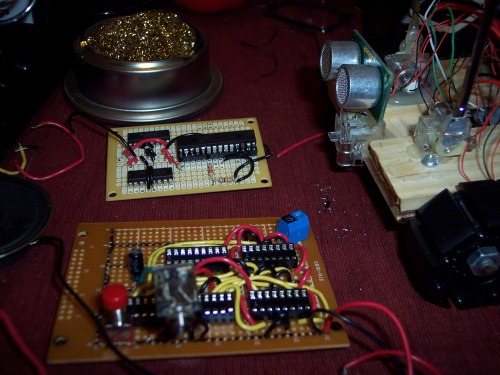
Two of the top chips are motor drivers, the sockets on the bottom are for the PICAXE 28X1 chip. I was going to use the project board that came with the starter kit, but I'm building another robot for my final tech school project.
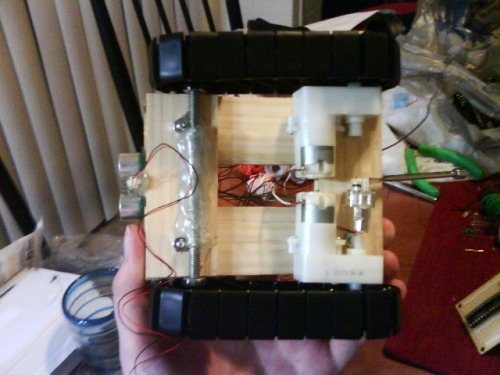
Construction of the bottom. I bought a long bolt, cut it to the proper length,, and then used locktite to secure nuts in place on either side of the wheels. Again, gratuitous amounts of hot glue holds the bolt in place. There was some concern about the wheels wearing away from the threads of the bolt, but I figure he's not going to be doing some heavy duty work. Also, don't tease me how the geared motors are a bit crooked, he does go to the right just a titch when running, but it's not enough to cause concern. I'll try harder on my next bot.

Even found a cool "bass" for him! It's the top from an old cordless phone I got from a thrift store. I'm planning to put some electrical tape on the end to give it more of a bass-y sound.
UPDATE 10/21/08:
I was able to set up my own board instead of having to use the picaxe project board. I needed it for another project. I don't have enough money to afford a project board, but have all the components I need to build my own. Go fig.

Sorry, still using the camera on my phone.
The motor driver running the tracks is the one on the top, obviously. I've included a reset button, and the second chip that runs the "head has power now.
I REALLY need some more soldering practice.
The board I bought was just a simple one from Radioshack. The two continuous strips running down the middle I set as Vcc and ground. This is a perfect sized board because I can put nearly all the components on it, switch out the processor (if need be), and it's wide enough so that I can mount it with some screws over the hole in the middle of the boards of the body.
I got his tracks to work and wrote a simple program to get him to go forward, backward, and turn. It was mainly a test to see if my circuitry worked.
Next step will be to get the SRF05 working and to see if I can get my bot to find objects without using the head motor.
UPDATE 10/23/08:
Babysteps forward is still forward right?
I got the SRF05 hooked up and tested it with the sample program in the manual, and what do you know, it works!
Now it was time for me to get a bit deeper into writing actual code, so I wrote a program to make Mort autonomous with objects infront of him. I set a 1 second interval between direction changes just so I can document this a little bit more easily.
I'm hoping to get the head motor hooked up tonight, so I can further edit my code so mort doesn't automatically turn right when faced with something. He'll be able to look both ways and decide which way is safest!
UPDATE 10/24/08:
I've added code now to turn the head, with each turn, Mortimer senses how much space he has to the left and to the right, and decides the most open option.
He gets stuck in the last bit of the video. I think it's because I haven't set a limit to how far he checks. Shouldn't be too hard to fix.
Progress is progress!
I did get a speaker hooked up to him and glued to the underside. I've tested to make sure it works, but didn't think to make a video of it.
UPDATE 4/4/09:
Wow... it has been a while. Now that I've got a semi-stable job, and have finished school, I can devote some much needed attention to Mort.
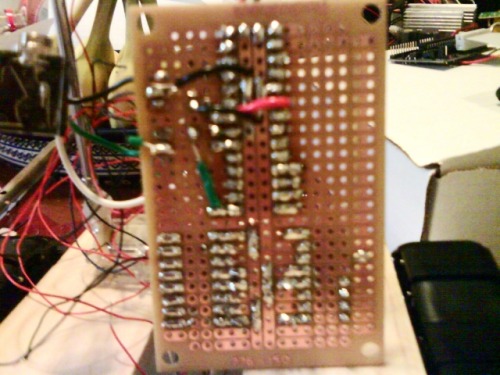
I've decided to rip apart his old circuit and replace it. In the first circuit, my aim was to keep it as small as possible. BIG MISTAKE. I had wires going over and under, troubleshooting was nigh-impossible, and short circuits were everywhere. I've found a board that is about twice the size. I'm able to spread things out and add posts so that I can remove wires.
Here are some pics!
A comparison of the two. I have been able to salvage some parts from the old board. I've learned my lesson too that sockets are your friend. I'd rather replace a 10 cent socket than a 5 dollar chip.

Better picture of the new board.
I'm so excited. All I have to do right now is pop in the chips and we're in business!
Well, that's it for now, let me know what you guys think!
This is a companion discussion topic for the original entry at https://community.robotshop.com/robots/show/mortimer-the-drum-machine
 I
I