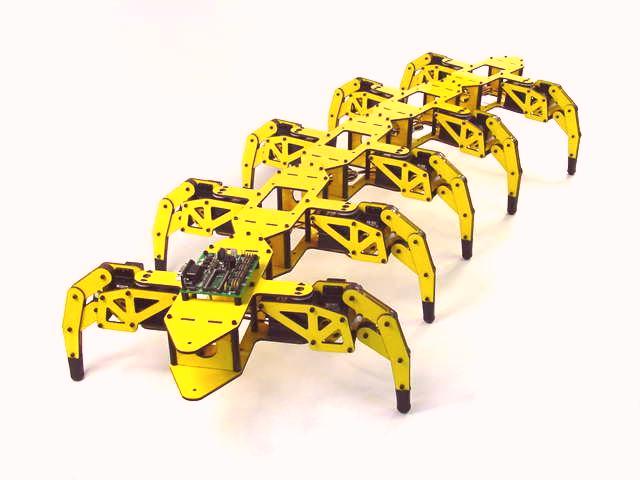
Moonlight Dragon - The Dragon Robot

Hi everyone! ^___^

I will officially start my 3rd robot project today - Moonlight Dragon! As you probably already know, I try to focus on Insect/Arachnid robots but this is a special project I’m working on; well, it’s more of a celebration of finally finishing school and starting university - so in a way, the end of one life and the beginning of the next! I would have to say that a Phoenix would have been more appropriate because of the whole being re-born out of the ashes thing but I think you’ll agree - dragons are way cooler! :mrgreen:

So yes, I’m abroad until the end of July so I’ll only be able to post designs of the Robot - I start University on the 24th of September so I’ll have some time to make some headway with the robot. Since I don’t have my own CNC at the moment, I will be crafting the parts by hand (well parts like the body segments anyway since they’ll be 3D and the designs I’ll be doing would be easier to do by hand) but I do plan on getting a CNC machine soon though. :smiley:

Anyway, I should really give you guys some information on what kind of dragon robot it should be:
I had a look around at different types of dragons from myths, legends, anime, etc. and firstly, European dragons put me off a bit - I just don’t like the small bodies with wings thing; it would be hard to make and I just didn’t like it very much. Then I remembered the Aztec dragon Quetzalcoatl (The Feathered Serpent Dragon) which then sparked my ideas - I then moved onto some Japanese/Chinese dragons which were also long serpent styled dragons. I ended up on deciding to make an Aztec/Japanese/Chinese serpent dragon because the long body looks cool and I could add some pretty nice designs in their too!

So I’ll basically be making a snake robot (for the body) with legs (I’m thinking about a hexapod but I’m not too sure at the moment; I’ll have to check out the cost for servos and stuff first).

So Moonlight Dragon will be a snake based robot with multiple segments and legs on some segments - I’m pretty sure this is going to be my craziest project yet! :wink:
Stay tuned for designs and updates! ^___^

AKdaBAOUS

Hey there everyone! :mrgreen:
I’ve got some initial designs for Moonlight Dragon’s body segments in terms of shapes and patterns. The colour scheme I was going for was a dark-ish blue with gold patterns (I can’t really show the gold on the image but on the actual body segment, I’ll colour the pattern in using a gold sparkly gel pen ^____^). I’ll give some detailed annotations with each design below. :smiley:

Moonlight Dragon - Body Pattern.png

Pattern Design: Well this is one of the pattern designs I have at the moment for the body segments - since I was going for the Aztec dragon theme for parts, I was thinking of using a few geometrical shapes in designs but it was also going to be a bit futuristic too so I was trying to make it look like it was “glowing/shining” in a way - hence the gold sparkly gel pen.

This “block” will be joined along with other “blocks” at different angles to create a chain of the patterns. This will become more apparent in the second image below. ^___^

Body Segment - Side View: Well, you can see now what I meant when I said that the pattern will join together and form a patterned chain. ^___^

So yes, you can see the colour scheme now and I think that it will look quite cool and it suits it’s name too! 8)

The bottom 1/4 of the body segment will be a really light grey-ish colour and I’ll try to add some thin grooves in it so resemble lines on the stomach that “real” dragons have.

The darker blue strip is where I will have a groove a few mm deep for the (I have no idea what it’s called but I’ll try to explain it) thingy that’s on the top of the dragon’s body above the spine. Just search “Japanese Dragons” on Google Images, you’ll see what I mean. ^____^
There are three of these grooves on the top of the robot’s body segment - you’ll be able to see this in the next image.

Body Segment - Front View: You can see the three grooves in this front view - their will be two on either side at an angle of 30°-45°; I haven’t quite decided that yet - I’m using 45° in the image. ^___^

The colour scheme is the same as you can see but I’m not too sure if I should continue the patterns onto the front - I have thought about it but after realising that the servos will be blocking most of the front and back faces, it seemed pointless to do it.

This is just the plain face of the segment - I will upload a more detailed one with all the holes marked on for the brackets so you guys can see the layouts. :wink:

Um…well, that’s pretty much it at the moment! I’ll have a mess around with some more designs and stuff over the next few days and we’ll see how it goes - until then, just chill out and stay tuned for more! ^____^

AKdaBAOUS

Hi everyone! ^___^

It’s been quite a while (sorry but I’ve been busy)! :mrgreen:
Anyway, I’ve just got a design update for Moonlight Dragon - I constructed a body segment design and I’ll just add some annotations to it to explain what I’m planning on doing with it. ^____^


  1. Well I’m still designing the head for the Dragon and I’m thinking of the easiest way to make it look really nice and detailed without using a CNC machine - I think I’ll have to pull out all my Arts and Crafts skills. Anyway, back to the topic at hand - this servo at the front of the body will be used as a basic head rotation servo and will be inserted into the cavity that I will have carved into that specific segment. I’ve made the body segments translucent so you can see the servo going inside and the free space remaining, etc. ^___^

  2. Since the body is going to be snake based, I need some way of making it move about like a snake so I’ve got a simple horizontal panning arrangement for this and I’ve tried to cover as much of the servo as I possibly can so that I have proper movement and less gap between the body segments.

  3. Every Dragon needs a tail and I want mine to be quite long and fancy but I’m currently thinking of how to make it blend in with the body and also about whether or not it should be controlled or free moving. :confused:


I’m also wondering about the number of legs for the Dragon - I could go crazy and add 6 but that would require more than 5 body segments so it would get longer and become more costly so I’m currently leaning towards the quadruped option with legs on the 2nd and 4th segments. ^___^

I’ve got some ideas for the legs but I’m working on getting the body sorted out first since the legs will just attach on - I still need to think of how to place the PCB, batteries, make sure the wires all reach, etc. :wink:

This is definitely going to be one fun project! ^___^

AKdaBAOUS

Hi everyone! ^___^
So I’ve had some rest and now I’m back (properly)! :mrgreen:
I decided to work on some more designs for Moonlight Dragon today and I’ll return to Infinity Mantis tomorrow (once I find the piece of paper that had all the servo-to-pin connections on it :blush: ).

Anyway, onto the designs!


So I’ve been looking at drawings of dragons that I would like to base my design off and I have seen that quite a few have a similar leg design - I have tried my best to re-create this as a Robotic leg for the dragon with all the aesthetics to match with the body.

I have decided to keep it a basic 3 D.O.F to keep the cost low. :smiley:

P.S. The bent part at the bottom is the foot and I’m still drawing that up so I’ll post it either later or tomorrow.

So then I added the legs onto the Body Chain and there you go - another stage of Moonlight Dragon completed! I decided to stick with four legs to keep the cost down. ^___^

I also drew up some quick “spiny things” that you find on top of dragons - I have no idea what they are called but that’s what I was trying to mention in one of the earlier posts. :smiley:

Well, personally, I think it looks pretty cool now but let me know what you guys think. I’m always open to suggestions! ^___^

AKdaBAOUS

I like your concept…a lot! :smiley:

In my time in Korea, I was told that Asian dragons differed from European dragons in that the latter were always evil and dangerous to humans whereas the former were generally aloof from but benign to humans. The Korean dragons did have wings as well as feet (apparently Japanese dragons are wingless), had very long whiskers or mustaches streaming back from beneath their nostrils, and often carried a ball or orb in one of their foreclaws. If a human could take the orb, he would have good fortune.

In his book Drawing Dragons And Those Who Hunt Them (copyright 2007, Watson-Guptill Publications), Christopher Hart calls those “spiny things” “dorsal spines.” So you’re close. I’m sure he is an authority on mythical anatomy. :unamused:

Just a thought for you to play with: What if you eliminated all the servos along the backbone, replaced them with simple hinge-pin pivots, and added a third set of legs? You might be able to achieve the snake like motion you want by using different side-to-side stride lengths in each pair of legs. (It might even work with just four legs which is more dragonlike.) You could modify one of the hexapod or quadrupod programs for control. If it worked, you could add a few more body segments without adding body servos. Also you might control the tail segments by monofilament fishing line running along each side and connected to one of INNERBREED’s pull-pull devices.

Anyway, have fun. :stuck_out_tongue:

Yes i like the legs also. :wink:

Eliminating the spinal servos would save weight, power and material. I agree with Ted on this.
The links can be passive also.
Lynxmotion once did a polypod…

Thanks for the comments guys! :mrgreen:

I thought about the wings but I couldn’t really get them to fit in with the design. :slight_smile:
I’m planning on adding the moustache thingys and other details into the head to make it as dragon-like as possible so that should be interesting. :smiley:
Dorsal Spine - I see. Well that would make sense if you compared it to Dorsal Fins from fish. Thanks for that! :mrgreen:

Thanks for the pivoting idea - I’ll try that out to see how it works. It would save a lot of stuff. :wink:

Well thanks for all the input guys - it’ll keep me busy for a while! :smiley:

AKdaBAOUS

The servo-less body segments is a much better idea - I’ve been fiddling around with cardboard tubes and these pivot thingys (I should really learn names for things :blush: - there’s a photo below ^___^). I can have lots of smaller segments giving more of a flexible body - much more like that of a snake. Thanks again for the ideas guys. :wink:
EFLH1151.jpeg

Hey everyone! :smiley:

Well I think I’ve got the pivoting idea sorted out for the body segments - details below. ^___^


Firstly, I would just like to say that there will be more body segments between the two pairs of legs but for simplicity, I have restricted it to three.
You can see that the distance between the segments has also been reduced meaning that more can also be added within the same space as before (provided they are sized correctly).
Another D.O.F has been added to each leg so that it can now turn individually instead of requiring the body to perform the turning motion.

The black lines represent the pivoting cross links which will be used; there will be one on the top and bottom to ensure stability. A photograph of the pivot mechanism can be found below along with another image showing an updated front view of the body segment.

So this is the simple mechanism that I will be using for the pivot. The large holes on each side (which are empty) will be where the screws go through to attach to the top/bottom of the body segment (please see the image below for clarification) - small cavities will be carved out of the body segments so that the pivots can fit in and then they will be secured in place with a screw.

Well apart from the pivot mechanisms that have already been explained, the only other new thing will be the batteries. If you refer back to the image above, you can see that the body is rather long and it would therefore make it very difficult to hold a battery pack in a single place because of the size of it and the problems it would cause to the C.O.M…

So I thought that I would split up the pack into individual cells and have them going through the body segments so even out the load and hide the cells from sight - they will be connected using wires which are slack so they don’t tense when the body moves. I’m still thinking on how to arrange the circuit board into all of this. I have an idea of carve out a massive cavity in the middle of one of the segments and mount the PCB in there.

Well that’s what I’ve managed to do so far - oh and yes, just a few other things …

I asked a company if they could send me some offcuts of Polystyrene (for modelling the body segments) and they sent me a few big blocks which will be more than enough for the modelling and testing which is great. I’ve also been programming Infinity Mantis too; I just thought I’d mention that in case anyone thought I’d given up on that (but it’s just turning out to be more of a challenge than I originally expected but that’s good because it’ll make my brain work harder). :mrgreen:

Well that’s all for now - I’ll try do upload some sketches of Moonlight’s head in a few days time; I’m just trying to tackle the programming with Infinity Mantis at the moment. :wink:

AKdaBAOUS

The “ball bearing push rod connection” you have there will give you a strong “push-pull” joint. Im concerned as to how you are mounting them.
From the photo the pivot point if free to move, along with the ball joints will weaken the link. Do you plan to fix the pivot point to the frame and just allow the ball joints to move?

Sorry but it’s my first attempt at producing a pivot mechanism so it’s probably wrong. :blush:
I will be securing the pivot point in place so that only the ball-joints can move - I know it doesn’t really look very obvious from the picture. Sorry about that. :blush:

Hey everyone! :smiley:
If you can remember, I mentioned that I would be uploading a design for the foot piece for Moonlight Dragon a few posts ago. I have to apologise since I forgot about that and just got around to doing it now. Sorry again. ^___^

Anyway, here it is - Enjoy! :mrgreen:

AKdaBAOUS
Moonlight Dragon - Foot.png

Akdabaous,

Commit this to memory: [size=150]There is no WRONG! Some ideas just work better than others.[/size]

We are temporaily elated by our successes. We are permanently educated by our failures. It takes a lot of both to really get anywhere especially with a hobby which is supposed to keep us elated.

You have already exhibited great ingenuity, inventiveness, and perserverance in your prolific designs. To all that you add the spark of artistic spirit and curiosity. To pragmatism, you add a sense of wonder.

So never admit to “mistakes” or “problems” :open_mouth: when you really mean “alternate theories” and “opportunities.” :smiling_imp: When you are demonstrating to an audience, replace “I was wrong, and I had to fix it” with “I actually tested this idea to see if it had anything to recommend it, but I like my own approach much better.” 8)

Remember your audience knows less than you do. That’s why you’re the one doing the talking. So select words that serve your purposes best.

And keep the reports of your projects coming; they refresh our imaginations. :smiley:

Well said Ted.

Yes i totally agree. Your designs and ideas are great, and with the rate at which you move from one project to another shows you have lots to give. Keep up the good work.

Thank you guys! It means a lot! :blush: :smiley:

AKdaBAOUS has been revived and fires of creativity are burning brighter than ever! :mrgreen:

Hi everyone! :smiley:
Sorry for not posting for ages but I haven’t been feeling well recently and now I’m pretty busy just sorting out things for University, so I’m afraid that I won’t be making and updates on anything for a little while longer. :frowning:

Hope this means you are beginning to feel better already - or will begin to soon. What university will you be attending? Will you be able to pursue your robot projects while there, or only when home on holiday?

Very best of good fortune to you! :stuck_out_tongue:

I’m feeling much better now RoboTed, thank you for asking. :mrgreen:
I will be attending the University of Sheffield (in the U.K) to study Mechatronics/Robotics. ^___^

I should be able to continue with the projects if I get a part-time job so I think that everything’s good for the time being. :wink: :mrgreen:

Thank you RoboTed! :smiley:

P.S. Just a bit of a random question - is it possible to cut 1.5mm Aluminium using tin snips?

Yes unfortunately for me that’d the only place in the UK that has that course.
I wish you the best of luck.

You can cut it with tin snips but it will leave very rough edges.

I agree with INNERBREED about the tin snips.

As alternatives, I have hade very good luck cutting aluminum this thick with table saws, chop saws, and radial arm saws using blades of 10 or 12 inch diameter. Of course you can only make straight cuts this way, nothing curved or changing direction internally. But the cuts can be beveled, or mitered, or compound beveled miters and you can make them in |, L, ****, or H stock. You can use regular wood working blades instead of metal cutting blades but thin plywood or veneer cutting blades of 40 or more teeth with little or no offset work best. Of course you will lose the width of the blade to kerf with each cut, so don’t lay out your parts next to each other without accounting for this.

Expect to get showered in nasty curled chips which can get around safety glasses, so WEAR SAFETY GOGGLES THAT ENCLOSE YOUR EYES AND/OR EYEGLASSES AND ARE IN CONTINUOUS CONTACT WITH YOUR FOREHEAD AND CHEEKS!

I built an entire sixteen foot long freestyle truss bridge for my garden railroad using these methods, so I guess they work. :wink:

You can also cut sheets of plastic and lexan this way. However I do it by reversing the blades so the back side of the teeth make the contact to avoid catching and shattering. Also watch the feed rate; you musn’t go too fast, but too slow can cause melting.

Have fun, but insure everything with Lloyd’s first.