Mini Machine!

Well I've started work on a new robot, with size in mind. It's setup is somewhat similar to the "start here" bot, but it's actually got a chassis and something to cover up the electronics. Hopefully the only wires we'll see on this bot is the wires from the Sharp sensor. (This info is now out of date: I can now reveal the chassis is transparent, so we can look at the guts!)

I haven't actually got the parts yet, but I've designed it and made a Cad:


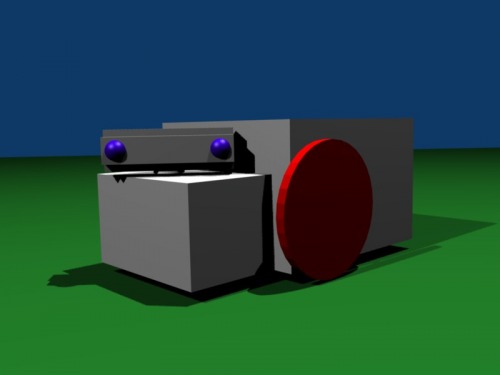
Yes, the Sharp sensor DOESN'T look like that, but I couldn't be bothered to model everything exactly and make them the right colours. And yes, it's NOT going to be a dull grey, it's going to be plywood (now I can tell it's transparent acrylic). And yes, the wheels DON'T look like that, they actually have spokes (I'm too lazy), etc etc.

Well, it is quite a midget, measuring less (now a millimetre more)than 10cm long, but when I was designing it I forgot to leave space for batteries, so instead of using 4 AA batteries, I'm gonna have squish in a 9V for the motors. This is not good for two reasons:

  1. Those little 9V batteries don't last that long
  2. Those little motors are gonna go WAY too fast, and they'll sizzle, so I'll have to use PWM.

Those little motors are Solarbotic's right angle drive GM7s. Although I haven't (now I have) seen them with my own eyes, from the datasheet and technical specifications I really like them, they are really small and and their dimensions are perfect for robot building, because of the way you can simply put them against the side wall of your bot:

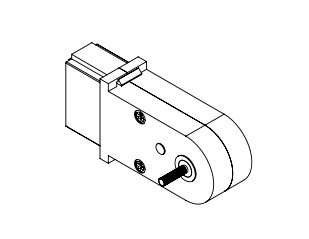
Of course, if your robot doesn't even have a side wall, like the "start here" bot, and many other chassisless bots, this motor is actually very bad.

Pictures:

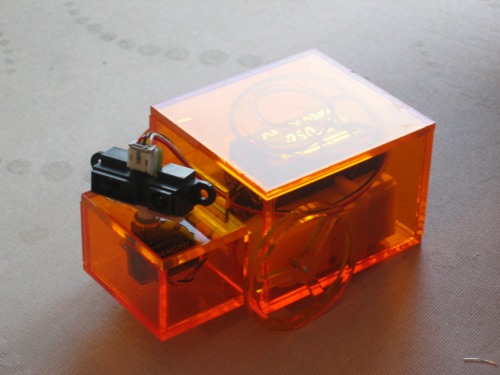
General view of the bot

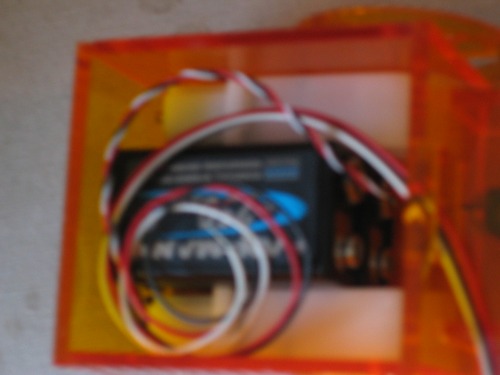
The guts! (without PCB as it's not made yet) sorry for the blur, my camera auto-focus get's confused by the transparent acrylic

Updates:

2009/02/ 8

I've finished the Cad, now I will start building the chassis.

2009/03/10

Now I've done a cool, transparent, orange, acrylic chassis! I know it's been almost a month since I updated this, but I was having problems with getting the chassis made, as the laser-cutter is at school. At least I've got all the parts now.

Almost all mechanical and structural details of the robot have been finished, now all I have to do is figure out how to make a printed circuit board and program the thing...

Images coming soon! (ie. once the camera's batteries have recharged)

Navigate

  • Actuators / output devices: 2 x Geared motors, 1 x Micro servo
  • Control method: Microcontroller
  • CPU: AVR ATtiny26
  • Operating system: Ubuntu (Linux)
  • Power source: 2 x 9V
  • Programming language: C
  • Sensors / input devices: Sharp IR sensor GP2D120
  • Target environment: indoor

This is a companion discussion topic for the original entry at https://community.robotshop.com/robots/show/mini-machine

Not bad. Don’t forget to
Not bad. Don’t forget to keep us updated.

9V

|x

Reconsider the use of the 9 Volt block battery. They might be able to give you sufficient current for the motors while your bot is standing on blocks, but probably not when you put the weight of the vehicle on the wheels.

See inside the block: it's just 6 tiny cells in series. Smaller than AAA cells. I do not expect sizzling motors, unless your motors are really tiny and your entire robot as well.

Compare a series of tiny air compressors trying to inflate an entire blimp. Sure they could provide enough pressure. But they would become very asthmatic before the blimp got filled by even 1%.

For reasonable motor power, you will need current as well as voltage. Four or five AAA cells would already outperform you 9 V block. Maybe you could scatter them around your bot instead of just adding a big bat-blob?

9V
How much ampage does a 9V provide? My motors take 100 milliamps at no load, but this thing should be quite light so the load will be quite low (I hope).

dunno

I don’t exactly know actually. Some battery manufacturers kindly publish the datasheets of their products on websites. Google it out.

Or use LMR’s search engine. We accumulated quite some intel over the year.

Yet more on 9V…

It is possible to run the motors and the microcontroller from a single 9v battery, some power being diverted to a voltage regulator, some straght to some motors? I’ve got a feeling the power would go straight to the path of least resistance (whichever that is) but you know, just be sure…

My microcontroller takes 15 milliamps. I wouldn’t mind working off separate batteries but at the moment my design is getting fairly wide, so of course a single battery is preferable.

Energizer’s datasheet for

Energizer’s datasheet for their 9v alkaline battery lists capacities for discharging at rates between 25 mA and 500 mA, but at 500 mA the capacity is down to about 250 mAh, so it’ll only last you about 40 minutes. 9V batteries are generally happiest in the <100 mA range, where the capacity is around 400-600 mAh.

Dan

its cute!!! :)what did you

its cute!!! :slight_smile:

what did you use to glue the acrylic pieces? hot glue?

amazing job… I love the
amazing job… I love the chasis design. I’m looking forward to more updates

Very neat
Nice bot! Where did you get the orange plastic/acrylic from?

So small. That’s great
Me likey.

Chassis

Thanks for compliments.

I got the acrylic from my school (I don’t know where they get it from, sorry Electrictape!), since my school has a laser-cutter I can use for my own projects. The glue I used is a special kind of solvent designed for plastics, it basically dissolves the edges of the plastic, and then evaporates entirely, leaving nothing but the plastic it had dissolved before, so I get a almost solid seal with no residue left.

that is an amazing technic,
that is an amazing technic, I must research and see if I can find that glue.