


Test_Motors_Forward_Backward.zip (39378Bytes)
3_ultrasonic.My_test.zip (29615Bytes)
Test_Obstacle_avoidance_Ultrasound_Plus_floor_detection.zip (39909Bytes)
Test_Obstacle_avoidance_Ultrasound_Plus_floor_detection_Fast.zip (40857Bytes)
Test_light_sensor.zip (39581Bytes)
Test_light_sensor_Change_colour_and_size.zip (39987Bytes)
Once you have unboxed the mBot and mounted the fun can start!
Don´t be fooled by the nice looking and easy going of this robot: it can teach robotics to children and adults alike. It´s so easy and well prepared to make all robotics easy, that you can not get lost. And if you do, you have loads of documentation and technical support on hand.
So mBot robot comes programmed already, it executes out-of-the-box (after mounting it) a program with three main functions:
- move around and avoid obstacles on its own,
- follow a line on the ground,
- or just accept commands from the supplied IR remote controller (like a nice robot).
I think it's a great way to show the capabilities of this robotic platform with three ready-to-use examples. The most I like is the command by remote controller: there you can check how fast, precise (and funny) this robot is.
However my first idea was to test the robot in a table. You know, let´s complicate easy things...
Problem? It can fall down and break it appart. The solution? It's easy! Just use the line detector to "see" if there is table or not. Yes you can do that!
With a little program in the easy to use mBlock software it took me only 10 minutes to develop and test it, and other 5 minutes to refine it! This is great! (Yes I myself know some programming languages and disciplines, but it's so easy you have to try play with it).
But first things first. What programming platform is this mBlock? How easy is it? Is it compatible with anything else? Spoiler: yes! It is very easy and compatible with your beloved Arduino boards! Keep reading:
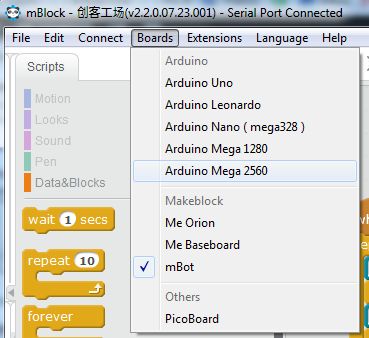
You can download the mBlock software from here. Hey! You can see there in the third tab, that mBlock is compatible with many Arduino boards! So you can develop robotics applications with your beloved Arduino board in mBlock. Here is the list I have right now for them in my mBlock software (note mBot is marked as it´s what I have connected right now):
From its website we can see that: "mBlock is a customized version of Scratch which is a graphic programming language (developed by the lifelong kindergarten group at MIT Media Lab). With mBlock, those who are familiar with Scratch can easily interact with electronic modules in Arduino eco-system."
This software has modules for everything, from inputs to outputs, to functions and even sounds. Drag and drop a module and voilá! You have that function working in your robot! If you have the robot on and connected by USB, the robot "gets" the software and executes it. Tip: if you test motors, put the robot at the top of something so you don´t mess with the cable ;-)
You can get wrong behaviour from the robot or nothing at all. No problem! Remove or re order the blocks and keep trying. Finally you get to where you want with the robot. Tip: develop easy tasks at the begining and test them. Save them and keep complicating the things. In this way you get familiar with those modules and the robot. I did it on that way too ;-)
So, how a program for mBot looks like? Here you have the program I did by my own. It is not perfect, but does what I want:

Yes you may think it is a complex program for a newer like you... So let´s try a easy one:
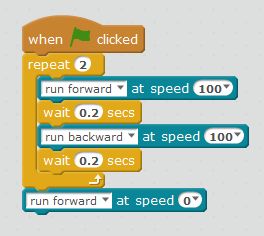
This program just repeats twice the following instructions:
- run forward at 100 of speed. Forward means BOTH motors moves to provoque that the robot moves forward.
- wait for 0.2 seconds (during those seconds motors are executing the precedent command).
- run backward at speed 100.
- wait again for 0.2 seconds.
- After doing from 1 to 4 twice, the robot ends that loop and keeps going with last sentence in this case:
- run forward at speed 0. That means stop motors.
As you see the program by itself is silly. But learning the basics on mBlock instructions and get used to motors is important for next programs.
The green flag means that you have to press that flag into the mBlock software so it sends the order to the robot to execute it.
As I said before, if we have the robot connected to the computer via USB cable for example, it is updated with this program. We can also force it opening the Arduino. We´ll see it later.
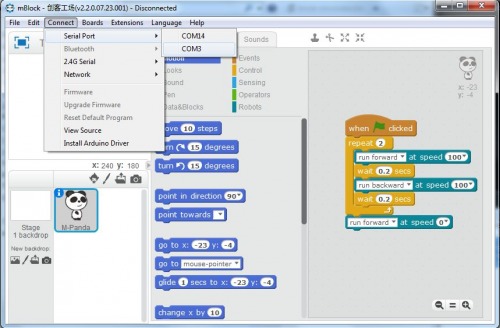
So we connect via USB mBot to the computer, open the mBlock software and "write" this program above. Then we have to connect to the robot. We do it using the Connect -> Serial Port -> Com... (in my case is the 14).
You can test with yours, until you see at the top of the mBlock program the message "Serial Port Connected" and listen to the mBot robot makes a sound like "hey I'm connected":
![]()
Then if you double click with the left button of your mouse or click on the green flag, you will see how the robot executes your program.
Now you can change speed, number of repetitions or seconds to wait and see how it affects to your robot. Attached you have this simple example to play with, but first try to build your own ;-)
Let´s see the code of this program in case you are familiar with Arduino or want to see what is behind the scenes (at the left):
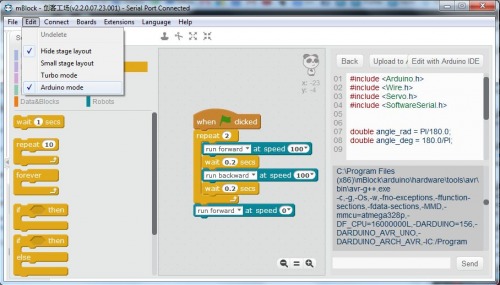
As you can see you have a button where you can open this sofware with your Arduino IDE if you have it installed.
But , what about the sensors? Well, they are nearly as easy as the motors! Let´s see a simple example I build to test the ultrasound one:

Don´t get impressed by this program (you can download it from here), it has only some new functions. I recommend you to review the funny and instructives manuals that are in the mBlock site here.
Basically we:
- declare the speed to 100 (because it´s fine like 100).
- we create a loop that will be executed forever. It´s simple and easy.
- Into this infinite loop we:
- declare the variable distance, that gets its value from the ultrasonic sensor, attached to Port3. Very straight forward, isn´t it?
- Now we start to give intelligence to our robot. It has to decide with "if" functions:
- if distance is less than 25 and it´s less than 15 then get backwards half second. Note: the ultrasonic sensor measures in centimetres (cm).
- if a random value is less than 50, then turn right half a second. It´s just to get things simple right now.
- other wise turn left half a second.
- If distance is > 25 (remember point 6?) then run forward, as there is not obstacle at less than 25 cm.
- Until when? Until it detects an obstacle at less than 25 cm, as the robot executes again and again from the point 3 (remember the infinite loop).
So finally after testing also with the line detection sensor I could develop and test sucessfuly the program to avoid obstacles on a table while the robot avoids also to fall down from the table, you can download this program here. I have tunned a bit this program and now the robot is faster and avoids nearly perfect any obstacle and fall, you can download it here. Please take note that for a perfect "fall down avoidance" you need two line sensors, one in each front side.
Update 27 August 2015: I have tested the omboard light sensor and it works great! This is a basic test. And this is an advanced one.
Final tips:
- Check the Youtube video list from mBot here, you will see other positibilities like the 2.4 GHz tutorial.
- Pins connections for mCore board of mBot is in GitHub with some comments.
- If you want to adapt your own sensors and servos for example to mBot, try this adapter.
- More about the adapter and schematics of the mCore board is here.
There are kits, upgrades and extensions for this mBot robot kit. If you want to see what else can be done and learnt with this robot stay tunned ;-)
https://www.youtube.com/watch?v=10LpNE1WSrI