

Hello I'm Kariloy and this is my entry for the Doodle Bot Art Competition.
Hence, meet the officially (on documents and IDs, such as passport and whatnot) named DBGTBBATGOAOHGMP (DoodleBot Got The Blues [clamp, clothing pin & methaphoric] But Also The Greens On Account Of Her Green Marker Pen) or instead just Little Stella for the tongue-twister challenged people ;-) !
The begining:
Well it all started ... when OddBot issued the Competition... my grubby eye already had hovered over the DoodleBot before... and since I still had some money left from my last (*sheds tear*) paycheck... before I knew it I've ordered one. Fast shipping, and about a week later I had the kit in my hands and spent a evening carefully assembling it.
The plan:
At start I was all hopeful and with huge plans, I already had started hacking down OddBot's original code while the kit was in transit. I had magnificent over reaching plans... that now, oh well I'll just stick with what I've actually accomplished.
The woes:
Given the Atmega8 limited programming space and the green light given to use wireless comms with Doodle Bot, I started adapting the code to handle my precious nRF24L01+ rf modules... soldered a quick jigg to make work with the Doodle Bot... and *ploff* disappointed results... the doodle bot got all wonky, and stopped receiving sketches... and got me all worked up and furious... and I shelved it, thinking I had ruined the mini driver board.
In the meantime one of the two bluetooth modules I had coming on the slooooow boat from China arrived... so, I decided to unshelf the bot, see what was wrong, try to fix it and use the bluetooth module instead.
Doh, it was the "corrupted bootloader issue" -- so once I've made that diagnose it was easy to fix!
Also made a fancy jigg, level shifting and voltage dropping to adapt the module to the bot. In hindsight if I wasn't in a hurry I could have sent for one of the DAGU bluetooth which I believe have all that stuff already taken care.
Re-worked the code... and soon I stumble against the worst of the woess... the bluetooth module connection often went off when the bot moved. It doesn't sound that bad? well consider this... everytime I lost connection between the PC and the Bot .... my pc would freeze... lovely.
First, I thought it was due to voltage drops, so I've added a couple of capacitors on my improvised circuit... one of them near...ish of the foot servo given that through observation the disconnects seemed to occur mostly during servo Up or Down movements. It took me quite REALLY REALLY WHILE to notice that the disconnects were actually happening because the whole improvised add-on circuit would wobble whenever the servo was raised or lowered... *FACEPALM* ... my answer to that problem... clothing pins to keep the connection steady :X
*INSERT HERE LOTS OF PERSONAL CRAP THAT PREVENTED ME FURTHER FUMBLING*
..the first deadline expired but was extended...
*MORE PERSONAL CRAP GALORE*
...and the extended deadline was drawing near... and I had the shelved again Doodle Bot staring at me... disapprovingly... so finally I decided to lay down a big square of plastic I had bought a couple of months back on the floor and get to it... so that I could finally participate on my first challenge...
Took a day off, cursed galore [don't do this at home kids, really :/ ], faced frequent disconnects again... but this time was because the batteries I've been using were below power, again I did not noticed that at first (and my multimeter was away) and I kept trying to fix the connector on place thinking it the culprit. Finally got my multimete back, check batteries, replaced batteries, and voilá!
One final issue remained, at random moments the serial commands send from over the pc... would just "hang" and the bot would stop. After several interations and debugging of code I finally solved that problem and managed to produce a fully Robot Teddy Bear drawing with commands being automatically streamed from the PC to the Bot via bluetooth serial.
One thing handy about my code is that it allows to interactively drawing without need of constant reprogramming/re-uploading of sketches to the bot. That was how I in the previous evening managed to get to the first draft of the robot drawing, interactively and iteratively.
The outcome:
Well... the drawn robot would make any pre-schooler quite jealous :P My first thoughts were to go the artistic way... but oh well... :P
But in the end I'm happy that I managed to make some code that allows either interactive drawing and pre-programmed drawing without the need of compilation and sketch uploads. \o/ Simple, yet convinient stuff. Plus I've also learn a bit more of handling with Serial.
P.S. - In the end the bluetooth on my linux installation completely "borked out", I had in the meantime already resorted to going to my windows installation *gasp* to run the python code (it was a pain [thankfully short] to install/run python on windows at first :| ) that sends the commands over serial.
The art:
=== SPOILER ALERT BELOW ===
If you don't want to go through the whole 5 boring minutes of the robot drawing, here is the final outcome:

Also below is the first version I've created interactively & iteratively. I've actually first done a sketch on paper and use it as a guide to create each segment at a time. Everytime I did not liked the outcome, I just erased the "bad" segment and manually picked up the bot and put her at the previous position, and then tried again another (refined) command. All the successful commands I would jolt down next to the respective segments and vertices on my paper sketch. In the end, I've just put them all inside a list that got fed automatically to the bot to create the resulting image above. So below, take a look at the first bot-draft.

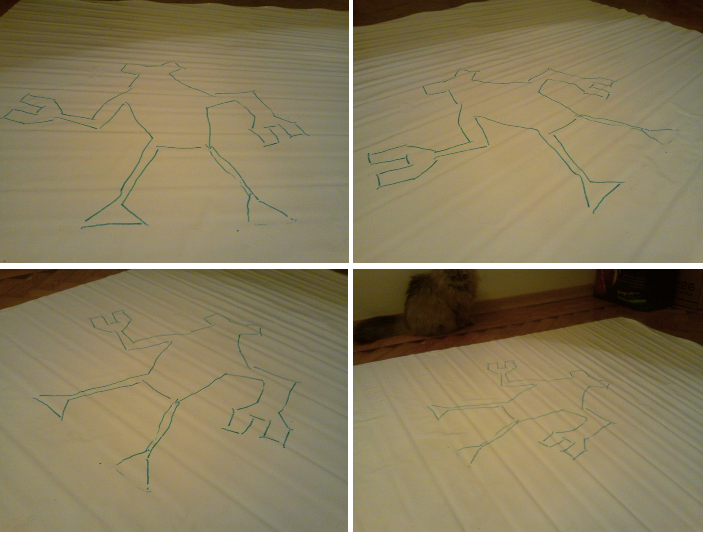
And at Maxhirez request here below is a composite picture displaying 4 additional view angles and a "special guest-spectator" in the "art gallery"!
doodles around on flat surfaces
- Actuators / output devices: continuous rotations servos
- Control method: autonomous (pre-programmed) / bluetooth
- Power source: 4 AAA
- Programming language: Arduino C, Python
- Target environment: flat & hard writable surfaces
This is a companion discussion topic for the original entry at https://community.robotshop.com/robots/show/little-stella


 I just