Little Black Box

10/12/08

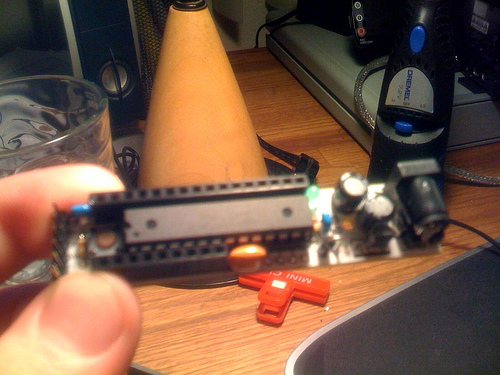
This will be my first robot with a brain, unlike my first attempt at a robot which just had 4 transistors for its extremely basic operation. I'll be using an Arduino, or more specifically the generic "Really Bare Bones Board" from Modern Device, which is considerably more affordable. Some people refer to these generic boards as "Freeduino."

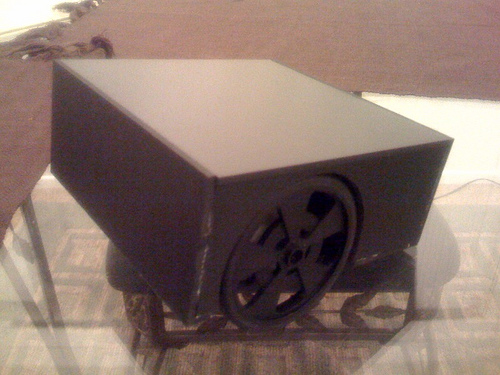
After my Solarbotics order arrived the other day I was so anxious to play with my cool new robot parts that I ended up building for a good chunk of the day instead of working, which I was supposed to be doing. But I completed the chassis for the bot already, built out of the 3mm expanded PVC I ordered. Some of you may have seen pictures of the parts here:

https://www.robotshop.com/letsmakerobots/node/2838#comment-10307 :P

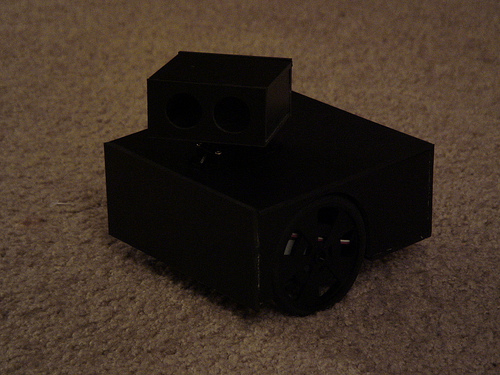
This will be an "arty" robot, as the lingo on this site seems to go, since I'm putting LED's inside the body and behind the eyes to create some cool effects while it moves.

Videos and more photos to come. Stay tuned.


I put the motors in and the wheels on. I'm still trying to find a caster small enough to work as a third wheel.
Oof ok so this is a terrible quality photo (cell phone pic) but I'm lazy and tired right now, so I'll upload a better version tomorrow.
This gives you an idea of what I'm going for. I'm going to put blue LED's inside, one pointing through each wheel, so that when they spin it makes a cool lighting effect. :D


10/20/08
Built the head this evening.
I'll put blue LED's in the head for backlit eyes ... perhaps I'll have him "blink" occasionally for added cuteness. :)
Also, I've soldered the Really Bare Bones Board together.
Actually there's one small detail missing in that picture ... 4 of the female headers. I dropped them somewhere and don't feel like getting on my hands and knees to find them under my desk just yet.

Avoid walls, look cool with shiny LED's

  • Actuators / output devices: Solarbotics Gear Motor 8
  • CPU: Arduino, Really Bare Bones Board, Freeduino
  • Sensors / input devices: Parallax Ping
  • Target environment: indoors

This is a companion discussion topic for the original entry at https://community.robotshop.com/robots/show/little-black-box

Great start Mr. Clean !Way

Great start Mr. Clean !
Way to come out of the Arty closet. Keep us posted on the inexpensive Freeduino board for brains.
I’m tingling all over.

I surely thin you should
I surely thin you should name this one "the black box". Things called what they are is nice :smiley:

ePVC
Aha, more expanded PVC construction. You’re gluing it together? What are you cutting/shaping it with?

That occurred to me,

That occurred to me, actually. I’m not sure I like the name, though. We’ll see.

Maybe “Little Black Box.”

Looks great
Looks great. I’m really looking forward to seeing a vid with that LBB (little black box) moving around. I’m especially curious how those blue leds will look behind the wheels

Yes, I’m gluing it together

Yes, I’m gluing it together with 3M Scotch Maximum Strength Adhesive. Takes about half an hour to dry, and holds really strong.

As for cutting I just used an exacto knife. Takes about 4 or 5 passes to cut through it, but it’s fairly easy material to cut. Of course I meticulously pencilled the lines, but I also used a ruler for the first couple passes with the knife. Helps get a perfectly straight edge. The half circles were kind of tough, but with patience it can be done with a pretty clean finish. Then I lightly sanded the curves with my Dremel to get rid of some of the frayed areas.

When I start working on the head I’ll need to make some very small holes for the Ping housing. I’m going to try to do that with the cutting tool on the Dremel. I’ll let you know how that goes when I get there.

Eyes

I made the holes for the eyes in Edward with a drill (rather large drill) and then expanded the holes with the sanding tool on the dremel. That way you get smooth results. Off course. you’ll have to find a drill that makes a big enough hole for the sanding tool to go through

And you live up to your name…

All I can say is… Recessed wheels! Sexy!

Seriously, that is a damn nice chassis, it’s going to be a awesome bot!


That’s a great idea,
That’s a great idea, actually. I don’t own a drill but I can borrow one from a friend, and the largest bit just might be slightly larger than my smallest Dremel sanding attachment. Thanks for the tip.

Thanks, Chris. :smiley:

Little Black Box Really Bare Bones Board hmmm…
So you could call it LB2-RB3. I know, lame… :wink:

Caster
Oh, and if you’re after a very small caster then a ball caster might do the job- I ordered in one of the Tamiya 70144’s from here - https://www.technobots.co.uk/acatalog/Online_Catalogue_Ball_Transfer_Units_392.html - but it turned out to be smaller in total height than my wheels so couldn’t reach the floor!

Thanks for the tip. The

Thanks for the tip. The distance to the floor is about .70 inches on LBB. Since I’m in the US I decided to look on Pololu’s site and order directly from them. These are the two options I found:

http://www.pololu.com/catalog/product/953

http://www.pololu.com/catalog/product/952

So either plastic, or metal. What do you guys think? Has anyone tried either of these ball casters, and if so, do you know what the strengths and weaknesses of the two are?

The only thing with the

The only thing with the casters is that they get dirty, kinda like a mouse ball.

Ya know, one idea that someone had was to use the front landing gear(the ones that rotate that is) of an rc plane. They are small, spongy or rubber and pretty small. Easy to clean as well.


The only problem is that I’m
The only problem is that I’m not sure that would fit under the bot since it’s only a .7" gap. But, I’ve got some tires from an old model RC plane, so maybe I can make those work. No casters on them, but I’ll try to get creative.

ahh…under the bot…I would
ahh…under the bot…I would say if you could, mount it on the front/back side… whichever doesn’t through it off kilter…

Rubber wheel

I’ve been experimenting with the tiny rubber wheel from solarbotics. Using a piece of metal wire or a paperclip, can make a good tiny caster.

http://www.solarbotics.com/products/rw/

You’d have to wait for the order to be delivered of course :frowning:

I can wait for delivery

I can wait for delivery since I can get done a lot of work other than finishing the chassis while I wait. The head hasn’t even been started yet.

Could you post a few pics of your progress with making casters out of those wheels? I want to get a better idea of how you did it.

I’m away on vacation with my

I’m away on vacation with my family for the whole week of Thanksgiving, so this project is temporarily on hold.

However … it recently occurred to me that after LBB’s completion, I really ought to equip him with some sticks and make a Little Black Drum Machine!! I just thought that was a fun idea, and decided to share it with the world. :slight_smile: