LadyBugBot

Meet my robotic fridge magnet! :)


Once upon a time I was getting into my fridge for another bottle of beer, and after closing the door, my eyes stopped at little funny ladybug magnet... And I thought: "Hmmm... Why don't I build slightly bigger one, intelligent, robotic fridge magnet? :)"

In a day or two I already had a rough design in my head and started to collect parts. Controller: Picaxe 08m (this was my first time with it, and I'm pretty happy with it! ) with CHI040 board which I found fantastically convenient for variety of purposes as well. Base: defective CD (I had couple of). Locomotion: With 08m I had no luxury of dedicating 4 pins to motor driver, so, continious rotation micro servos from DAGU cuts pins count by 2, leaving space for bumper switch, tilt sensor and piezo speaker. I went to construction store and bought a bunch of furniture magnets. One of medicine dropper parts magically had perfect size for my tires. Now, the body... Hmmm... first I was thinking of some plastic ball cut in two hemispheres, but then I came up with papier-mâché. After I tryed it out, it was so cool, so I decided to write a walkthrough.

Below is the interrior view of LBB.

I had to hot glue 10 of my magnets to CD to have good enough magnetic force. By the way, My dead CD was LightScribe one, so I did not hesitate burning some stuff on it :)

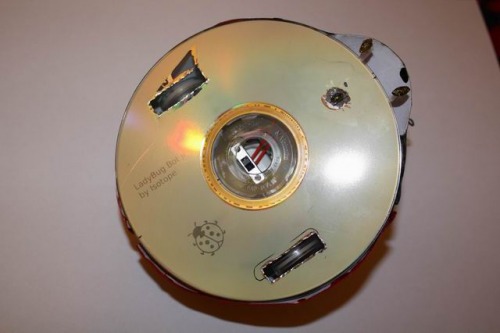
The power switch fitted just fine in the CD hole. Below is picture of my board which is glued upon 3xAAA batteries taped to each other (initially I used 3xAA and battery holder, but this setup could not fight gravity :) ) which glued to servos which are in turn glued to CD base. You can see A tilt switch soldered onto board facing up. I use it to roughly determine if LadyBugBot facing up or down and use it in subroutine which makes LBB turn until facing upwards.

Wheels and mecano parts I used to screw body onto chassis:

Little piezo speaker:

And at last, my home brew bumper switch which is actually not only bumper switch, but cavity sensor as well. Basically it consists of 2 little levers glued to 2 springs which are centered between 2 contacts. If lever goes to cavity or bumps against something - spring completes switch circuit. It took me long time to tune it to work properly.

Now, the behaivour. LBB basically roams around my fridge door and avoids cavities ie. door edges. Randomly LadyBugBot does some other actions:

  • stops for 10 seconds and produces creepy sound
  • turns left
  • turns right
  • positions itself upwards
I have some ideas for upgrading LBB in future like replacing AAA batteries by AAA accumulators + solar cells and giving it some LDRs to simulate more complex behaivour.

Inhabits my fridge's door.

  • Actuators / output devices: Two servos modified for continuous rotation
  • Control method: autonomous
  • CPU: picaxe 08M
  • Power source: 3 x AAA
  • Programming language: Picaxe basic
  • Sensors / input devices: Tilt sensor, bumper switch
  • Target environment: Fridge door

This is a companion discussion topic for the original entry at https://community.robotshop.com/robots/show/ladybugbot

Wow, really nice job!!No way

Wow, really nice job!!

No way I believe you did it in 16 hours! :slight_smile:

I have never seen anyone get so much out of an 8m! Nice!

And btw; I think this must
And btw; I think this must be the first vertical LMR bot!:slight_smile:

08M rocks!

Great Job! I like the way that sounds: "Target Environment: Fridge door"

Nice work on the bumpers/cavity sensors. I cant really make out how the springs and levers make or break contact, but it looks tiny and nifty.

* * * * * (five stars for this one)

Unless upsidedown also counts
Magnet Roboter

Great job
This will make the blogs. The visual details are right on.

Nice work isotope - how many
Nice work isotope - how many of those 16 hours were spent adjusting the front tactile switches I wonder?

Gotta Luv those 08M’s!

Great job, Isotope. You squeezed everything from that 08M, which is one of my favorite chips.

Cool idea how it defies gravity.

Well done!

Thanks :slight_smile: You are right, it
Thanks :slight_smile: You are right, it is more like 26 hours… I was so hurrying to input robot page and underestimated the time I actually spent building it :slight_smile:

Thanks, mintvelt! I knew you

Thanks, mintvelt! I knew you gonna like this 08 bot :slight_smile:

The sensor is designed so springs do not touch contacts when on flat surface, but they are in little tension. When lever is at cavity, it goes down, unloading spring and letting it touch front contact.

:slight_smile: I was trying to make it
:slight_smile: I was trying to make it look exactly as the fridge magnet on pictures :slight_smile: Tnx

I spent friggin 2 hours
I spent friggin 2 hours building and tuning it :slight_smile:

Thanks :slight_smile: It is real
Thanks :slight_smile: It is real pleasure to know that you guys like my little buggy :slight_smile:

very nice
Calculon likes. He didn’t think little wheels like that could overpower magnets.

Another cool design from

Another cool design from Isotope. Great job!

The bump/cavity switch is a cool innovation.

How long before Make or another site pick this one up? ; j

That is really cute, cool
That is really cute, cool idea! Strangely saw it on Make before here. : )

Very nice bot

LadyBugBot is a very nice bot indeed. A friend of mine is renovating kitchen and I just remembered seeing this lovely bot. So now I feel I must try to copy it because it would make an excellent gift.

Just finished working with papier-mâché. Time to get some sleep and give it some time to dry.

And thanks for the great bot and inspiration :slight_smile:


You are welcome! :smiley:

Tnanks! :slight_smile: Let me know if you will have any questions, anything I could help you with.

… and do not forget to take pictures and stuff before you give it away! :smiley: Good luck!

Made

http://blog.makezine.com/archive/2010/04/coaster_bot_roundup.html

Wow! That is nice! :smiley: LBB

Wow! That is nice! :smiley: LBB gets popular :slight_smile: