K-9 2.0 running on the EZ-Robot platform

The making of K-9  2.0 video slideshow.

K-9 getting to know his new home video.

K-9 controlled via a VCN iPhone app video demo.

A bit of fun with K-9 at Xmas 2014 video.

Smoke/Gas sensor demo video.

Interactive Doctor Who Quiz hosted by K-9


Post 1 of 3.

Hi everyone.

My name is Steve, and I'm currently living in London, UK. I've been looking through this website for quite some time now, and have been impressed with what you guys have made, so I figured it was about time I jumped in, say "Hi", and share with you guys what I have been working on over the past 14 or so months. This is the first of three posts talking about the inspiration and features of my home robotics build. In the first post I talk about the inspiration behind the build of K-9 2.0. The second post explains the features and build details, and the third details recent changes and improvements made.


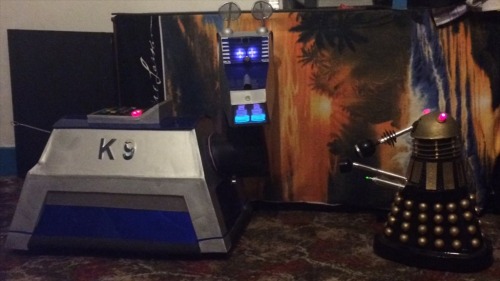
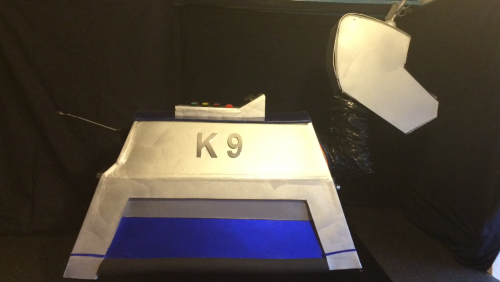
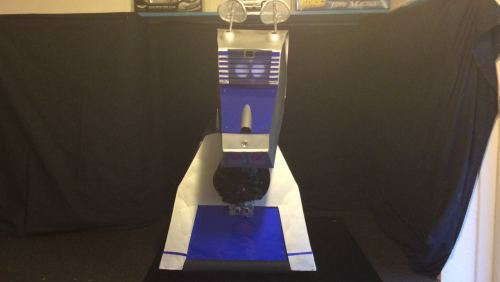
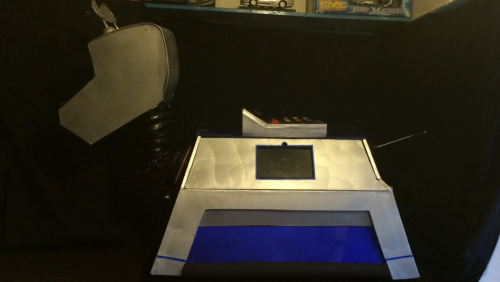
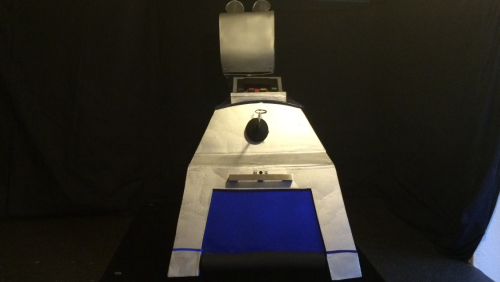
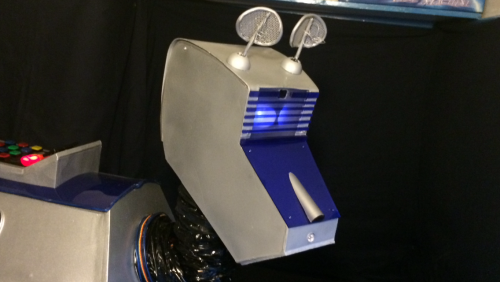
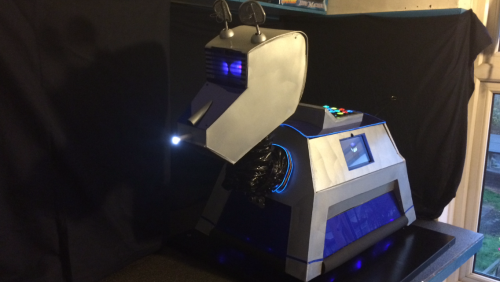
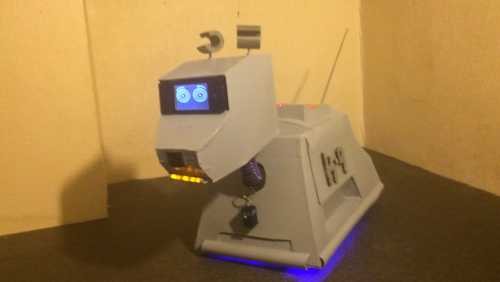
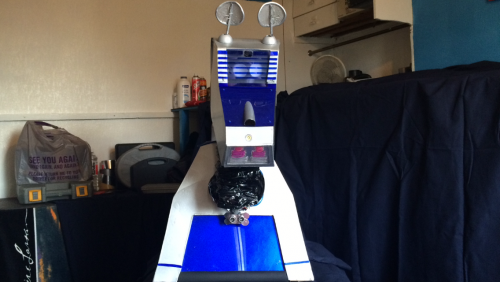
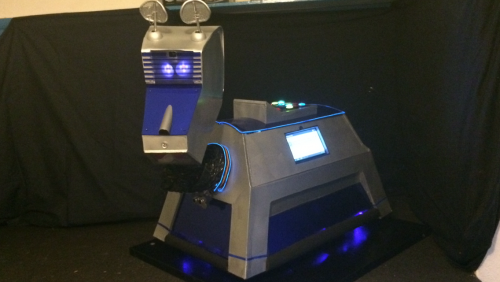
So, after a little over a year in the making, I am pleased to present a project I've been wanting to do for years, pretty much since the first time I saw the little fella in Doctor Who when Tom Baker (one of my favourites) was playing The Doctor. K-9 was pretty much one of my all time favourite characters in the show, so with that in mind, and with my love of dogs and my interest in robots, it was only logical that building my own K-9 unit some day was on the cards. So, why K-9 2.0? K-9, because it's a cool name and the clever play on words. I just couldn't change that, and I couldn't call him FiDo (whovians will know what I mean by that). 2.0, well obviously my K-9 looks a little different to the one's seen in the show. This is because I wanted to give him a newer, slightly more modern look, but still keep the original shape I fell in love with as a child (I don't like the new one in the new kids TV show. It looks too much like a toy to me). I also wanted to have a more personalised look and shy away from building a replica, as many robot builders have already done so, although I very nearly did. (I hope I haven't offended any K-9 aficionados out there with his new look).


Okay, why the build, now? Well, I had an accident a while ago now resulting in a back and left leg injury which left me unable to work or do much else for a while. So, looking for something to do to keep my mind and hands busy, and not become a couch potato, I thought "I want to build something", so I drew up some plans and made an R/C Cardboard K-9 prototype which incorporated some of the technology I wanted to use in a future possible big build.

He was was a lot of fun to build, but I wanted bigger and better... and smarter. At this point I had a lot more mobility so I decided, "let's just do it", and as you can see, I did.

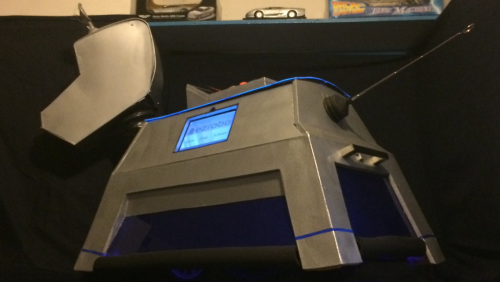
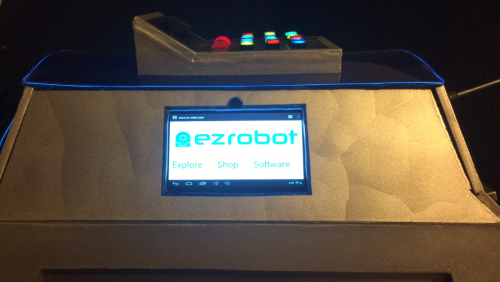
My (not so) little robotic pooch nearly turned out very different, and I'm not just talking about how he looks. After making the R/C prototype, I searched through my "spare parts" cupboard and found that I had three strong 12v 30W motors and another working R/C control and receiver. So I drew up some blueprints, I got my tools together and dusted some MDF sheets I had laying around in the shed. I was going to make a full size similar dimension R/C K-9 and hack some PIR sensors and audio equipment to install inside of him. I started on the chassis first, just working a couple of hours a day or night, and a few weeks later pretty much had it complete so started to make the body frame. During a not very good day as my back gave out again, I was searching the interweb when I came across the website for EZ-Robot. After reading the documentation and community forum, this changed everything. EZ-B v4 Microcontroller, servos, face/colour/object recognition and so much more, this was for me, or rather this was for K-9 2.0. After spending days going through the website and forum I made a shopping list and placed an order for some parts, as well as some other parts from other suppliers such as relays, voltage regulators, and more. My goodies arrived a few days later and it was "game on". I started playing around with the EZ-Builder software and my new EZ-B v4 controller, and was well impressed. This lead to a few changes in K-9's design, but changes for the better as it turned out.


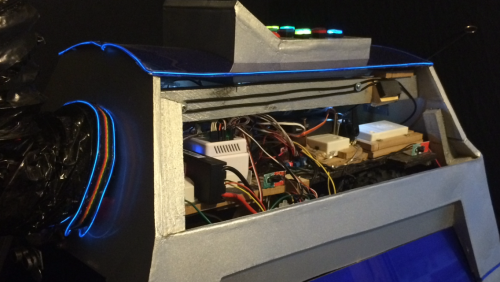
So the build is pretty much complete now, and everything is installed and working. As a matter of fact, I finished the build a few months back, but recently stripped out K-9's entire electrical system and did a complete electrical re-build, as well as adding some additional sensors, as well as some re-programming to reflect the recent changes.


In post #2, I delve in to K-9's features, abilities, and build design. This is my very first attempt at building a microprocessor controlled robot, with no scripting/coding knowledge or "qualified" woodwork/electrical experience but I'm pleased with the way he has turned out. But it's not what I think that matters (well perhaps a little bit), it's what you guys think. Well I hope you enjoyed this insight to how K-9 2.0 came to be (and if you kept reading this far, then fair play to you), and I hope you enjoy reading my post. I would love to hear your thoughts and opinions, things you may have done differently, things you like, and things you don't, and it would be great to here from you. I hope K-9 2.0 inspires you in some way and hopefully gives you some ideas with your own robot projects.


This is a companion discussion topic for the original entry at https://community.robotshop.com/robots/show/k-9-2-0-running-on-the-ez-robot-platform

K-9 2.0 features.

Post 2 of 3.

The making of K-9  2.0 video

K-9 getting to know his new home video

K-9 controlled via a VCN iPhone app video demo

A bit of fun with K-9 at Xmas 2014 video

Overview

  • Sturdy wooden (MDF) and acrylic design 
  • Fully microprocessor controlled using the EZ-Robot EZ-B v4 controller and EZ-Builder software platform 
  • Full drive movement, forward, reverse, turn left, turn right 
  • Twin 30w 12v drive motors with PVC wheels and rubber tyres 
  • Heavy duty servo and bearing steering system
  • Multiple control options including… 
    • Fully WiFi controlled Via laptop, tablet PC or smartphone 
    • 3G/4G LTE controlled via Smartphone 
    • Speech, facial, colour, glyph recognition controlled 
    • On-board ultrasonic distance/ avoidance sensors to help control autonomous movement
  • Speech synthesizer that allows two way verbal communication 
  • Fully customized chatbot program to allow dynamic conversation between K-9 and humans 
  • Multi-movement head, looks up, down, left and right 
  • Autonomous movement abilities and personality generator 
  • Multiple sensor array including… 
    • Passive infrared
    • Ultrasonic distance
    • Smoke and gas detection
    • Sound detection
    • Flex/bump sensor strips
    • Temperature
    • Compass
    • Accelerometer
    • Photosensitive diode module
    • Three on-board cameras, one capable of facial, object, gesture recognition
  • Retractable LED torch/flashlight from K-9’s nose (his laser weapon in the TV shows) 
  • Multi-coloured sound reactive EL lighting panel for his mouth 
  • Independent rotating ears (both move in same or opposite directions from one another) 
  • RGB LED eye panel, (i2c connection) (eyes can blink, show emotion and patterns) 
  • Front facing camera for no latency video streaming, vision tracking and still photo capture, face and object recognition
  • Side facing camera for video and still photo capture 
  • Removable 8.1" Acer W3 tablet with Windows 8.1 for K-9s VDU (visual display unit) on his side panel 
  • Relay controlled blue under chassis LED lighting with various flashing modes 
  • Blue edge lit EL lighting for dorsal panel and collar 
  • Multiple drive speeds via H-Bridge and PWM control 
  • Security remote power On/Off to K-9’s power systems (so no unauthorized operation) 
  • Wagging telescopic tail
  • Ability to navigate with room mapping 
  • Removable dorsal control panel with… 
    • Relay controlled illuminated LED buttons with various flashing modes with or without sound F/X
    • LED battery meter to monitor main drive battery 
    • Programmable LCD display for live system and CPU information
  • Removable magnetic inspection panel 
  • Ability to verbally inform of incoming phone calls and emails, and who is calling or sending them 
  • Built so body can be removed from rolling chassis for easy maintenance 
  • Two sound sensors so K-9 can look in the direction of who is talking
  • "Flex" sensors installed in the bumpers for additional object avoidance 
  • Media player which can be controlled using voice recognition or WiFi control 
  • Verbally tells the latest news/weather/traffic reports and more using RSS feeds 
  • Can entertain by playing games, telling jokes, telling fun facts, and trying to sing songs 
  • And he can do the whole “Line following” thing too.

Chassis/drivetrain.

The chassis is made from MDF and 2x1 battons which makes a very strong platform. The drivetrain is made from 2x 12v drive motors which came from an old kiddies ride-on car. Very strong with lots of torque. These are wired in to a 10 amp motor controller, and the steering system is made up from wood and has a single un-powered wheel. This turns by a lazy Susan bearing and is powered via a heavy duty servo. The whole chassis is designed to easily separate from the bodyfor easy maintance.

Chassis.jpg


Body.

The body section is made from MDF, 2x1 battons and blue acrylic sheets. I wanted to use the acrylic to give K-9 a bit more of a modern look and also liked the idea of having him in two main colours. I sprayed one side of the acrylic panels with silver paint so they have a shiny metallic blue look when they catch the light, and I didn’t want them see through. I did the same with the dorsal panel but used a heat gun to melt it in to a curved shape.

new_k9_pics_094.png


Head.

The head is made from PVC sheets. It was going to be MDF but it was just to heavy for the servo to lift it. Using PVC also gave me a bit more room to work with. I used the same principle to melt the top of the head in to shape as I did with the acrylic and heat gun. The head contains an RGB LED array for the eyes, and a 640x480 resolution at 20fps no latency camera. Two micro servos servos are used for the rotating ears. Another servo is used for K-9’s nose which is explained later. 
He also has a smoke/gas detection sensor module on his face plate. 

NEW_k9_pics_353.png


NEW_k9_pics_478.png


Neck.

Made using a Small disc of MDF and 4x4 Batton. I made a “push & pull” lever design from the batton for the head to look up and down powered by a HD servo, while the lower part is fixed to another lazy Susan baring and HD servo to look left and right.

NEW_k9_pics_415.png


Control panel.

MDF again, with some coloured buttons I found online. These were hollowed out and some clear 8 phase fairy lights inserted. These turn on/off using one standard servo, while changing the flash phases is done using another servo (this has since been changed to relays). These have sound effects added via a soundboard and are manually, autonomously, or voice activated. There is a LED battery meter installed and a scrolling dot matrix display (recently changed to an LCD display). The control panel can be removed for easy maintenance access.

004.jpg


006.jpg

003.png


Under chassis lighting.

These were made using some blue 8 phase fairy lights and some clear hose pipe. I fed the lights in to the hose and attached it to the chassis with zip-ties. The bottom of the chassis is covered with aluminium tape to reflect the light further. The power and phase change use the same servos as the control panel, and are controlled the same way.

new_k9_pics_073.png


Inspection panel/VDU.

This is designed to be easily removed for maintenance access. It clips in to place with a magnet and houses a touchscreen tablet PC. This is K-9’s VDU, and displays a diagnostic information animation, but is a fully working tablet so can be used for web browsing, playing video ect. This can be easily removed if needed by sliding it out when the panel is removed.

new_k9_pics_126.png

001__2_.png


Tail.

A telescopic aerial and a keyring was used to make the tail. This is connected to a servo and wags left and right. The gaiter is a cars rubber steering rack boot.

032.png

NEW_k9_pics_273.png


Lights.

Control panel and chassis lighting is, as mentioned, 8 phase fairy lights. The collar and dorsal edge lighting is a length of EL wire and has 3 phases, again controlled by a servo. I was going to edge light the “K” and “9” insignia on the side of his body, but you cannot bend this stuff too much, and it would have looked messy when the light was off, so I decided against it. So I used the excess wire I had for his collar.

NEW_k9_pics_500.png


Torch/Laser.

Initially I was going to use a laser pointer but didn’t see the point of shining a red dot on the wall, and a little dangerous if kids are around if it were to shine in their eyes. I wanted something useful. I then thought water pistol, but water and electronics, probably not a good idea. I did come across a pen size blow torch and initially thought “cool”. Then straight away thought “very NOT cool” if kids are around again. So I found the brightest LED penlight torch I could find and that is what K-9 has. Using a servo with a linkage it deploys and retracts very smoothly. Using the same servo, the end presses down on to a soft momentary switch when deployed and activates the light. This works great in a dark room when using the camera. It also has sound effects programmed which are heard when the torch is activated. 

NEW_k9_pics_381.png

NEW_VIDEO_pictures_016_0.png


Ears.

I sacrificed one of my stereo speaker grills to make his ears. Two rubber antennas I had laying around, and some steel wire hold it all together and then painted silver. These then fit to the two micro servos in the head. These are controlled by various means, such as voice recognition, and programmed in to his verbal responses. Some program scripts for the ears have sound effects, some do not.

NEW_k9_pics_549.png


Eyes.

The eyes are made up from an RGB LED panel which has 28 LED’s (9 per side). I have set up several animations of different designs and colours, but mainly run with a “random blink” program. This unit also contains one of the on-board cameras which does all of the visual recognition.

NEW_k9_pics_402.png


Mouth.

Being a Knight Rider fan, I’ve always liked K.I.T.T’s voice box, so I wanted to do something similar for K-9. All I used for this was some sound activated EL wire with the microphone unit located in the body next to a speaker I installed. I measured a design an drilled holes in to a peace of PVC and threaded the wire through.

NEW_k9_pics_341.png

NEW_k9_pics_346.png


Speaker.

I got lucky with the speaker I’m using. It’s Bluetooth, but has a aux headphone socket which can both work together in tandem. This means that the EZ-B controller (which I hacked to add a headphone socket to) and tablet PC are both jacked in to the speakers aux socket via a 2 to 1 splitter, and my iPhone can connect via Bluetooth without one cancelling the other out. More on the iPhone connection later. I have EZ-B soundboards set up with phrases and sound effects which all go through the speaker clearly, as well as the dynamic chatbot speech program. 

speaker.jpg


Collar.

The collar is a peace of ribbon stuck to a peace of cardboard, and the excess EL wire attached to each side. Underneath is the ultrasonic sensor and a servo for object detection and avoidance. The dog tag is simply a peace of cardboard cut out and some aluminium tape stuck to the front. I thought about doing a spanner, but my craft skills were not up to the challenge that day, so it’s a bone instead.

NEW_VIDEO_pictures_017_0.png


EZ-B v4 power.

The EZ-Robot EZ-B v4 I have installed, is powered via a 7.4v LiPo battery. The v4 is routed through an inferred power switch relay so it can be turned on or off via a remote control key fob (similar to a car alarm fob).

remote_1.jpg

remote_2.jpg


EZ-Builder project.

Most of what is mentioned above is currently set up for a game controller, speech recognition, control commands, linked to other controls, and are in a personality generator. The personality generator is currently set to tell a random joke, a random fun fact, or to say some other random stuff. This is just a start as I will be programming/teaching K-9 to do more on his own. His ears, eye animations, lights, head and tail are all connected to various personality commands. Other programs I have set up are an auto network connect, face / colour / movement recognition, script manager for all movements, speech recognition, VCN network control, and the RGB animator. Other programs such as a fully functioning media player is still being worked on. 


iPhone connection.

The primary feature for K-9 was to have the ability to speak, and when I say speak, I mean to have a dynamic conversation. This was very important for me to include this. I did start to use pandorabots a while ago now, and is still being used now, but with some improvements. Using a VCN remote PC app on my iPhone I can use the iOS speech recognition system along with Pandorabots which works extremely well, not just with my voice, but with any one of my family and friends. With the exception of pressing the speech to text button and the send button, I can now have a very easy conversation with my K-9. Even though I’m the one training him, he has managed to develop his own quirky personality, especially the way he speaks. This is where the Bluetooth side of the on-board speaker comes in. The EZ-B v4 controller can play all the sound effects ect via the speakers aux, and the iPhone can still stream audio as well without unplugging the aux. So with this in mind I recorded a load of phrases of K-9’s voice and imported them to a soundboard when dynamic speech is not required. I have also made ringtone recordings of people in my iPhone’s “Contacts” list, as well as other alert tones so K-9 can now tell me who is calling, texting or emailing me without looking at the phone, or just tell me I have an incoming phone call, text message, email, reminder alert, Callander alert, alarm or voice mail.

What’s next.

To get him as fully autonomous as possible. I want to map out the ground level of my house so K-9 can roam around on his own to improve on the security checks he is programmed to do.

I want to get a stronger servo for his head, specifically the vertical servo, as when he lifts his head there is sometimes a lot of buzzing and I really want to eliminate that. Problem is the high torque servos, 25kg and over, are quite expensive.


To make him fly, because he is REALLY heavy to lift, lol. Kidding.
The next post details and shows the recent changes made, mainly to K-9’s electrical system (will be up later today).


K9_VIDEO_STILLS_032.png

K9_VIDEO_STILLS_030.png

K9_VIDEO_STILLS_020.png


First, I love the way you
First, I love the way you improvise on things which I would do with electronics and an small microprocessor, you just use a servitor control a switch. Your way works, and while my way does, you’ll notice I still have no robot posting while you have done a wonderful job on K9.

BTW, and this is not a criticism. I seem to recall that after the first K9 was destroyed, at the very end of that show, the Doctor recieved a package labeled K9 2.0. I could of course be mistaken.

I’ll admit that I would have done things differently. I’d probably use a small Linux box such as an Odroid XU3 Lite to be the main controller, and used a 12.6v LiFePo4 battery. Yes they are expensive and large compared to the LiPo batteries, but they have plenty of power and they have can take more deep discharge cycles than an SLA.

K9 is one of two fictional bot I think I enjoy building. The other is R2D2, which I’ve already committed myself to building a reimagined version.

I will watch the movies when my connection takes a step above glacial.

My sympathies for you bad back.

**Thanks @Dangerous thing. **

Thank you for you comments, and I’m glad you like my K-9 project.

Being new to all this, I probably took a slightly unorthodox approach to my build, but now in learning a bit more now, (and I don’t know if you read post #3 before you replied), I have made a few changes to K-9’s main electrical system by the way of loosing the servos to control lighting, and replaced them with processor controlled relay switches which has made for a much cleaner build.

In regards to the name, I know the different K-9 reincarnations where designated by a Mk (Mk 1, Mk 2, ect). I’ll have to check that out. Now see what you have gone and done D T… Now I’ll have to watch some Doctor Who episodes again to find out. Its a hard life, lol.

About power, LiFe battery packs are still on the cards for K-9. It’s just that I don’t know a great deal about them yet, such as if they can be recharged while still hooked up to a device while it is still powered on (apparently a no no for LiPo’s), and if they can be undervolted like LiPo’s (which is why I don’t use LiPo’s any more, reasons outlined in post #3) or if they can be run down and and not kill the battery like NiMH packs, although I see you mention about deep discharge cycles in your post. Also I haven’t  seen many user reviews on them.

One last thing. I’m with you. There are many great fictional robots I like, but K-9 and R2D2 are two of my favourites as well. I just wish I hade the room to have a full size R2 unit as I’d love to try and build one. Anyway, thanks again for the compliments and sympathy, although if it wasn’t for my back injury,make-9 might not have been built. Every cloud and all that. :slight_smile:

Steve.

Update.

Doctor_Who_quiz_1.png


Hey guys.


I just wanted to share a little project I was working on with K-9. When my nephew and neice come to visit, they always say that they would like to play games with him. So my solution was to make two games for them to play., and anyone else for that matter. I started off with a simple "Rock, Paper, Scissors" game, and then made a multiple choice "Doctor Who quiz". They were created using the EZ-Builder software from EZ-Robot, are played using speech recognition, speech synthesis, and using .exe command prompts to show pictures relevent to the questions and answers. I made an "Instructable" explaining how the multiple choice quiz was put together, as with a little bit of work, the quiz can be adapted to any quiz subject of choice. It has also been entered in a "Fandom" competition Instructables is holding, so If you feet inclined to vote for my little project, myself and K-9 would be very grateful indeed.

Both the games have proved very popular with the kids (and a few adults as well), so I'll have to think of more games I can add. They are nothing special, but they are a bit of fun and engaging to play. Anyway, I have posted the links for both video demonstrations below so I hope you enjoy them. And yes, in the Doctor Who quiz video, I did answer some questions incorrectly which was intentional for demonstration purposes...honestly, that was the reason. By the way, if you are a Doctor who fan, you can play along too.

Enjoy.

Interactive Doctor Who Quiz hosted by K-9.

Rock, Paper, Scissors with K-9.

I really enjoyed the video…

Thanks for posting all the pics and providing alll the detail.  I especially enjoyed the video.  What a great piece of work.  I hope this inspires others to follow.  Just last night I was studying over the E-Z Robot site and thinking about taking the plunge.

Really cool,

Martin

Okay, it’s pretty awesome
I hope my Phydo can measure up

**Thanks for your reply Jim. **
I’m sure it will measure up, if not surpass my build. If you decide to share you work, I for one would love to see it.

**Many thanks Martin. **
I’m pleased you enjoyed the video, and found the write up interesting too. Yes I must say, I’ve been very happy with EZ-Robot so far. If you do decide to jump in and give them a go, I assure you that you won’t regret it.