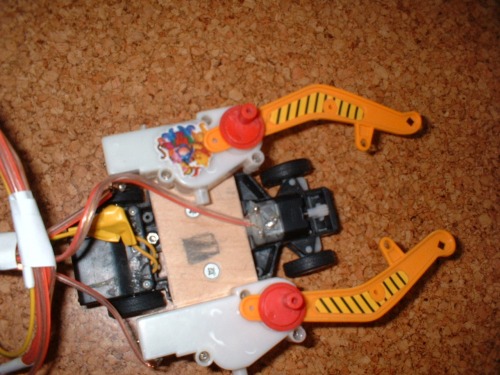
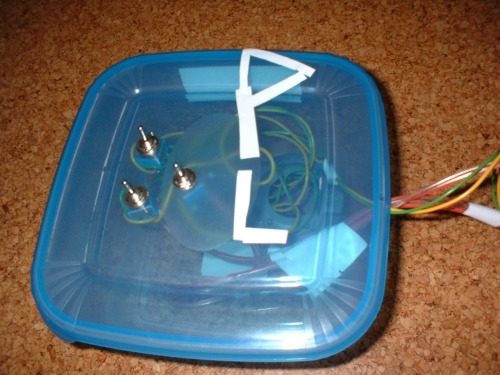
Hi everyone. I have just started in let's make robots and I wanted to show you my first project. I hope you like it . So first what I did is went to the part search. It was easy becose I needed only 3 switches 2 gearboxes 4 motors 1 AA batery holder and some wires. After I've done my shoping I went to my room and grabed the schematics of this robot. Then I went to my workshop wich was my backyard garage and started searching for the base of my car. I found an old toy car lying arownd and it became my cars base. the remote became an old luncbox. Then I started making the base for my two big white gearboxes. The base for the gearboxes was an old peace of wood. I mounted the gearboxes on the wood and mounted the wood to the car. Then I drilled a hole in my lunch box for the wiers to come out and drilled three more holes on the lunchbox for the swiches. Then I solder the swiches to the wires and solder the wires to the 4 motors. Then I mownted those plastic orange toy parts to the gearboxses my sister sticked a sticker on one of gearboxes and we went out on a test run. We tested if this car cuold pull and push my cats eating bowl. It cuold move my cat's bowl so it was working. And thats this robot's story. Thank yuo all again for waching.
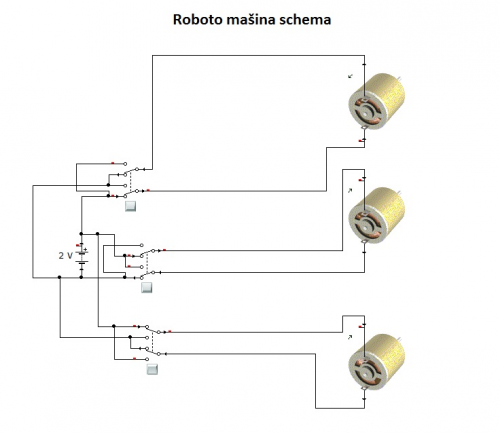
Update so I changed the pictures into good ones and added the robots schematics. It has 1 mistake left. One of those swiches had to turn 2 motors not one, oh and by the way Roboto Masina schema = Robot car schematics
It pushes and pulls objects
- Actuators / output devices: simple 3V motors
- Power source: 2 AA batteries
- Target environment: Indoors and outdoors
This is a companion discussion topic for the original entry at https://community.robotshop.com/robots/show/just-want-to-say-hi-and-show-yuo-my-first-project-the-car-puller
Welcome to LMR!I’m getting
Welcome to LMR!
I’m getting dead links for all of your pictures except for the main one at the top.
Maybe those pictures would tell a story, but it would be nice to understand more about what your robot does and how you built it.
I’ll work on making my robot presentation more clear
Thank yuo for your advice ignoblegnome i’ll work on making it more clear to understand how my robot works and how did I built it.
Is it understandable now ignoblegnome?
Is the story understandable now?
That is better, thank you.
That is better, thank you. Something you could work on is developing a more clear writing style, which will help everyone understand you better.
It is a nice little project. One of my first efforts posted on this site was about like that, but I ‘cheated’ and used a kit. I later used the chassis from that robot as the basis for a much more advanced robot.
Now that you know how to make a motor go forward and backward with a switch, can you figure out how to add electronics or even a microcontroller to make it go on its own?
Whatever you try next, I wish you the best of luck. Thanks for sharing your efforts!
Thanks for posting the
Thanks for posting the schematic. If you are interested, each of your switches could be replaced with what is called an h-bridge circuit. This would allow you to control your robot from a microcontroller.
If you want to take the next step, do some reading on this site and ask questions. Plenty of help is available for folks who want to learn and are willing to do their research first.
Thank you for the help but for the moment …
Thank you for the help ignoblegnome but at the moment i’m learning how to program Arduino from www.arduino.cc and from that i’ll try to make a remote control.
I will see what is a h-bridge circuit …
If it’s easy to use and cheap so I will use it instead of Arduino(or use both of them). Thank yuo for the help ignoblegnome.
An h-bridge and an Arduino
An h-bridge and an Arduino are different things, and they can be used together.
The Arduino is a microcontroller. You can program it to do stuff. However, to make the Arduino run motors, you will need a motor driver circuit. The Arduino outputs don’t provide enough current to run a motor by themselves. There are motor shields to add to the Arduino. A motor shield includes an h-bridge circuit.
Because Arduino is an open source product, there are many people making Arduino boards and shields. Some of these may be less expensive for you than an Arduino brand board.
I’m a big fan of Ro-Bot-X’s boards. He has some all-in-on boards like the Robot Builders Arduino (RBA) and the uBotino that include both the Arduino microcontroller and the motor driver chip right on the same board. This may be a good option for you. I’ve written a review of several of Ro-Bot-X’s boards, and you can find more information and buy them online at robotxdesigns.ca.
Thanks now it’s …
Thanks ignoblegnome. Now I understand the difrence between arduino and the h-bridge. And thank you for posting those links. But can you help me with two things. First from what shop did yuo get that transmiter and reciever used in https://www.robotshop.com/letsmakerobots/node/20466 and how can I get a transmiter and a reciever and second how do I program arduino to control the motor from a motor driver chip?
The post you refer to is for
The post you refer to is for an h-bridge. There are no recievers or transmitters. Are you referring to the transistors? All the components used in that post are standard devices available from many sources. Just search for the part number.
Generally speaking, you will use the digital outputs of your Arduino to control the motor controller. The specific outputs to use depend on the board you select. Some controllers require only two digital outputs per motor. Others have an additional enable pin for each motor, so you end up needing 3 pins per motor for a total of six. Read the documentation for the boards you are considering for more detail.
If you go with one of Ro-Bot-X’s board, he includes assembly guides that have program examples. That one is for his newest board, the Robot Builder’s Arduino.
There are also numerous examples of Arduino-based robots on this site, many of which post their code. Take a look around. My own robot Penny is an example, but there are many others.
If you buy a different motor controller, like Adafruit’s motor controller board, I’m sure that there are examples you can find, or Adafruit may have some example code posted.
I bungled the link for
I bungled the link for robotxdesigns.ca. Fixed it here.

