Internet Controlled Security Rover

Just ran across this forum and have come to the conclusion I may not be as odd as my neighbor’s think I am. There are actually other people building robot rovers in their garage!

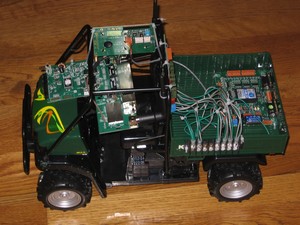
I started by building an internet controlled RC car. I thought the internet controls would be dificult and I did not want to invest in an expensive vehicle until I had confidence in building the controls. Turned out much easier than I thought. I simply bridged a Linksys router, on the car, to the Linksys router in my house. The RC car was way too fast for the internet connection though. After crashing the $20 car with $300 worth of controls on it, I decided it was time for a new vehicle.

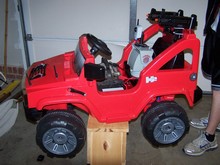
My next project was a kids car. Moving the controls from the RC over to the Kids car was a snap. Since the car was much bigger, I added two air soft uzis and an Internet camera. What a hoot! The kids love it. The two uzis empty in about 15 seconds and spray a wide path. It’s hard to miss :slight_smile:

But the kids car isn’t powerful enough to climb hills and gets stuck on wet grass and small stones. The darn thing only has one tiny drive motor attached to one rear wheel. I bought it new on ebay for a $100. But you get what you pay for.

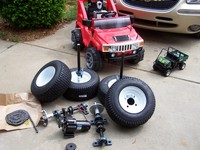
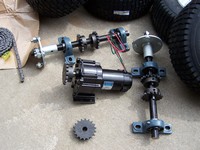
I’m now building my own vehicle. I bought 4 16" lawn tractor tires at Northern Tool and Supply last weekend, sprockets from McMaster Car and a Lessen 360 in-lb, 5 RPM motor. That’s right, 5 RPM. I’m aiming for 20’ per minute because of the delays in the video picture and controls over the internet. I intend to add a second identical motor and use skid steering. I’ll be testing the power of the one motor and 16" wheels this weekend. Though simple calculations tell me I should get 45 lbs of push with the one motor.

Finally, my question: Does anyone have any experience with “Skid Steering”? Do you think two 360 in-lb motors will be able to do it with 16" diameter tractor wheels? Will the span between the wheels make much difference? I’ll be driving the left two wheels with one motor and the right two with another.

I’ll post some photos and a link to my project page if the forum allows me to tomorrow.

Cambot

If you are going big, you might want to look for a used riding lawn mower. I’ve got an old snapper riding mower that I think about modifying as I ride it around the yard. It will defiantely crawl in and out of ditches with a 215 lb payload on it. :wink:

I’ve been trying to post a link to my Rover project page since Saturday. Anyone have any idea how I get rights to do that? Also tried to post photos using HTML, no luck there either.

I am very familiar with SKID STEERING. My Surveillance Rover uses four wheel drive to turn 360 degrees on the spot. Its excellent for manuevering but is hard to drive on really rough patches of ground like grass, rocks, cement, and rough carpet. You really have to have strong motors and good motor shafts and tires. What actually happens is the shaft and hubs connected to the wheels rub hard against each other and actually wear away the shaft and hub alot. The more powerful the motors are and the less grade the shaft and hubs are the more wear your going to get. Again, this is from experience. Make sure everything is tough and when turning dont push the motors at 100 percent. It works great, im sure you’ll have no problem especially with your setup, sounds neat! 8)

The effectiveness of skid steering is closely related to the geometry of your chassis, and the types of tires you are using. A four-wheeled robot is in contact with the ground at four points - the bottoms of the wheels. Imagine the footprint of your robot as a rectangle, with one corner under the center of where each wheel’s contact patch with the ground. Depending on the geometry and layout of your chassis, your footprint may be a long thin rectangle, or a short fat one, or it may be a square.

In skid steering, you’re trying to rotate around a point in a way that approximates a two-wheeled robot. Because there will inherently be at least some physical separation between the front and rear wheels of your bot, there will have to be some sliding involved, thus “skid” steering.

If you have too much traction between your bot’s wheels and the surface it’s running on - knobby tires on carpet, for example, the tread will dig in during skid steering, and actually make it more difficult to turn, as it tries to move the wheels laterally across the surface, despite their firm grip. This effect is more pronounced as the physical separation between the front and back wheels increases, as there will have to be more sliding in order to turn the chassis.

Conversely, bringing the front and rear wheels together makes it easier to turn this way, but at the expense of front-to-back stability, as the robot’s footprint becomes a short fat rectangle. In the extreme case, there is no separation between the front and back (not possible unless you put one set of wheels inside the other), and your robot becomes a two-wheeled robot, requiring a caster wheel, or some form of balancing system to hold it up. A caster-bot or segway-style balancing bot has only two driven contact points, and steers quite easily, since there is no skidding involved.

The key to skid-steering, it seems, is to come to a balance between the aspect ratio, or the length of your robot’s footprint, as compared to its width, and the amount of traction your tires provide with the surface it will be operating on.

An interesting compromise between skid-steering and castoring can be seen in a number of battle bots, which use a skid-steer type of layout, but replace either the front or rear wheels with omniwheels, which allow sideways sliding, but provide propulsion forwards or backwards. In this case, the robot will pivot like a two-wheeled or castor-style bot, around the two normal wheels, while the omniwheels slide sideways freely, but in forward or rearward driving the omnis help out, by providing traction and driving force on all four corners.

I couldnt of said it better. Exactly what I was trying to say, but went cheap on the number of characters… :laughing:

You are not a cheap character… :stuck_out_tongue: A character, yes, though. :smiley:

8-Dale

Must be if im building Surveillance bots at age 15 :smiley: …Sometimes my parents think IM more of a robot. :stuck_out_tongue:

Well, your account fits the criteria for posting links (1 linkless post and 24 hours old), so you should be able to. Were you trying to edit your first post and add links in? You wouldn’t be able to do that until you had one other post without links or images. If this is the case, you should be able to edit the first post and add in your images and links now that you have a second post.

Also, here is the format for links and images:

Link text
URL-of-page
URL-of-image

Thanks for the information. It’s more than I could have possibly hoped for. Thinking of the wheel layout as a square makes it very clear. I’m using #40 chain, a 1" axle and 16" diameter turf saver tires. I’m going to pull the wheels in to be safe. The center of gravity will only be about 12" high because I’m setting the batteries very low and the over height will only be 20" or so.

I’ve included a link to my project page and a couple photos of my first two trial cars below. I’m using a simple design I found on the web, part of a book review, for the basic concept of the one I’m building now.

shelato.com/SecurityRobot/

1st Generation Internet Controlled Bot

2nd Gereration Internet Controlled Bot

Oh man, :laughing: I love the digital license plate! When your running from the cops, you can just change the license number! ahaha

Interesting project. I’m always looking for the “inexpensive” wireless bridge solutions (especially the $15 after rebate types). The maxport serial-ethernet adapter at $75 looks to be the least expensive doing a quick google search. The VB program is also interesting as it appears to be a fairly short routine for a winsock application.

It warmed up here in SC and I took time out for yard work the last couple weekends. This morning I was finally able to get back to building my 3rd generation rover. I assembled the axles. I have the second motor on order and sould have it by next weekend, I hope.

Project page:

shelato.com/SecurityRobot/

You could put an entire LinkSys WRT54GL wireless router on a robot for about the same price. All you would need to complete the link is an inexpensive ethernet module. Of course, this would be too large for some robots, but would work well for a lot of rovers. You could have a completely mobile roving access point with a setup like this. :smiley:

8-Dale

Nice Job!

If you goto the project page and blow up the picture of the red hummer, you can see the antenas of the Linksys router sticking through the hood on the drivers side. “Maxport” is the ethernet module that makes the connection between the router on the car and the micro controller RS232 port. The Lynksys router on the car is “bridged” to my home router. I could communicate directly from my laptop to the car, but my intention is to control the car over the internet.

I tore the guts out of the Linksys before installing it in the car. The antennas are mounted directly on the circuit board of the router. The routers blue plastic case has no component connections.

I get great distance between the two routers. My home router is in a spare room on the back of the house and I can drive the rover around the cul-de-sac out front without a problem.

I saw that. :slight_smile: Nice installation.

I want to put one of the WRT54GL routers on a robot one day, and have another WRT54GL as a base wireless point. The WRT54GL runs Linux and there is a lot of third party support for it. :smiley:

Excellent! You have proven that what I have wanted to do is not only possible, but practical. :smiley:

I am also watching the development of the newer Wireless-N (WiMax pre-standard) hardware. If the range is even half what is claimed, there are some real possibilities here for wireless robots.

8-Dale

What is the communication protocol for the Maxport module? I’ve looked for a user’s manual for it but haven’t found one. Looking at wireless bridges, the Buffalo Airstation for $60 on the net might be cost a effective option as opposed to reprogramming a wireless router.

The Comfiletech site is confusing and it can be difficult to find things. Here is a link to the manuals:

cubloc.com/data/01.php

and here is a link to the Maxport manual which can be found at the page above. The “Maxport” is simply a nicely packaged Xport mfg by Lantronics.

cubloc.com/xport/Maxport_v113_PartI.pdf

If you decide to flash a Linksys with the DD-WRT firmware, you might consider purchasing an older Linksys router on ebay. The newer routers actually have less memory. Buy one that is before V5.

The micro controller I used needed an RS232 to Ethernet interface. I chose to use the Maxport because it was supplied by the same company as the micro controller. I made simple modifications to the Zedomax temperature controller program to make the program control a car.

cambot

I was just looking to see what is available for the router on eBay. I didn’t see any ads that tell what version of the router they are selling. :frowning: All I would really want is one to be a roving access point and wireless link for a robot. If a V5 router will handle that with the DD-WRT or similar firmware, then I think it would work fine for me.

8-Dale