


This is part III of a series I call “How to build your first robot”.
This part is not so much instructions of how to build & program, that was in Part I-II.
To finalize Part I-II, I will just say; I may put “construction time” to a few hours when entering a robot. And it is possible to make a robot in 10 minutes if you have the materials in front of you.
It is also possible to program a robot in 10 minutes.. But..
Specially the programming, because it is so much trial and error, it usually does NOT just take an afternoon. Some parts take days, and usually when I make a robot, it is made of many layers / parts interacting. Each of these layers of code can sometimes take weeks to get to work. It is, however sometimes frustrating, fun time.
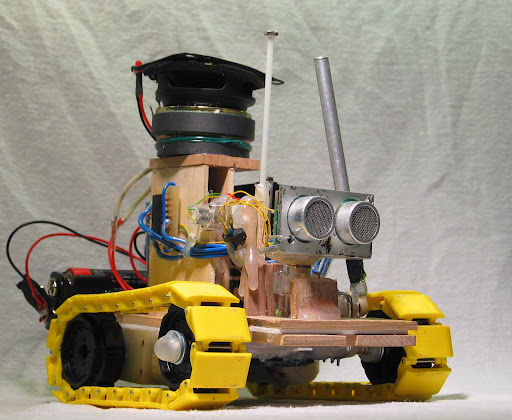
If you followed Part I & Part II, you will have a robot that can navigate, and you have seen that you can just add extra servos & sticks & stuff onto it, and this is what I did to make “Bernhard the Cuplifter” featured here.
Perhaps you have interest in the "support-chips", psy has made a brilliant walk through that can be found here.
I used the basic chipset and motor, servo etc from Part I, navigation, construction and programming techniques from Part II, and added extras: To make Bernhard understand what is a Cup and what is a wall, I was teaching him based upon knowledge of what he sees.
(I also changed the little blue servo in the front, after 2 of them was fried for some reason. cheap little stupid blue servos! To my surprise I got a much more steady flow over the whole robot after using the larger and more slow / steady servo. A tiny bit slower, but all in all I like the bigger servos better now, even though everybody think the little ones are must-use-items.. I like steady..)
Finally (and that did only take en hour), the last layer; I gave him some quick "funny" gestures if certain parameters was met in the code (Distance is 100-150 away, we have a cup in front of us, fire gesture 3 with these variables as parameters.. etc).
Layer upon layer of things that is finished and working, and then interacting with each other..
To produce these gestures, I made use of a simple Pot meter and “my magic black box” - both these issues will be covered in later “walk through´s” - Put him in funny positions, copied the code, and pasted it into he's brains.
So – there you go – I have thrown “everything I know” about construction and programming after you. My intention was to kick start you as I'd wish someone had kick started me starting from absolutely blank about a year ago. I want you to be able to make robots, and progress your own ways.
In this part, I will touch the more “sensitive” issues; Everyone is happy if someone else writes a useful table of resistor-codes. But if people tell people how to make “something look good”, they may be offended, or not read the good intention etc.
So please try to read this – Part III – as my humble opinions, and my humble attempt to pass on some experiences I have to you. This is not a “how to” any more, it is merely a “This is how I do it”, I merely hope it will inspire and help, it is not a dictation.
Take a look at these 2 pictures of the same robot, taken with the same camera:
Picture A:

Picture B:

Would you take a picture or a film of a beautiful tree, or a posing hot babe on the beach, or a car.. from 100 meters op in the air?
- Face your robot. Lift it up, so your camera can level with what gives personality, usually "eyes". Often even below this level, this makes the robot look even more grant. Here, as often, I have gone just to the point where I level with the ground the robot is standing on.
- Lights, lights, lights.. look at what the pro'd do - there is a reason for all the spots in studios. NEVER use camera-flash. If you cannot go outside in sunshine, at least just set a spot on what you are taking picture / video of. Take a look at this It is just by these simple guidelines that the picture comes out that well, compared to taking the picture from above with no extra light on, being "something on the table". I just had a mobile phone to take the picture, so I lifted the robot up on a printer/scanner, and turned the spotlight on the desk onto it. LOTS OF LIGHT, and go low!!
- A little touch, that I myself often not get to; if you take the picture outside, have a mirror, and reflect some sunlight onto the "face" of the robot. that will give something really special! Be aware of the light or little extra spot that shines in "the face" - it will lift from 90% to 110%.
- Crop your images. Any free software can be used - right now Iuse Picasa from Google. Cut away all that is not necessary on the picture, and when taking the picture, be sure to get close. Use Macro if you can on the camera. When cropping: if the Robot is facing front, cut tight, if the robot is facing to the side, be sure to leave a little extra "blank space" in front of the robot's "nose", or it will look as it is squeezed into the frame.
- Optimize your pictures - alone clicking the "I feel lucky"- button in Picasa usually wil optimize. Apart from this, if you feel confident, you can also adjust other parameters- but take care not to make "special effects", nobody likes to look at them, it is a sharp edge between optimizing and destroying. On the pictures of "Bernhard the Cuplifter" below, I placed him on a cake-form to get some extra shine, on Styrofoam, and then I adjusted the highlights by moving a slider in Picasa.
- Edit your video. Try to cut away video that is boring (wife/girlfriends are always good test-audiences), and do not be afraid of showing "Oops" - again, wifes are good testers - they tend to laugh when they are not supposed to - and that may because that part of the video is actually the best. I just use the free video-editing software that comes with Win / Mac.
- Add titles to your video. Sometimes they land strange places, and it is good if people can find you / the rest of your work. This way you can also have your project one place, and feel free to post your video at other places, which is also often fun, now that you have spend so much time on it.


 Looking forward to the video, once again you’ve gotten me excited about yet another project.
 I wanted to do this kind of thing, and where looking around in my drawers, and almost made something myself, something that "anybody can do"… When I suddenly saw this thing that I bought once for USD 10:

