

I was trying to do that. When I click all 1500, they all go to 1500, however when I try to fine tune, only the right side is responding and the left side is not. Please advice.
and there is a noise when I click 1500 not sure where it is coming from. The noise sounds static
I’m also fine tuning the right side and I click write. However when I press read nothing comes back to where it was and servos go back to their original position.
OK I think I was able to align all to what I can see. However I cant get to write or it does not get to save as everything goes back to where it was after disconnecting the battery or sometimes without disconnecting the battery. Please advice.
@cbenson I would really appreciate your help with this. I apologize for how slow I am with getting this. It’s my first
We’re here and happy to help. My apologies for not linking to this post before:
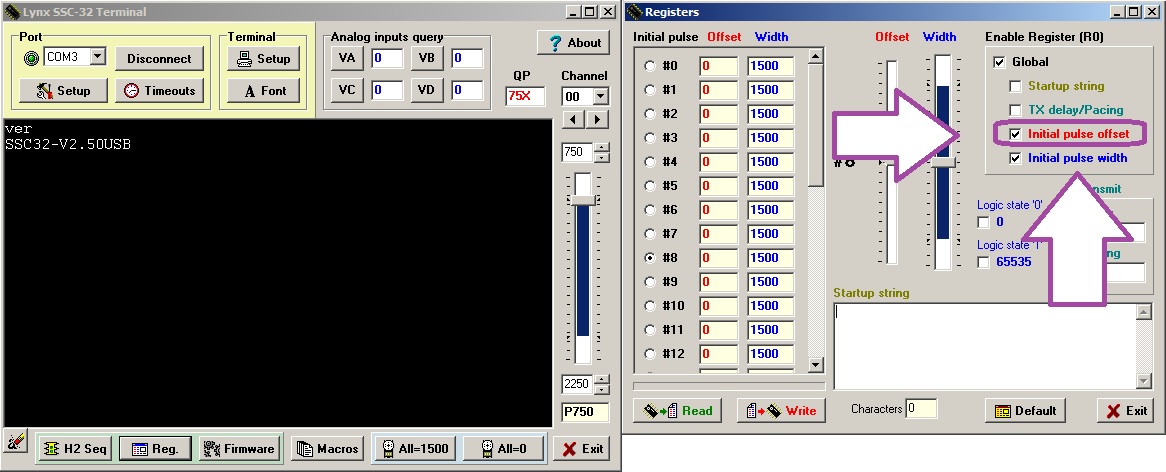
Can you take a screenshot of the window you have with the servos offset and load here (omit any personal info)? The screen shot below should help as well:

Hi cbenson - I’, the guy who posted the 3DOF calibration question that you posted a snippet of. With scharette’s help, we concluded that, since I needed to adjust the Width parameter (in Lynxterm) that meant the legs were NOT assembled correctly. I went back and carefully looked at photos 6, 7, and 8 here: http://www.lynxmotion.com/images/html/build172.htm and physically adjusted the centered (1500) servo positions so that they matched the photos. THEN I was able to use only the Offset values to fine-tune the initial position of the servos. (BTW, I have found your forum comments to be very helpful.)
1 Like
Excellent… so success?
I agree. @cbenson you’re amazing dude. I’m making final adjustment of fronts and rears and will share images soon.
1 Like
Ok so I just finished adjusting and fine tuning with offsets. However I still the issue that when I click on “write” it will only read if the battery remains connected. However if I disconnect the battery the offsets tuning will be lost.


Please advise on what I should do next
Caught it - under Enable Register, there is “Global”, but the “Initial pulse offset” is not selected and is therefore not being written when you click “Write”. The initial pulse width doesn’t really need to be selected unless you want the servos to move to a specific position upon power up (tends to be inconvenient).
Thank you so much. I will try that in a bit. What did you think of the build? Doesnt seem right in terms of angles?
Indeed - looks good.
@cbenson I just checked and global was already checked. However when i connected the board to my laptop and clicked read, it did read so that made me happy.
Could you please advice on what I should do next?
Hope this helps:
Hi @cbenson I’m a little confused. What is that for? I was able to adjust all the offsets and write/read no problem. Not sure what that picture you sent is for.
I have those boxes checked. I think we can move to the next step.
Sorry, didn’t catch your reply. Note that you don’t need Initial Pulse Width" checked (and propose unchecking it and writing again before proceeding) - checking that field it will make your servos move to a position as soon as they are powered, whereas the start button on the controller takes care of that. Next step now that the servos are all good is to connect the BotBoarduino back up, set the SSC-32U to 38400 baud, load the Phoenix sketch… steps 5, 9 and 10 here:
http://www.lynxmotion.com/images/html/build99f.htm
You need to have the right PS2 library downloaded and installed, and once it’s all ready to go, press the “start” button on the handheld controller.
In your photo - there does not seem to be any rubber at the end of the feet?
1 Like
That is correct I still did not put the caps on the feet because I was thinking about installing the sensors since I bought them. I also bought the pixy but I dont know how feasible that is