Probably you have seen some interesting projects around here which use applications created on processing, such as:
- RGB Mixer - Processing to Arduino by Guibot
- Virtual Joystick Using Processing and Picaxe!!! by CtC
- Arduino multi-servo remote control through serial with Processing by dc
- RGB Mixer -Processing to Picaxe (Stolen from Guibot) by CtC
- ICU . I See You by Guibot
And the list continues here and here...
Well, processing is a really easy language to learn and to create applications.
It has lots and lots of examples that you can try, play with and join together.
How it is open source, there are many contributed libraries that can be very useful, you can find them here.
But the one that you'll certainly like most is Serial which allows your application to communicate with your robot. It comes included in the program so you won't have to download and install it.
Returning to the main objective of this tutorial, to start using processing, you'll need to download the latest version here.
- On Windows, you'll have a .zip file. Double-click it, and drag the folder inside to a location on your hard disk. It could be Program Files or simply the desktop, but the important thing is for the processing folder to be pulled out of that .zip file. Then double-click processing.exe to start.
- The Mac OS X version is a disk image (.dmg) file. Drag the Processing icon to the Applications folder. If you're using someone else's machine and can't modify the Applications folder, just drag the application to the desktop. Then double-click the Processing icon to start.
- The Linux version is a .tar.gz file, which should be familiar to most Linux users. Download the file to your home directory, then open a terminal window, and type:
(Replace xxxx with the rest of the file's name, which is the version number.) This will create a folder named processing-1.0 or something similar. Then change to that directory:
cd processing-xxxx
and run it:
./processing
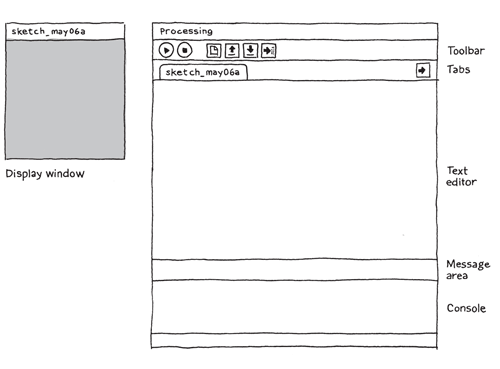
Once you've done that you should be running the Processing Development Environment (or PDE).

Toolbar:
In the toolbar there are the following butons
- Run: Compiles the code, opens a display window, and runs the program inside. Hold down shift to Present instead of Run.
- Stop: Terminates a running program.
- New: Creates a new sketch (project) in the current window. To create a new sketch in its own window, use File → New.
- Open: Provides a menu with options to open files from the sketchbook, open an example, or open a sketch from anywhere on your computer. Opening a sketch from the toolbar will replace the sketch in the current window. To open a sketch in a new window, use File → Open.
- Save: Saves the current sketch to its current location. If you want to give the sketch a different name, select “Save As” from the File menu.
- Export: Exports the current sketch as a Java Applet embedded in an HTML file. The folder containing the files is opened. Click on the index.html file to load the software in the computer’s default web browser. Hold down shift to export an application instead of an applet. Note that exporting a sketch will delete the previous contents of the “applet” or “application.xxxx” folders.
Text Area:
It is where you edit the code.
Message Area:
Gives feedback while saving and exporting and also displays errors.
Console:
Displays text output by Processing programs including complete error messages and text output from programs with the print() and println() functions.
Now you can start playing around!
I think that the best and the coolest way of starting is to, run, read and try to understand the code of the examples provided.
It is what I have done, with the help of the reference.
Perhaps you’ve noticed that the most of the examples have always two functions:
void setup() {
}
void draw() {
}
The setup() block runs once, and the draw() block runs repeatedly. As such, setup() can be used for any initialization.
The draw() block is used to handle animation (It is like the loop() on arduino).
And if it uses libraries it has always the following on the beginning:
import … .;
So, if you want to make a really simple debugger you’ll have to write something like this:
import processing.serial.; // Imports the Serial library
Serial myPort; // Create object from Serial class
int val; // Data received from the serial port
void setup() {
size(200, 200);
myPort = new Serial(this, “COM1”, 9600); // Change the com port name and the baud here
}
void draw() {
if ( myPort.available() > 0) { // If data is available,
val = myPort.read(); // read it and store it in val
}
println val; // Prints the data stored in val on the console
}
Now I think that you have got enough to start making your own applications…
Waste time trying the examples and every time you don’t understand what something means, have a look on the reference.

