

Nov 17:
This is a new revision of the 1-kilogram sumo robot I entered into last year's competitions at the University of Saskatchewan. The events are hosted by the college of engineering's IEEE Robotics Club which also holds weekly tutorials so that even 1st-year students can learn and build their own sumo robot. The competition has two weight classes: 500grams intended for new builders and 1kg for the rest of us.
I really enjoy building competitive robots. This is the first time I've built one that *isn't* a combat robot, and I'll admit, I really have fun with it. I enjoy writing code, so most of the build time was sitting at the computer tweaking things to run just right. I have a menu system on this robot so I can select "Sumo Match" (with four sub-categories for different starting positions), "Turret Mode" (follows a detected object by turning but not moving forward), "Sensor Check" (LEDs show what the sensors all see), and now "Remote Control" (so I can drive it with a TV remote!).
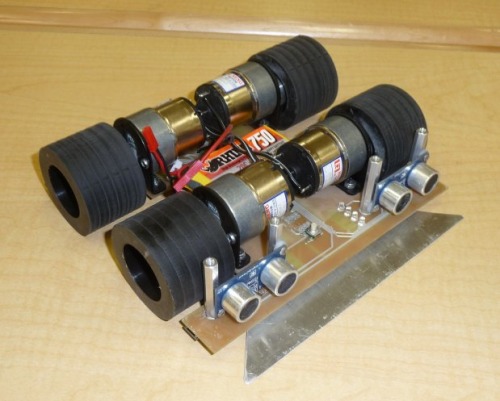
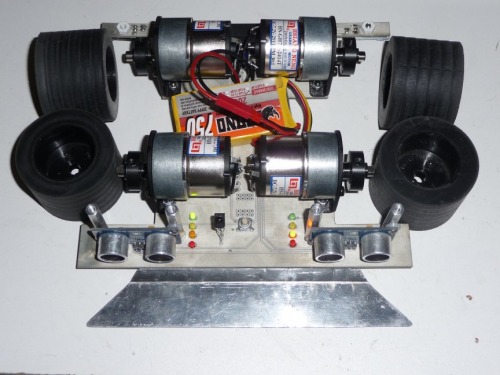
This is from the March'09 event. FT Sumo is four-wheel drive, using Lynxmotion motors and wheels. For opponent detection I use two Prallax Ping))) sensors. A 750mAh 11.1V lipoly battery powers everything. Originally I used a sheet of garolite as the base and had a circuit board on top of everything, then it ocurred to me that I could save a lot of weight and strengthen things by combining the two. So now the circuit board IS the base.
On the bottom you can see the motor drivers (black squares) and the Parallax QTI line sensors on each corner. I removed the right-angle connectors off these and soldered them directly into the board for reliability.
FT-Sumo (I'm still looking for a good name) won both tournaments last year so I haven't changed the hardware much. What I did add for this year is an Infrared Receiver so it could receive commands from a remote control. I was considering doing an RF link but this part is less than a gram (tight on weight as it is!) and super cheap compared to RF.
Soon I'll post pictures of the newest revision.
Nov 18:
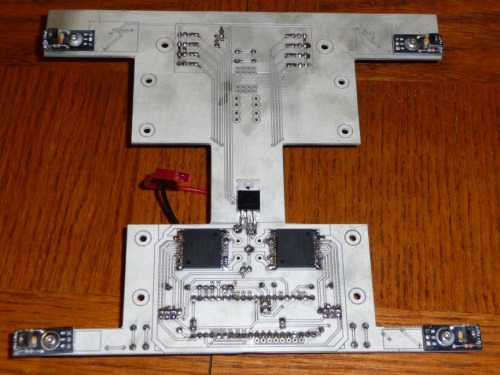
Here is the new circuit board after soldering in everything except the motors and Ping)))'s. You can see the IR receiver at the front of the bot next to the "Select" button. The two other buttons are for scrolling through the menu and sub-menu (displayed by the 8 LEDs at the front).
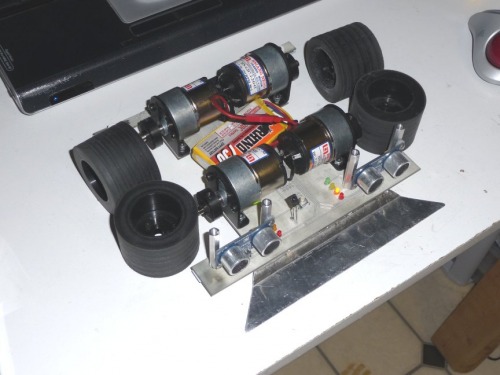
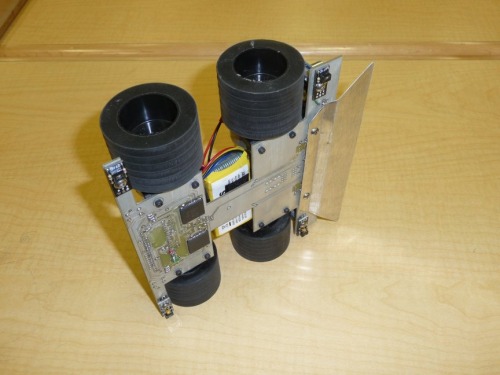
Here it is with everything on except the wheels. It is much easier to program when it doesn't try to drive away! I machined my own wheel hubs out of black delrin to replace the aluminum ones from Lynxmotion because delrin is half the weight. I plan to make a new wedge and now it can be twice as heavy if I want.
Nov 22:
Here is the code for the menu system. I thought it would be a good place to start. I've tried to add useful comments but if anything doesn't make sense just say so and I'll explain it better! The code is written in C for a CCS compiler. It won't copy directly to Hitec C or any other, but the commands are easy enough that you can work out the proper syntax.
Nov 25:
Added the function to decode Infrared signals from a TV remote. Now I can stop my sumo bot from its never-ending victory spin (very hard to poke the off button when it's spinning so fast!) AND I set up a sub-program to be able to drive the bot with the remote!
** To keep the code in proper order, it will be color-coded to help read along! Nov 22 is black, Nov 25 is red. **
// Global variables
#define IR pin_B0 // set this to whatever pin your IR detector is on.
#define button_R pin_A0
#define button_L pin_A1
#define button_start pin_A2
#define led_L1 pin_C0
#define led_L2 pin_C3
#define led_L3 pin_D0
#define led_L4 pin_D1
#define led_R1 pin_B1
#define led_R2 pin_B2
#define led_R3 pin_B3
#define led_R4 pin_B4
int1 toggle=0; // 1 bit
int8 command=0; // 6bit sequence 00xxxxxx
int16 IR_timeout=0;
int8 prog_choose = 1;
int8 sub_prog_choose = 1;
int8 prog_on = 0;
// IR decode routine
#INT_EXT
// DISABLE_INTERRUPTS(GLOBAL);
void poll_IR(void) {
int8 i=0; // for loop variable
command=0x3F; // clear last command (00111111)
delay_ms(60); // delay to in-between transmissions
while(!input(IR)==0) { // wait for transmission to restart
delay_us(10);
if (IR_timeout <= 5000) IR_timeout++; // 50ms timeout
else {
IR_timeout = 0;
return;
}
}
delay_us(2222); // to last half of bit 2
if(!input(IR)==0) return; // check Start bit 2 for "1"
delay_us(1778); // to last half of toggle bit
toggle = (!input(IR)); // set toggle bit
delay_us(10668); // skip address bits
for(i=6; i>=1; i--) { // for 6 command bits
if(!input(IR)) bit_set(command,i-1);
else bit_clear(command,i-1); // set each bit of command
delay_us(1778); // to next bit
}
if (command >= 0x38) command = 0x3F; // catch for invalid commands (noise)
// ENABLE_INTERRUPTS(GLOBAL);
} // end poll_IR
void main() {
// All the PIC-specific header stuff goes here. //
// Check the eeprom for saved data
sub_prog_choose = read_eeprom(2); // check for sub-program
prog_choose = read_eeprom(1); // check for last program run
prog_on = read_eeprom(0); // check for low voltage reset
start:
if (prog_on) { // goes straight in if low-voltage reset occured
if (prog_choose == 1) goto prog_1; // Sumo Match
if (prog_choose == 2) goto prog_2; // Turret Mode
if (prog_choose == 3) goto prog_3; // Ping/QTI Test
if (prog_choose == 4) goto prog_4; // Remote Control
}
// These just illuminate LEDs to show which program is highlighted
if (prog_choose == 1) output_low(led_R1);
else output_high(led_R1);
if (prog_choose == 2) output_low(led_R2);
else output_high(led_R2);
if (prog_choose == 3) output_low(led_R3);
else output_high(led_R3);
if (prog_choose == 4) output_low(led_R4);
else output_high(led_R4);
if (sub_prog_choose == 1) output_low(led_L1);
else output_high(led_L1);
if (sub_prog_choose == 2) output_low(led_L2);
else output_high(led_L2);
if (sub_prog_choose == 3) output_low(led_L3);
else output_high(led_L3);
if (sub_prog_choose == 4) output_low(led_L4);
else output_high(led_L4);
while (!input(button_start)) { // select program until start button is pressed
if (input(button_r)) { // cycle programs
while (input(button_r)) delay_ms(10); // holding button
if (prog_choose <= 3) prog_choose ++;
else prog_choose = 1;
write_eeprom_wait(1,prog_choose); // Set Program
if (prog_choose == 1) output_low(led_R1);
else output_high(led_R1);
if (prog_choose == 2) output_low(led_R2);
else output_high(led_R2);
if (prog_choose == 3) output_low(led_R3);
else output_high(led_R3);
if (prog_choose == 4) output_low(led_R4);
else output_high(led_R4);
}
if (input(button_l)) { // cycle sub-programs
while (input(button_l)) delay_ms(10); // holding button
if (sub_prog_choose <= 3) sub_prog_choose ++;
else sub_prog_choose = 1;
write_eeprom_wait(2,sub_prog_choose); // Set Sub-Program
if (sub_prog_choose == 1) output_low(led_L1);
else output_high(led_L1);
if (sub_prog_choose == 2) output_low(led_L2);
else output_high(led_L2);
if (sub_prog_choose == 3) output_low(led_L3);
else output_high(led_L3);
if (sub_prog_choose == 4) output_low(led_L4);
else output_high(led_L4);
}
} // repeat while not pressing Start button
while (input(button_start)) delay_ms(10); // press start button
write_eeprom_wait(0,1); // Set Program Running
prog_on = 1;
if (prog_choose==1) { // 5 second countdown for sumo match (I like lots of flashing LEDs!)
output_low(led_L1);
output_low(led_L2);
output_low(led_L3);
output_low(led_L4);
output_low(led_R1);
output_low(led_R2);
output_low(led_R3);
output_low(led_R4);
delay_ms(1000);
output_high(led_L4);
output_high(led_R4);
delay_ms(1000);
output_high(led_L3);
output_high(led_R3);
delay_ms(1000);
output_high(led_L2);
output_high(led_R2);
delay_ms(1000);
output_high(led_L1);
output_high(led_R1);
delay_ms(1000);
}
goto start;
prog_1: // Sumo Match //////////////////////////// This is where the sub programs go. I'll post those soon!
prog_2: // Turret Mode ////////////////////////////
prog_3: // ping/QTI test ////////////////////////////
prog_4: // Remote Control ////////////////////////////
// This line calls the decode routine if there is something on the input pin.
//if (!input(IR)==1) poll_IR(); // (a better way would be to call on pin or port interrupt)
if (command!=0x3F) { // Valid codes for Phillips TV remote protocol
switch (command) {
case 0x00: // Number Keys
break;
case 0x0C: // Power/Standby
motor_pwm_L(stop,0);
motor_pwm_R(stop,0);
break;
case 0x0D: // Mute
motor_pwm_L(coast,0);
motor_pwm_R(coast,0);
break;
case 0x10: // Volume +
motor_pwm_L(forward,min_speed);
motor_pwm_R(backward,min_speed);
break;
case 0x11: // Volume -
motor_pwm_L(backward,min_speed);
motor_pwm_R(forward,min_speed);
break;
case 0x20: // Channel +
motor_pwm_L(forward,min_speed);
motor_pwm_R(forward,min_speed);
break;
case 0x21: // Channel -
motor_pwm_L(backward,min_speed);
motor_pwm_R(backward,min_speed);
break;
case 0x30: // Pause
break;
case 0x32: // Rewind
break;
case 0x34: // FForward
break;
case 0x35: // Play
break;
case 0x36: // Stop
break;
case 0x37: // Record
break;
default:
break;
}
// After using the command, set it back to NULL (0x3F) unless you want latched operation.
command = 0x3F; // 0x3F is not a real command, so it's safe for NULL
}
if (input(button_start)) { // stop button pressed
delay_ms(50);
if (input(button_start)) goto stop_prog;
}
goto prog_4;
// *** end of running programs *** /////////////////////////////////////
stop_prog: // Stop sequence for all programs
write_eeprom_wait(0,0); // Program Off
prog_on = 0;
motor_pwm_L(stop,0);
motor_pwm_R(stop,0);
delay_ms(50);
motor_pwm_L(coast,0);
motor_pwm_R(coast,0);
output_high(led_L1);
output_high(led_L2);
output_high(led_L3);
output_high(led_L4);
output_high(led_R1);
output_high(led_R2);
output_high(led_R3);
output_high(led_R4);
while (input(button_start)) { // while holding button
delay_ms(50);
}
goto start;
} // end main() loop
Added PCB file for Traxmaker
- Actuators / output devices: Lynxmotion motors
- Control method: IR remote and autonomous
- CPU: PIC 16F874A
- Power source: 11.1V 750mAh lipoly
- Programming language: CCS C
- Sensors / input devices: Ping))) Ultrasonic sensors, QTI line sensors
This is a companion discussion topic for the original entry at https://community.robotshop.com/robots/show/ft-sumo-updated-nov-25-09-added-ir-receiver-code


