

A couple years ago I asked Fritsl if it would be ok if I name a robot after him as he inspires SO MANY PEOPLE with his good nature and awesome projects. He agreed as long as I don't get too crazy with his name or poke too much fun. I gave him my word that I don't plan to dress the robot up as a woman or make it hump anything. But I did proclaim jokes will be made :-) and hopefully all will laugh in a non hurtful way. He agreed to my request. With that said if your going to name a robot after the founder of the best online robotics group, it had better be something a little more than a "start here robot" or a silly face robot. Hence project Frits a life sized humanoid biped robot was born.
(Frits is also a brand of root beer I drink, and its an unusual name where I'm from. Name used with respect!)
Like most of you when I first saw Star Wars and other movies I just had to have a humanoid biped robot. Fast forward through years of making robot toys and its now a life goal to make my own. But if one is to make a biped there's an infinite number of ways to simulate human behavior. I chose to mimic the small humanoids kit robots available online as they are a proven design for general use and can be easily adapted to higher functionality. Plus the construction method allows for quick assembly, repairs, and modifications.
Darpa Grand Challenge - A lot of group talking/planning was done to enter Frits into their challenge. But after the rules were released it was decided that their rules make the contest of no interest for a number of reasons. (its the "class system" part of their rules that removes all interest in their competition) So this allowed me to take my time and really build something special without rushing to enter the competition.
Video's
These are simply servo test video's. I am saving the walking motion video's until I get a bit farther along as I am still doing various testing.
Servo's:
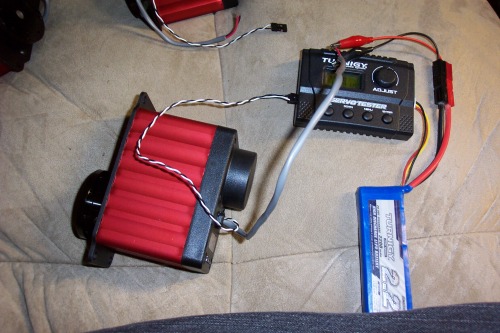
In this design the main body structure is composed mostly of servo's. I searched online for a month or so trying to figure out what brand and size of servo's I wanted to use for this project. But I had a problem with an insurance company and decided to use these Torxis brand servo's as they have extreme high torque specs of up to 3200 oz-in, 22.6 N-m peak at 12v dc. In this picture I'm showing the size reference of a regular blue servo, a standard servo, and a Torxis servo.

After some initial testing I found that these are brutally strong and tough as hell. The only 2 negatives I found for my application are that they not as fast as I would like, and you have to be VERY CAREFUL with these as they are more than powerful enough to cut off misplaced tools, wires, or fingers.
After buying 20 of them, the projects assembly began.

Testing them with a servo tester.
I quickly proved my theory regarding the quick assembly of these into the humanoid appendages.

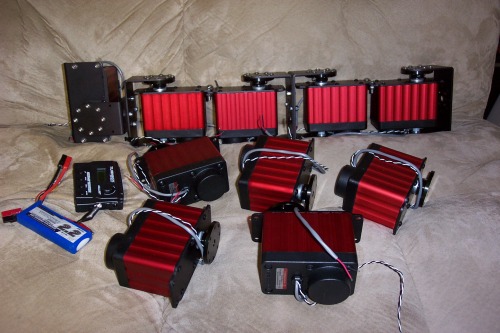
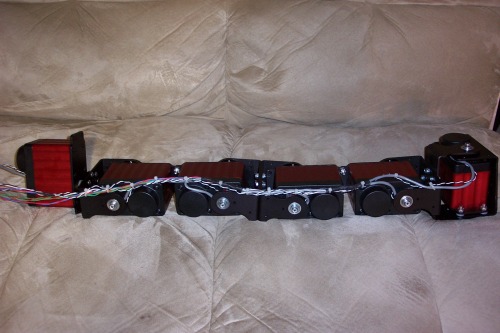
With little fore thought I simply bolted together my completed leg assembly's in a few hours. The only problems at this point was planning my future wiring to keep them clear of the moving joints. This picture shows the completed legs and buttocks minus the feet which will be machined later. The scaling was roughly modeled off my leg dimensions, and the size constraints of the parts used. This "scale" means the completed robot should be roughly 6 feet tall when completed. Also in order to help compensate for the slightly slower servo speeds I made the legs have a double knee joint. This will allow for a faster step motion due to parallel pivots for each leg's stride.
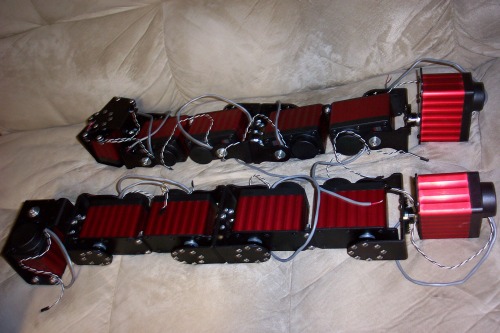
Here I've wired the legs for use. It took a crazy amount of time to account for the joint flex and to provide just the right amount of wire slack. (about 8 hours for both legs!)
At this point I had the legs basically ready for the hip structure. To make this I went with 1" square aluminum tubing. Instead of simple rectangles boxed and plated for the hip structure. I planned to round off the corners for a better appearance and to boost the corner strength at the points where the vertical segments overlap. (the welds are stronger than the base metal)
Problems!
My next step was to purchase a new welder and plasma cutter explicitly for this project. So I shopped around and found the exact brand/models I wanted and made those purchases. During the training classes they included these units worked flawlessly. However I soon learned a few things that completely changed the design of this project. It turns out that welding aluminum is completely difficult and riddled with requirements that everyone who's never done it would never know about. In this case the internet completely makes these issues seem much less than they are in reality. The next problem was after I purchased all the aluminum required to make this robot's parts. I then found out that the aluminum I purchased is not pure. Its an alloy which means I can't weld it even if I were good at welding aluminum. Learning all this took months of trial and error.
After the struggle of little to no progress fighting this welding issue I switched my design to make the chassis out of square steel tubing. I worked this new design out with some friends and it turns out that 1/2 inch square steel tubing is actually lighter and stronger than the 1 inch aluminum chassis design I had planned. A quick online purchase and the chassis progress was under way again!
More Problems!
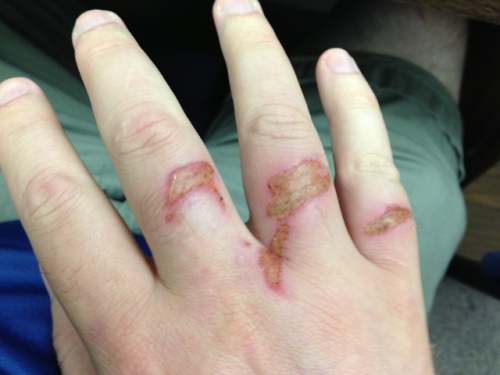
The first step to making the hip structure was to measure the segment lengths in order to make my fold cut points. These get welded together to make the rectangle's of the hip structure. This was going fine and all safety measures were done when an unforeseen issue transpired and the grinder got away thus providing Frits with a nice spatter of red colored "coolant". I was pretty lucky as no real damage was done, but this points out the obvious that stuff can happen at anytime even if your being as safe as possible. 7 bloody scabby points later and we were ready to proceed on with getting Frits put together.

Progress!
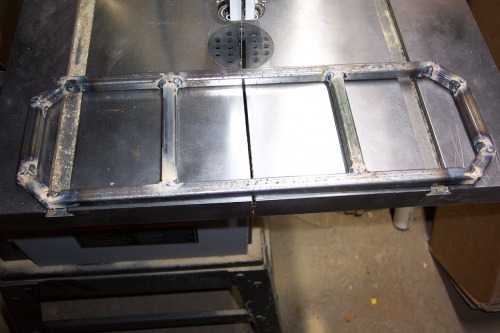
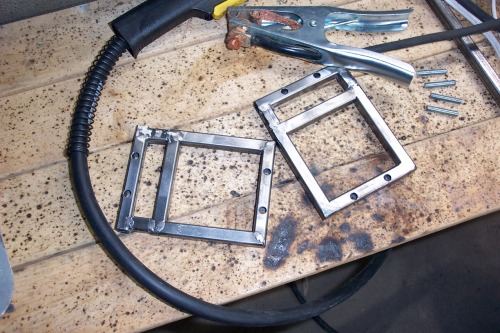
Since switching to 1/2 inch square steel tubing the progress has been moving forward! A series of notches, then some bends, and lastly welded up solid you get the first of the hip rings.

A trial fitting, and Yes the servo fits as planned! Now to make 2 more and spacers.

This part is the second hip ring. (above) I made another design adjustment after starting the second ring. I figured out my folly with the angle grinder and changed my design to jigged/cut/welded joints for the remaining rings. The finished product won't be quite the same as the first. But it will prevent all chances of self injury from flying angle grinders! :-) I also made the top ring slightly larger than the lower and designed add on foam pads for extra fall over protection. Those will be machined later on. Back to the structure!

So the process is simply measure, cut, grind, repeat until you get a section done then weld it up.
This part is the leg mount. (above)
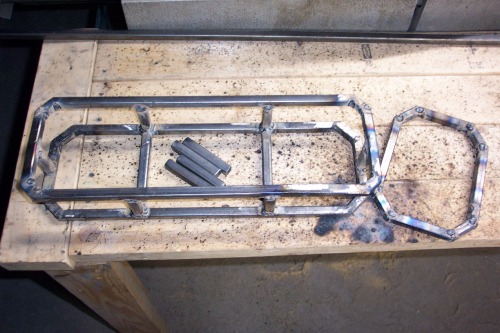
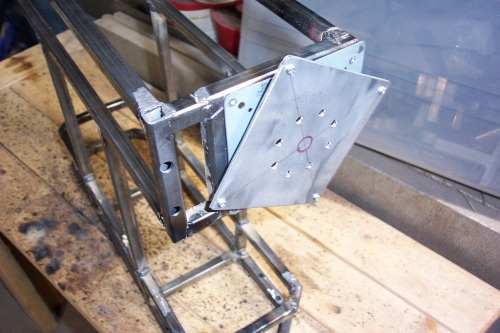
This is the leg mount and second ring welded up, (above) with the chest rotator ring on the right. All of this will be ground down for fit and finish. But first the last step in the chest rotator is a slight adjustment for shape and to weld it on with standoffs. This will all make more sense in the coming pictures.

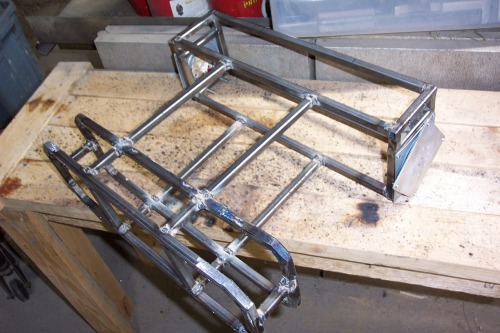
Here's the majority of the hip structure. At this point I drilled the bolt holes for the servos to eventually be attached.
I couldn't help myself and had to trial fit the legs. Granted I realized in hindsight that I put them on backwards!!! :-O
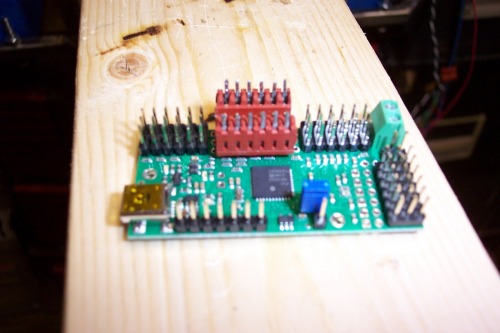
So at this point I was ready to test the legs walking motion. I picked up one of these Pololu servo controllers as the software they use has a nice simple GUI allowing for one to drag the bars to real time move the servo's while figuring out the desired positions.

In order to test the walking motion, I suspended the lower torso from 2x4 lumber. Then I had to rewire the legs (again). The other thing to note from this picture is the tape on the hip servo's. Its there to protect the red anodizing from scratches while repeat assembly/disassembly of the building process. The legs work fine and I'm ready to start fabricating the upper torso.
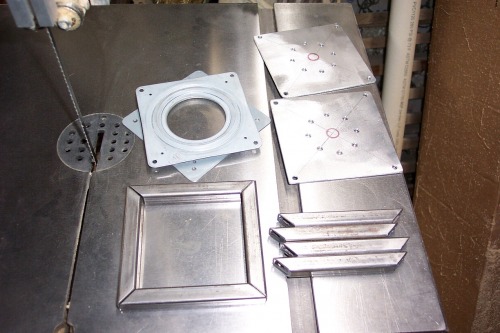
The next complication is with the shoulder joints. In the small hobby humanoids the servo's can support the weight of the arm hanging off 1 servo. But in the case of a robot of this size, the side loads would be far too much so a load sharing system needs to be designed. I chose to use a set of 300lbs capacity "lazy susan" bearings which will mount on the shoulder frame and only the rotational attachment will contact the servo. This will allow the shoulder servo's to survive. Above are the bearings, rotational hubs, and the mounts.
I think I am going to make this project public at this point as there's enough of it done (not just a pair of legs!)
These are the mounting points of the chest for the arms to bolt on. They will get the bearings and hubs mounted on top of these to support the arms and shoulder servo's. It will be come more clear once the whole assembly is competed.

And this is the beginning of the chest structure (lower in picture). It will soon be welded on the hip structure (upper in picture) to make one piece. The torso twist (chest rotator) will be removed as this design would hinder biped balance. So for now Frits won't have that ability. But I might figure out a better way to accomplish it once I better understand his sense of balance. Also I shortened his torso as it will translate to better balance and less weight. I don't know how tall the real Fritsl is, but this Frits won't be 6 feet tall as originally planned.

Here's the (more or less) completed chest structure. Next is to mount the shoulder support bearings.
Here the bearings are installed.
Here an overview of the whole chest structure. Next the arms will be installed. I still have not made up my mind on what to do about hands. So for the time being Frits will have stumps ending below the elbows. But once the arms are test fit then the whole structure will be cleaned up, welds ground down, and painted black to match the brackets.
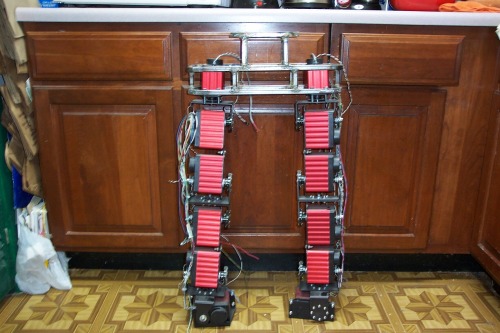
Here's the basic chassis of Frits since the numerous redesigns, with the shoulders in place and the legs on. He's suspended from the counter as I have been playing with walking motions. Not yet shown are the arms, feet, and head. (which is still under construction)
More to come!!!
This is a companion discussion topic for the original entry at https://community.robotshop.com/robots/show/frits-a-humanoid-biped

 Not sure what to say other than thank you
