

Last week I got this avrUSB500v2 programmer kit from tuxgraphics.org. The kit has all the needed components except the ATMega8 chip. You have to purchase that separately. Here are the kit's components and ATMega8:

Note that FTDI smd-chip is conveniently already soldered to PCB.
The kit includes a (really) small manual showing the schematic and a list of components with their labels on the PCB (R1, C1, U1, …). Because components are labeled on the PCB it was quite easy to assemble the kit. After some soldering the kit looked like this:
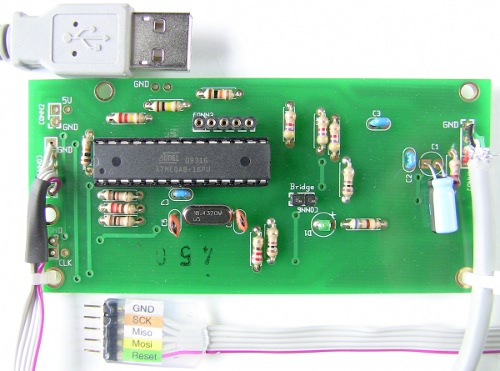
[front]
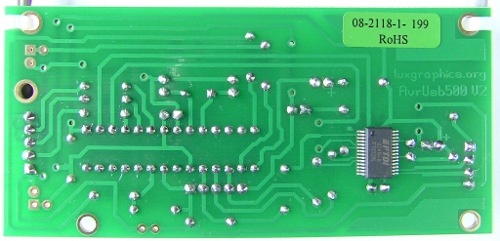
[back]
So far things went very smoothly. No problems in soldering and all the components found their places. Well, there was one extra resistor left over but that wasn’t really needed. It’s there in case you use ATMega88 instead of ATMega8.
Now it was time to plug the thing to my computer’s USB port. It was a bit tense moment because I was afraid I’ll fry the kit and my computer. Plugged it in and … Ta-daa! Vista found a FTDI device. Hooray! It works 
Next I tried to make it work in Kubuntu Linux running in a VirtualBox virtual machine. No luck there. I guess VirtualBox does not support FTDI. I didn’t spend much time on it though so there may be some workarounds that I’m not aware of. It was time to boot to “real” version of Kubuntu. This time thing looked much better. FTDI chip was found and all seemed to be well.
Software for the kit is available on tuxgraphics.org website (download link at the bottom of the page) and it’s also on the CD that comes with the kit. I untarred the software and installed avr-gcc and avrlibc. Then I just ran make and it compiled nicely.
To program the programmer you need a program called uisp with a bit bang patch. There’s a precompiled version available with the kit’s software package but unfortunately that was linked against older library versions than what my Kubuntu had. CD on the kit is bootable and it has all the tools too so I thought to try that. Bad luck once again, the CD didn’t boot. I guess the file system wasn’t set up correctly (can’t remember tight now what errors it showed). So, I’m back to my own Kubuntu installation.
Next thing to try was to compile uisp with bit bang patch (uisp_bbp) myself. Already patched source is available on tuxgraphics website. I downloaded and untarred the archive and ran configure. Everything went fine so far. Running make was the show stopper this time. The patched (and a bit old) uisp source has some errors. Here’s some so you’ll know what to expect if you try this yourself:Avr.C:127: error: deprecated conversion from string constant to ‘char*’
DAPA.C:1300: error: ignoring return value of ‘int system(const char*)’, declared with attribute warn_unused_result
The first one can be fixed by changing struct TPart’s member char* name to const char* name in file Avr.h. There’s quite a few errors like the second one. I fixed those just by placing return values to some foo variable and then doing foo=foo; to prevent unused variable error. I guess the reason why I got these errors is that I was using gcc 4.x.y and it has those errors on by default (the software is probably tested with gcc 3.x.y which only warned about them). I think it’s possible to configure gcc 4 to only warn about those but because it’s been about 2 years since the last time I used autoconf, makefiles and friends I chose “thee ugly way”.
After I finished compiling uisp_bbp I just copied it to avrusb500v2-1.2 directory (where I untarred the sw) and ran make load_test_1. Load test 1 loads a small led blinking software to the programmer. That worked fine so it was time to run make load. Because programmer’s software is loaded using bit bang it takes quite a while to load it. For me it took about 40 minutes.
Programming the programmer (are we having enough of programming yet?) went fine. I booted back to Vista and launched AVR Studio with excitement. AVR Studio found STK500 programmer with automatic port setting. Oh the joy! Time to make a led blink on a bread board. This is how it looked like when I got it set up:

I checked out some examples from the net and led blinking software was done in no time. Programming the ATMega8 worked like a dream.
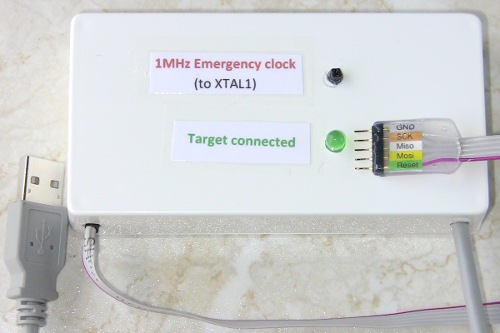
Today I built a casing for the programmer and now it looks like this:
The bottom line: Nice piece of hardware. Does the job. Programming the programmer might cause some headache. Probably not the best choice if you have no experience in electronics/soldering/coding in C/Linux stuff (IMHO).
Next thing to do: Copy of Geir’s RGB LED night light done with AVR