

Ok, I know this may sound
Ok, I know this may sound stupid, but I dont know how to attach a heatsink to the IC… and I have no idea where to find one… Ich bin dumm…
Ok, I know this may sound
Ok, I know this may sound stupid, but I dont know how to attach a heatsink to the IC… and I have no idea where to find one… Ich bin dumm…
Not affiliated
a quick google shopping search found these.
8 in a pack and comes w/ thermal tape already on the sinks
you get the idea even if you don’t buy from them. best o luck
http://www.arcticmod.com/computer-mod/swiftech-mc14-vga-memory-ram-heatsink-pack-8-heatsinks.htm
Speaking of heatsinks. Does
Speaking of heatsinks. Does anyone know if aluminium is a goo material for heatsinks?
Al is cool
That’s why engine blocks are machined from Aluminium. Well, one of the reasons.
Just make sure the contact of the IC with the heatsink does not block the transfer. That’s where the magic glue comes in.
5 1ohm resistor ?
Why do you use 5 1 ohm resistors, why not just 1 5ohm with a bigger wattage ?
I found that if I use 1 ohm
I found that if I use 1 ohm resistors I could be more precise setting the motor speed
Nice work, but since it is a
Nice work, but since it is a Start Here project i would include some other things:
-explanation of the coding part
-explanation of how a breadboard works, since you are using one (this one with a few lines below it would be enough imo: http://en.wikipedia.org/wiki/Image:Breadboard-144dpi.gif)
-saying that 5 resistor of 1 ohm in series is like using a single resistor of 5 ohms
hi! Everything you say makes
hi!
Everything you say makes great sense, I will update this text as soon as possible
thank you for giving feedback
by the way, I found this walkthrough about breadboarding 
EDIT: the text is done, only is missing the code explanation…
It seems like an awful waste
It seems like an awful waste of your arduino for such a purpose. I know of robots which can run without a brain on two spdt switches and still perform the same function.
good for you
why don´t you make one of those? :]
in case you haven´t noticed, the main purpose on this tutorial is to teach the basics of Arduino programming and setup
But your not even making a
But your not even making a robot that can avoid obstacles all it’s doing is fumbling around a room till it hit somthiing and then maybe it turns a bit what I’m really saying is that we need an arduinobot more on the lines of FRITSL’s first robot project see my post here: (https://www.robotshop.com/letsmakerobots/node/2420)
Also whats the poit of having an spdt. switch if you have I believe to be photoresistors for eyes is it for those chance occasions when the photoresistors fail? If that’s the case qhy not position them to the front of the robot?
P.S. I’m not trying to be horribly mean.
The keyword when we
The keyword when we discussed about an Arduino tutorial was to be EASY, and this was what I came up with, you don´t have to buy any expensive part and you almost don´t have to solde …
The PART I is where the bot only moves in the light direction, the PART II will have a basic obstacle detection (the spdt switches)
If you follow it you will be able to give first steps with Arduino and move further on to more complex setups.
I´ve seen your track record, and I don´t see any robot project of your own, so maybe this could be a good starting point for you,
otherwise if you don´t like it whait untill someone make a better one, or you can make your own and share it with us
no hard feelings :]
i think this is an excellent
i think this is an excellent start. Of course it needs improvement…but everything does!
LOL
LOL
Is the part 2 still in the
Is the part 2 still in the works or already up and I didnt find it?
sorry mate, still haven´t
sorry mate, still haven´t the time to make it, will try to do it int the next few weeks
cant wait to see your
cant wait to see your H-bridge tutorial,
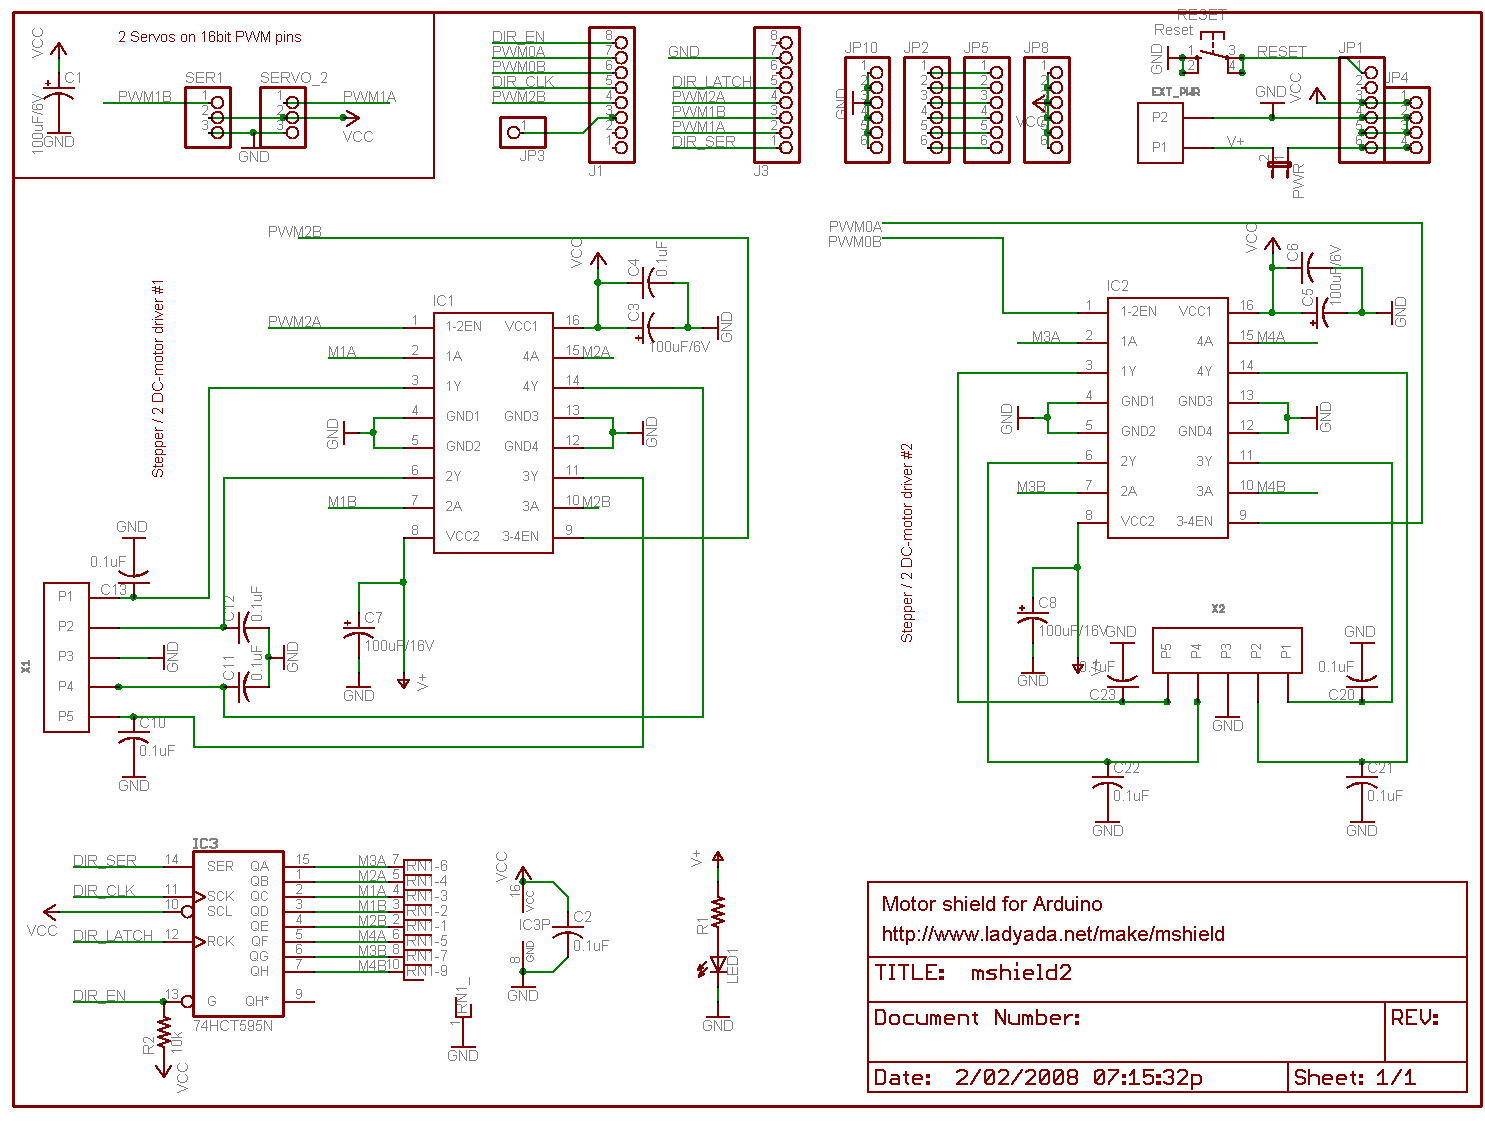
a couple days ago i ordered this, and it looks promissing maybe you could use this schematic to build a prototype
good shield
good! that is a great shield!
I started with one too, but unfortunately it got burned due to a stupid mistake and this accident made me work on a prototype, you can see it here. But wait for an update, because this HBridge prototype i´ve made, can and should be done in a more ‘techy’ fashion… (with capacitors and so) …
Part II
just to say it won´t be any part I, I apologize for this.
I´ve done it, but its a bit wacky, too many wires and connections just to achieve a stupid goal… it was a good intention tough…
sorry mates


it stil has some great info
it stil has some great info