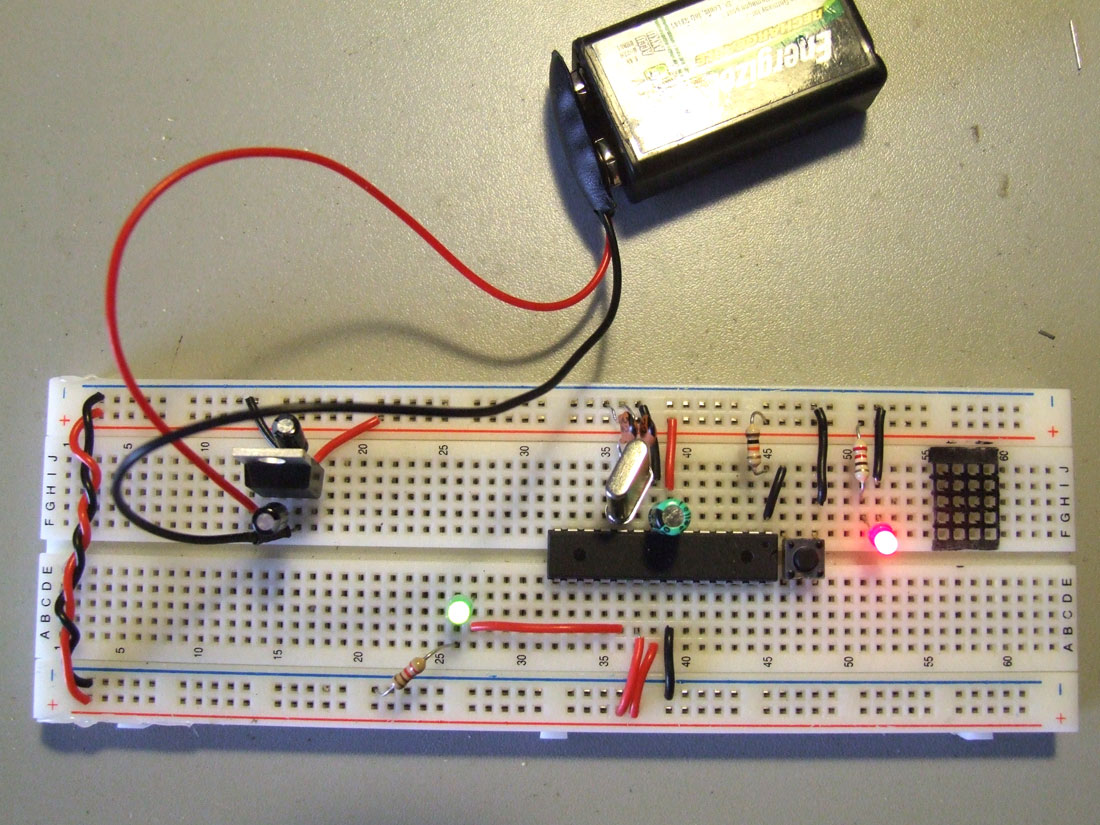
This came up with the need of having the arduino permanently installed on the robots, I´m tired of having to remove the arduino from one bot to the other, and then rewire everything, and then reupload the code everytime I have a new idea, or everytime I want to show the bot to someone. I followed the ITP Physical Computing tutorial, and it works like a charm, no I want to try to upload code with the FTDI cable, and If I have success on this I can start making my custom Arduino boards. :D NOTE: Please don´t follow the foto as it is. A friend told me to power this circuit from the output of the voltage regulator. The way it is now will burn the chip!! Lucky me it doens´t happened! Tomorrow I will update the foto!
Foto updated! A guy at the arduino forum told me to put a 100uf capacitor between pins 7 and 8.
I started making my own circuit son perfboard and using a… crap I cant think of the word its late… The plastic thingy ([SIC] Frits) that lets you sodler it on a board and pop the chip off and put it back when needed. Someone will come up with the name my brain is fried. Anyway they cost 20 cents or less and let you keep the citcuit permanant but reuse your chips. Just pop it back on and reprogram with the code you saved. Takes 5 minutes or less to bring a bot back to life and saves $$$
Its ineresting that you are Its ineresting that you are able to get it working with a crystal on a breadboard. For the life of me, I couldn’t get it to work on multiple breadboards with the 16mhz crystal. I had all caps, for it as well, pretty much like you have it…even tried it with 2 different procs and crystals. only after soldering it all to a board did I get it to work…
That is weird, it should That is weird, it should have worked with you… did you try a different setup?
The only thing I tried with this until now was blinking a LED, but soon I will try something more complex… buttons, potenciometers, servo, sensors, L293D with motors, etc…
later I will put all the stuff on a pcb and see what I get
Like I said, two different setups, both didn’t work. I checked all of the connections, made sure I was reading the schematics correctly, verified voltage to and ground points were connected correctly. I thought I had some bad chips at first until I built the boards and mounted them in the sockets…they worked fine after that. I have the crystals that are 1/3 the height as yours…though I don’t see how that could matter. I never tried my setups with the resonator because I had already built and soldered it to a board so I don’t know if that would have made a difference.
Solderless breadboards Solderless breadboards connection strips act as capicitors, which probably threw off the timing of the crystal oscillator. With the breaduino, getting the proc pins more directly coupled to the crystal pins (with a correct capacitance) the device can operate. Check the Limitations section of a Wikipedia article that says the stray capacitance limits operation to below 10 MHz.


 i’m going to
